In chemical photography, you have only one master image of each exposure. It’s stored on the film you put into your camera. If you value the images you can make from it, that master image is precious to you. Be it original negative or original transparency, any version of the image not produced from the master will allow reduced flexibility and/or deliver inferior quality. Photographers routinely obsess over the storage conditions of their negatives, in some cases spending tens of thousands of dollars to construct underground fire-resistant storage facilities with just the proper temperature and humidity.
One of the inherent advantages of digital photography is the ability to create perfect copies of the master image, and to distribute these copies in such a way that one will always be available in the event of a disaster. In the real world, this ability to create identical copies is only a potential advantage. I have never had a photographer tell me that his house burned down, but he didn’t lose his negatives because he kept the good ones in his safe deposit box, his climate-controlled bunker, or at his ex-wife’s house. On the other hand, I have talked to several people who have lost work through computer hardware or software errors or by their own mistakes. It takes some planning and effort to turn the theoretical safety of digital storage into something you can count on. The purpose of this article is to help you gain confidence in the safety of your digital images and sleep better at night.
Before I delve too deeply into the details of digital storage, I’d like to be clear about for whom I’m writing. I’ve been involved with computers for more than fifty years, and consider myself an expert. If you are similarly skilled, you don’t need my advice, and I welcome your opinions on the subject. Conversely, if you are frightened of computers, feel nervous about installing new hardware or software, and get confused when thinking about networking, you should probably stop reading right now; what I have to say will probably not make you sleep better at night, and may indeed push you in the other direction. My advice is for those between these two poles: comfortable with computers, but short of expert.
I’ve tried to avoid making this discussion more complicated than it has to be, but it’s a technical subject, and it needs to be covered in some detail if you are to make choices appropriate to your situation.
Okay, let’s get started. People occasionally ask me what techniques I recommend for archiving images. I tell them that I don’t recommend archiving images at all, but I strongly recommend backing them up. Let me explain the difference.
When you create an archive of an image, you make a copy of that image that you think is going to last a long time. You store the archived image in a safe place or several safe places and erase it from your hard drive. That’s called offline storage, as opposed on online storage, which stores the data on your computer or on some networked computer that you can access easily. If you want the image at some point in the future, you retrieve one of your archived images, load it onto your computer, and go on from there.
When you back up an image, you leave the image on your hard drive and make copy of that image on some media that you can get at if your hard drive fails. Since the image is still on your hard drive, your normal access to the image is through that hard drive; you only need the backup if your hard drive (or computer, if you haven’t taken precautions) fails.
The key differentiation between the two approaches is that with archiving, you normally expect to access the image from the archived media, as opposed to only using the offline media in an emergency.
A world of difference stems from this simple distinction.
I’m down on archiving for the following reasons:
- Media life uncertainty. It is difficult – verging on impossible – to obtain trustworthy information on the average useful life of data stored on various media. Accelerating aging of media is a hugely inexact undertaking. Manufacturers routinely change their processes without informing their customers. The people with the best information usually have the biggest incentive to skew the results.
- Media variations. Because of manufacturing and storage variations (CD or DVD life depends on the chemical and physical characteristics of the cases they are stored in, as well as temperature and humidity), you can’t be sure that one particular image on one particular archive will be readable when you need it.
- File format evanescence. File formats come and go, and by the time you need to get at an image you may not have a program that can read that image’s file format.
- Media evanescence. Media types come and go (remember 9-track magnetic tape, 3M cartridges, 8-inch floppies, magneto-optical disks, the old Syquest and Iomega drives?). By the time you need to get at an image you may not have a device that can read your media.
- Inconvenient access. You may have a hard time finding the image you’re looking for amidst a pile of old disks or tapes.
- Difficulty editing. Over time, your conception of an image worth keeping probably will change. But it’s a lot of trouble to load your archived images onto your computer, decide which ones you really want, and create new archives, so you probably won’t do that. You’ll just let the media pile up. Your biographers will love you for that, but it will make it harder to find a place to store the archives, and harder to find things when you need to.
The drawback to the online-storage-with-backup approach has traditionally been cost. But disk cost per byte has been plummeting at a greater-than-historical rate for the last fifteen years, and it’s now so low that, for most serious photographers, it’s not an impediment to online storage of all your images.
Why are disk prices dropping so fast? A succession of technological breakthroughs (a couple of biggies were the giant magneto-resistive effect and perpendicular recording, for you technophiles) has dramatically increased the aerial density – the amount of data that can be stored in a square inch or square centimeter. Greater aerial density means more data on the same number of platters, or even on fewer platters, which makes disks cheaper per byte stored. Greater aerial density allows smaller platters without sacrificing the amount of data stored, which makes disk drives cheaper. Greater aerial density also increases performance: when the bits are all crammed together, more of them pass the head per unit time, and data transfer rates increase. When the tracks are closer together, seek times drop. Smaller drives also dissipate less power. Increasing aerial density is a wonderful thing for computer users in general, and photographers in particular.
When an old technology is challenged by a newer one, the old technology often improves dramatically. This has been the situation with disk storage. Twenty years ago, most technologists believed that by now, disk storage technology would have been substantially replaced by now with flash memory. That hasn’t happened, not because flash memory has failed to advance as predicted, but because disk storage has evolved faster than most people thought it would. This has been a good thing for photographers, especially in the last ten years when the size of digitally captured images has been increasing quickly (but not as quickly as disk drive capacity). Today, leaving out scanning backs, the upper end of the size of digitally captured images is around 80 megapixels for medium format cameras and about 35 megapixels for 35mm sized cameras. Over the next five years, these numbers might double, (or quadruple if camera manufacturers decide to oversample and eliminate the antialiasing filters. If disk technology continues to advance in the next five years at anywhere near the rate of the last 10 years, the economics of storing all your images on disk will become more attractive as time goes by. Eventually, rotating magnetic memory will be replaced by some other kind of nonvolatile online mass storage, and what I have to say about storing your images on disk will probably apply equally well to that storage medium.
Let’s test my contention that disk storage has become sufficiently affordable by working out some examples with today’s pricing. If you have 10,000 raw images from a 24 megapixel camera, at 16 bits per pixel you have half a terabyte of data. You can buy a 3 terabyte external disk for $120, so it will cost you about $60 to store all those images. Let’s say you are a prolific shooter and a terrible editor, with 100,000 raw images. Basic storage for those images is less than $600. Maybe you do a lot of editing and love layers, so you’ve got to store big Photoshop or TIFF files. If your files are 500 megabytes apiece, you can store 6000 images on that hundred-buck disk.
It’s not all good news. That’s just the beginning of what it will cost you to store your data dependably. Disk reliability has made great strides over the 50-year history of the device, with calculated mean time between failures now coming in at over 100 years, and field failure rates of possibly a half to a quarter of that. All the same, a sensible attitude towards a disk is to view it as a failure just waiting to happen, and to arrange things so that, when disks die, you can easily replace them and restore your data. A disk failure may be an occasion for a mildly elevated pulse, but it should not cause panic.
If you implement my backup philosophy in your own home or studio, you’re going to need three kinds of non-volatile storage. The first kind is your main disk storage. It should be fast, and large enough for all your images. The second is your backup disk storage. It should be equally capacious, but needn’t be fast. The third is your offsite image storage. I will discuss each in turn.
Main Disk Storage. This is the primary storage for your image collection. Your computer came with at least one internal hard disk. Depending on the size of that disk, you may be able to keep up with the growth of your collection of images simply by upgrading your computer every two or three years. If so, you needn’t worry about the details. If you find that you must add disk capacity, you have some decisions to make. The possibilities are:
Adding one or more internal hard disks. This probably the cheapest way to go, especially if you don’t value your time highly. You’ll need to find out if you have room for the disk(s), if there is adequate power and cooling capacity. You should also have a look at your motherboard and see what kind of disk interface it supports, and buy disks that are compatible with that interface. You may have several interfaces to choose from. If it’s a fairly new motherboard, it probably supports SATA, and you’ll want a SATA drive. It may not support the latest and greatest SATA version, so you might not get all the performance or which your fancy new disk is capable, but it will work. If all this sounds daunting, have a trusted repair shop do the work, or read on for less invasive alternatives.
Adding one or more external hard disks. External hard disks contain the same disk drives as the internal ones, but they come packaged in their own cases, with their own power supplies, and have different interfaces than internal drives. The cost premium for the extra hardware is surprisingly low. I recently saw a Seagate 3 TB raw hard disk on Amazon for $120. The external version was the same price, and came with a backup program. There are three interfaces commonly employed by external drives: USB 2.0, USB 3.0, Thunderbolt, and eSATA. Maximum transfer rates are 480 Mb/s for USB 2.0, 5 Gb/s for USB 3.0, 10 Gb/s for Thunderbolt, and 6 Gb/s for eSATA. You may be suspicious of these rates; I know I was. In my testing, I was pleasantly surprised to find that USB 2 and eSATA were capable of sustained disk transfers of the large files that comprise photographic images at rates within 20% to 25% of those quoted.
Adding a network file server. There are two types of network file servers. The traditional way to build one is to take a more-or-less ordinary computer with an Ethernet port, and put a lot of disk storage on it. Most desktop operating systems support some form of file sharing, so you don’t need server software. If you decide to use server software, you will gain enhanced management options. You can buy a computer with the idea of making it a file server, or you can upgrade an old computer that you happen to have lying around; the file server role makes few demands on computer hardware than acting as a desktop machine.
An alternative to using a standard computer as a file server is to buy a box designed from the ground up as a file server. These devices are referred to collectively as Network Attached Storage. A NAS box will typically be smaller, cheaper, more reliable, and less power-hungry than a file server of similar capacity built from off-the-shelf computer parts. You can buy a 15 TB NAS box for between $300 and $1000 more than the cost of the disks alone. No matter which way you obtain your file server, you will have to live with the performance limitations of network access. You want your file server and your workstations to support gigabit Ethernet, which offers raw transfer rates of 1 Gb/s. You will probably obtain rates of about 700 Mb/s for photographic image transfers. That means that a 40 MB image will load in about half a second, a 500 MB image in about ten seconds. You may want to copy images from the file server to your hard disk in bulk, work on them, and copy them back when you’re done.
Backup Disk Storage. My principle tenet for disk-based storage is that no single hardware failure, few double hardware failures, and no foreseeable software error should cause loss of data that cannot be recovered in a few minutes of reconstructive work. This means that onsite data must be stored in at least two places, and I recommend three or four. The candidates are the same as for online storage: internal hard disks, external hard disks, and network file servers. However, we evaluate them differently when talking about backup. I think internal hard disks are a non-starter for backup. There are too many things that can go wrong inside a computer that can take out data on a hard disk, and many of those things can take out data on several hard disks. If you must have your backup storage on the same computer as your primary storage, at least put it on an external drive with its own power supply. If your primary computer has a meltdown, you can get running quickly after you replace it by just hooking your external hard disk up to the new computer. You get even more isolation from a single failure with network attached storage. Don’t worry about having a fast interface to your backup hard drive; the actual backups will be done in the background, possibly when you’re asleep, and you won’t care how long they take.
Offline Image Storage. The traditional way to back up disk drives has been magnetic tape. Unfortunately, magnetic tape has not advanced as rapidly as disk storage in the past fifteen years and is now the backup media of choice for only systems with hundreds of terabytes of storage. Let’s consider backing up a single 4 TB drive. A 5 TB Oracle/StorageTek T10000C tape drive will cost you thousands of dollars, the cartridges cost almost $300, to back up a drive that costs less than that. You can get an LTO drive for less, but the cartridges cost more per byte. What about optical discs? You already have a CD writer, but it would take more than six thousand CDs do that backup. Even if the CDs were free, you wouldn’t go to the trouble. You could back up the drive to DVDs, but it would take 800 disks. A BluRay read/write drive; even with 25 GB per disc, would take160 discs do to our backup.
In my opinion, the cheapest and most convenient backup for hard disk systems is – wait for it – hard disks. Have one or two external 3 or 4 TB hard disks on a computer and make sure that this storage always contains a backup copy of all your images. Have an identical set of disks in reserve. Every month or so, take the external disk drive(s) to an offsite storage facility like a safe deposit box, and bring the reserve disk(s) home. The cost to back up our 4 TB disk? Less than three hundred bucks, a bargain. Be careful when you transport your disks; they’re not as fragile as they used to be, but you still don’t want to subject them to any but the most gentle of mechanical shocks. You should consider rubber or plastic cases that reduce the effects of shock and static electricity.
One possibility for offline image backup is Internet data storage. As a way to make your images accessible wherever you are, this could be a winner. However, your bandwidth to the Internet may be a problem, not so much for uploading the data, but for recovering it in the event of a disaster. At T1 speeds, 1.5 Mb/s, it would take a month to restore 4 TB of data. If you tried downloading this much data continuously over a DSL or cable line, you’d probably get a notice from your ISP requesting that you take your business elsewhere.
How to move your data around among disks. You could move images from your primary storage to your backup storage simply by dragging changed files over. I don’t recommend this; you want to use a method that keeps your backup data current automatically. You don’t want to have to remember which files you changed, and you probably don’t want to wait the time required to replace all files on the backup device every time you edit a few images. Most of all, you don’t want to have to think about backup during your normal working day; it should just happen.
There is a kind of backup program that clones entire disk partitions. Symantec makes one called Ghost. Acronis has one called True Image, and the one I currently favor is called ShadowProtect. These programs are really good at getting you back up quickly if the disk that holds your operating system fails. I recommend that you use one of these programs, but not for your images. Data is usually stored in a proprietary format, and it’s sometimes difficult to restore to different hardware than what was running when the backup was made.
The kind of backup program you want for your images is a file and folder synchronization program; an Internet search on “file sync” will yield a slew of candidates. The kind of synchronization you will be performing is one-way synchronization; that is, copying data from your primary image store to the backup image store. You can set up a file synchronization program to copy files from your primary disk whenever a file changes, or after waiting set period of time. I recommend the latter choice, since it allows you to avoid having your machine bog down performing the backup while you’re working on your images. Some sync programs let you set different criteria for different file folders. Most of these programs also offer options that let you save the last few versions of each file, which can be useful if you overwrite a file with an edit that you later regret.
Here’s a sure-fire way to ruin a day. You’ve been backing up for years, but have never done a restore. You have a disk failure. No problem you think, as you find and mount the backup. The backup proves to be corrupted. You find the previous backup. It’s bad too. Turns out all your backups are bad. The moral: whatever backup software you use, you need to make sure that it works, and that it keeps working. This is one of the reasons I’m down on the backup programs that generate a monolithic file with all of your images rolled up into it. The only way to make sure you can get at your backup data is to do a trial restoration. I know lots of people who resist trial restorations, because they’re a pain. You may not have that space available. Doing a trial restoration over your primary data is a move that makes most people a little queasy. Restoring a lot of data also takes a while. You can use virtualization and restore to another virtual machine; if you’re comfortable doing that, you are more skilled than the target audience for this little essay, but remember, if you’ve got a terabyte of data in your backup, you need a terabyte of free disk space to do the restoration.
The file-sync approach avoids all that. Your data is stored right out in the open, and you can open a few files and make sure they are uncorrupted. You can also use the file compare option of most file sync programs to compare all of your backup files to the primary ones. By the way, one of the nice things about most of the NAS systems is that you can have them send you an email if there’s a problem, plus a regular status report. That way you don’t have to remember to go out and check up on your storage; after a few weeks of looking at an email from your NAS box every morning, you’ll notice if it’s missing.
A word on compression. Avoid it, unless it’s part of the image file format. Lossless compression (the kind that doesn’t affect image quality) doesn’t work well on photographic images. It won’t damage the images, but you will find that the losslessly compressed files are only slightly smaller than their uncompressed versions. In addition, compression offers opportunity for new adventures in obsolescence.
How to organize your images into folders. I wish I knew more about this. I would welcome an article on the subject from anyone with a well-reasoned point of view. I do have one recommendation. Keep raw and finished files in completely separate folder trees, since the kind of scripts you will want to run against the two kinds of files will be different.
How to get at the image you want. If you are incredibly organized, you may be able to create a directory tree that will let you find what you’re looking for just by sorting through folders. For the rest of us, some kind of image organizer is essential by the time the number of images in your collection hits quadruple digits. Image organizers let you assign keywords to images and retrieve them by searches. They let you group images together independently of the folders where the files reside. They let you rank and flag images. There are many organizers around, and there are several programs, like Lightroom and Aperture, that include organizers and do much more.
I have a perspective on choosing an organizer. Take the long view. Many organizers work by creating a database in proprietary format with the information that you enter about your images. You will invest a great deal of time in assigning rankings and keywords to images. You will upgrade computers and operating systems many times over the life of your image collection. Try to find an organizer that will be around for years, and will be updated to run on newer operating systems as they are introduced. If an organizer today runs under both Mac and Windows OSs, that’s a good sign. It also inspires confidence if the company selling the organizer has a track record of shipping quality products, supporting them well, providing transition paths when they introduce new products, and making money. If you can find an organizer that does all its work with IPTC tags rather than proprietary database entries you’ll have a chance of transporting your organized image collection to another organizer program, but even that isn’t a slam dunk.
Here are my specific recommendations.
Local storage. If you can, keep all your images on internal drives on your main workstation. If you have several networked workstations, use file synchronization software to keep all copies in synch (be careful of two way file synching; done wrong, it can turn a small error into a big one; if possible, do all your editing on one workstation so you don’t expose yourself to this possibility). If you must use external drives, use eSATA or Thunderbolt interfaces. If you want to have local storage on a RAID box, feel free, but it’s not necessary.
Local Backup. Use file synchronization software in backup or one-way mode to copy images automagically from your workstation to an external disk, an external array, a local file server, or a NAS box. If you want to have local backup on a RAID box, feel free, but it’s not necessary.
More Local Backup. Use file synchronization software in backup or one-way mode to copy images automagically from your workstation to another local file server or NAS box. Alternatively, use file synchronization software in backup or one-way mode to copy images from your local backup server to another local file server or NAS box. My current favorite NAS boxes are the ones from Synology.
Offsite backup. You’re going to be carrying your disks to your safe deposit box or to a friend’s house (if you have a like-minded photographer for a friend, you can keep her backup disks and she can keep yours). You want to be able to quickly remove disk drives from the device that writes them. If you don’t use a RAID, you can buy USB devices that accept bare drives. Hook one or more of them up to your workstation or file server and do backups to them with file synch software in one-way mode. Pull them out occasionally and take them off-site, bringing back the old off-site ones to be rewritten. I’m gun-shy enough to recommend that you have at least two off-site copies of every backup.
You can buy RAID boxes that take bare drives; Drobo is one of the main vendors. I used to use Drobo boxes to writer the off-site backup disks, and then take the whole disk pack to the bank. The Drobo boxes work if you reinstall the disks in any order, but you need to put the drives in the same kind of Drobo box that wrote them in the first place (a regular Drobo can’t read Drobo FS disks, for example), and if your house burns down, it might be hard to find the right Drobo. That’s the reason I’ve gone back to plain disk drives, written in standard formats.
The way I think about it, there are three configurations for basic one-way file synchronization. I have made up names for the three.
- Push file synchronization. The files to be backed up are on computer A. The disks that the files will be backed up to reside in or on computer B. the software doing the backup runs on computer A.
- Pull file synchronization. The files to be backed up are on computer A. The disks that the files will be backed up to reside in or on computer B. the software doing the backup runs on computer B.
- Third-party file synchronization. The files to be backed up are on computer A. The disks that the files will be backed up to reside in or on computer B. the software doing the backup runs on computer C.
Sounds complicated, doesn’t it? It’s actually worse than that. Since we’re talking about more than two copies of each file, we can have hybrid approaches that use, say, push file synchronization from a workstation to a NAS box, third-party file synchronization with a server transferring data from one NAS box to another, and pull file synchronization with a server pulling data from a NAS box and transferring it to local storage which is then rotated to the safe deposit box. That’s not just a pedagogical way to look at things; in fact, it’s the scheme I use myself.
Here are some places where each type of synchronization might make sense.
Push from workstation to server. You spend most of your time at your workstation. If the synch software is running there, you are likely to see if something’s wrong. You can push to several servers for redundancy.
Push from workstation to NAS box. Advantages as above. You can push to several NAS boxes for redundancy.
Pull from workstation to server. If you have many workstations, you only need one synch program to pull from all of them, and thus only one workstation backup program to keep track of. If you are providing backup for people who are technically unsophisticated, you don’t have to install any software on their workstations, and they don’t need to keep track of anything. You can have several servers do this for redundancy.
Pull from workstation to NAS box. This would be a good solution in the case of many workstations if you could get good synching software for the NAS box, but I’ve not seen any.
Third-party from workstation to NAS box with software running on a server. All of the advantages of pulling from workstation to server, but the data ends up on a NAS box. You can do this with several NAS boxes all from the same server, for redundant storage, or from different servers, for redundant storage and synching.
Push from server to NAS box. This is a way to create redundant copies without taking up workstation resources for the second and third copies. When combined with pulling from workstation to server, you could do everything with only one file synch program installation.
Pull from NAS box to server. Good for creating backups on a server that will be taken offsite. Backups can then be in a non-proprietary format easily read by the server or by workstations.
There are many file synch programs. Some are free, some come with the OS, and some cost extra. Not much extra, considering what your data is worth, except in the case of some software for Windows Server. I can recommend two file synch programs. I’ve tried a lot of file synch software, but by no means all; if you have a favorite that’s different from the two I like, feel free to post your experiences in a comment.
The first program is called Vice Versa. There are versions for Windows workstations and Windows servers. There is no Mac version. Sorry; the next post talks about a Mac/PC compatible syncher.
Vice Versa comes with a scheduler of sorts, but you really should buy the additional scheduler called VV Engine; it’s much more flexible, lets you see what’s going on better, and, in my experience, is more reliable.
Vice Versa lets you create as many profiles as you wish. Each profile can synch one directory (and all directories contained therein) with another directory. The directories can be local, on a networked computer, or on a NAS box. If one of the top-level directories doesn’t exist, Vice Versa will throw an error and stop; there was originally no option to automatically create top-level folders. At first, I thought this was a deficiency, but after working with the program for a few years, I think it’s insurance against potentially costly mistakes. I have a way to take the drudgery out of creating all the top-level directories when you mount a new disk, and I’ll report of that later.
You have lots of options for synching. Filters for folders and subfolders:
Comparison options, including workarounds for interoperating among file systems with different ideas about how to do timestamps:
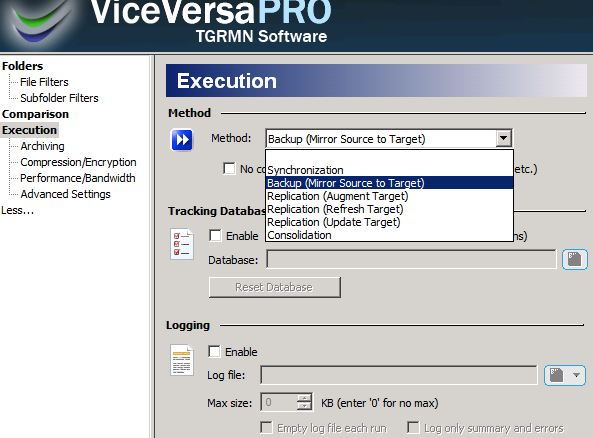
Many different synching strategies:
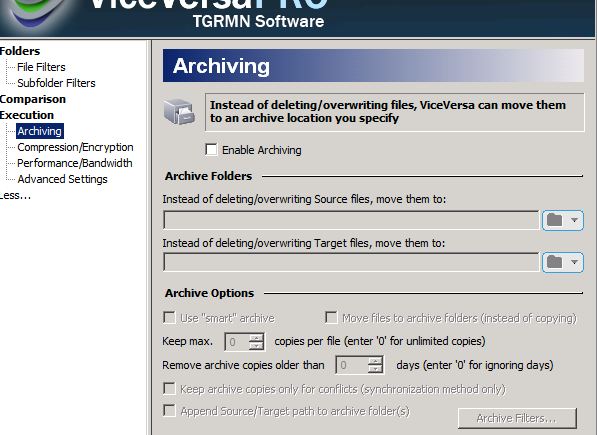
Lots of choices about what to do about old, replaced, files:
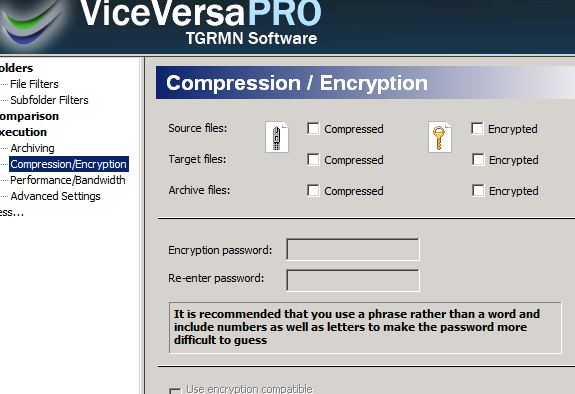
You can compress and/or encrypt your backups. You won’t save much space compressing .psd or JPEG files.
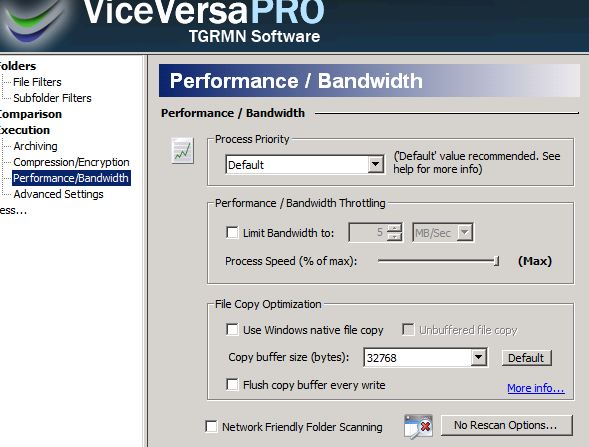
You can set things up so that Vice Versa doesn’t use system resources without limit:
Are you getting the idea that this program is not written for neophytes? You’re right. If there was any doubt, here are the “advanced” choices:
All in all, Vice Versa has a lot more capability than we need for simple backup, but it’s nice to have flexibility. If you look at the settings in the above set of screen shots, that’s what I use for third-party backups and pull backups with Vice Versa running on a server.
The interface to VV Engine is through a web browser. That means you can manage a set of backups locally, or, if you allow it, from any computer that’s handy. On the fancy version of VV Engine, you can divide your profiles into groups to make things easier and keep down screen clutter:
You can get a high-level summary at the main screen, and you can drill down to see more:
You can drill down further:
And, if you take a look at the log, you can see that the two files that Vice Versa doesn’t like have no time stamp. I really should fix that.
Vice Versa is unusual in that the good scheduler is extra. That’s bad. They’re unusual in that the server version is priced around a hundred bucks rather than around a thousand, as is the case with some other synchers. It’s still a reasonably priced package. It’s a little imposing for many people, and for them, I have another alternative. Stay tuned.
In addition to Vice Versa, I can also recommend a program called GoodSync. Imagine the meetings at which the product marketing folks rejected AverageSync, SoSoSync, JustOKSync, and BarelyAdequateSync as not sufficiently appealing, and BetterSync, BestSync, GreatSync, and SuperSync as too pretentious, before settling, with commendable modesty, on GoodSync. GoodSync runs on both Windows and Apple workstations. There is a Windows Server version aimed primarily at pull synching from workstations, which I haven’t tried because it costs close to a thousand bucks. Since the Vice Versa Windows Server version is up to the task of backing up a handful of workstations, NAS boxes, and other servers, I see no reason to spend so much more money on a server-side syncher.
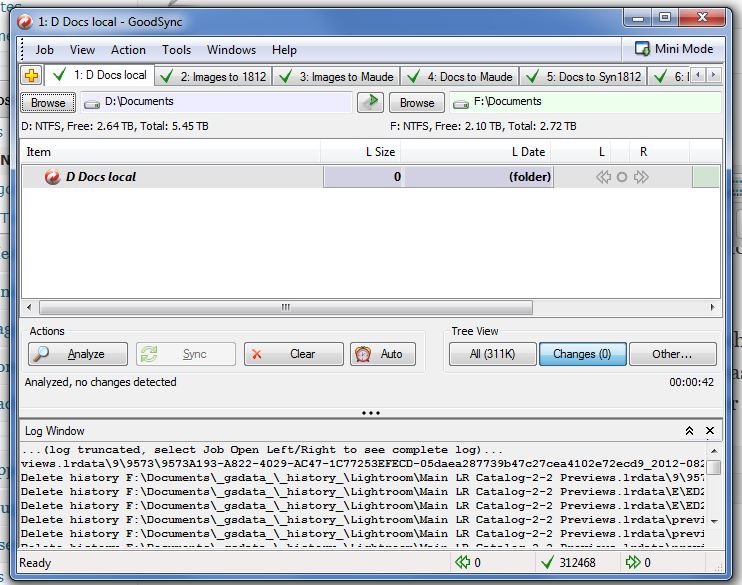
GoodSync is more conventional than Vice Versa in that the scheduler is combined with the synch program, making it more intuitive and in some ways easier to use than Vice Versa. Like Vice Versa, it has more synch modes than you’ll need for backup. The user interface is more polished than VV. Here’s the main window, with your backup jobs accessible in tabs running across the upper part of the screen, changes in the middle, and a log at the bottom:
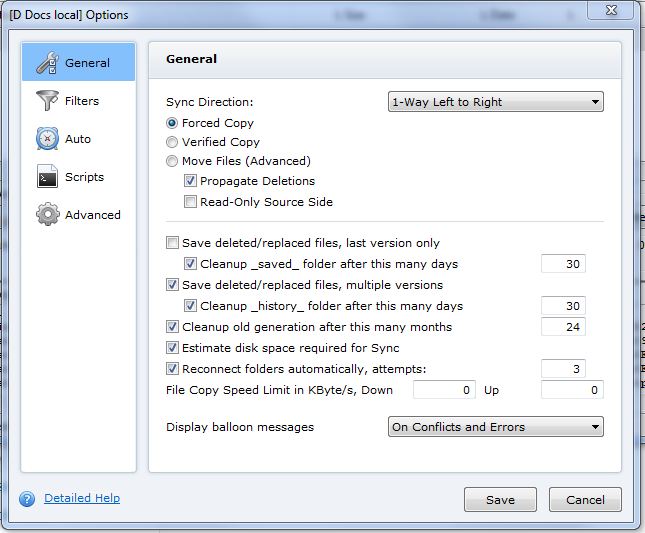
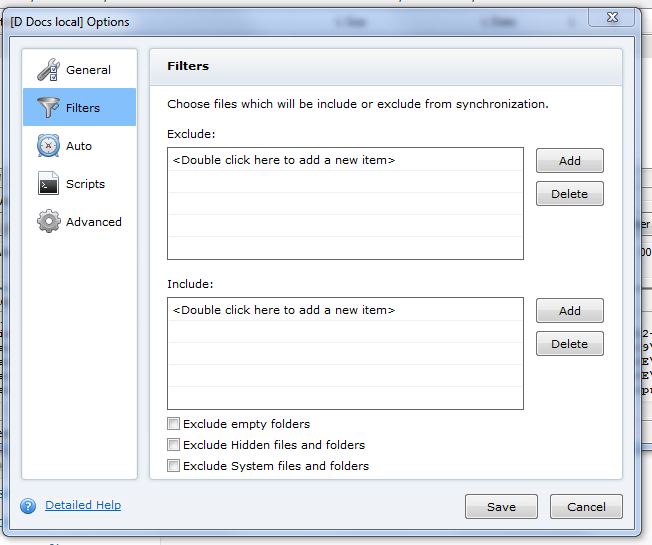
The options and filters are similar to VV, except that there aren’t sub-folder filtering options. Note that GS will clean up old copies of deleted or changed files automatically:
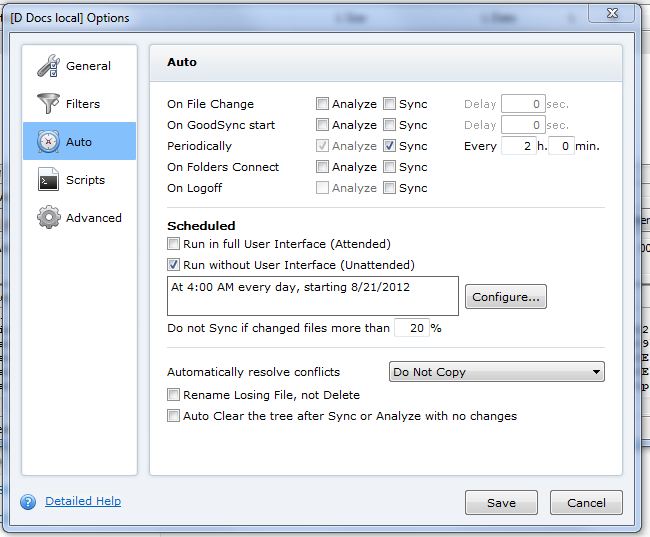
The next set of choices involve scheduling:
The scheduling options are comprehensive. There is one feature that I like that VV doesn’t have: the ability to abort a run if more than a certain percentage of the files have changed. Using this option could prevent complete deletion of your backup caused by changes in your directory structure. There are also welcome options for what to do in the event of conflicts.
You can indulge your inner programmer and write scripts:
And there are plenty of head-scratching advanced options:
You get real-time information on what’s happening:
You may be thinking, “What’s this state file?” GoodSync stores information about the directory structure and synch state right in folders it’s synching. For backup, this is not strictly necessary, but it does save time, and GoodSync’s analysis runs a bit faster than VV’s. If you use GS on the workstations to push and VV on the server for third-party and local backup, as I do, you’ll be backing up those now-useless state files, but they’re small and won’t hurt anything.
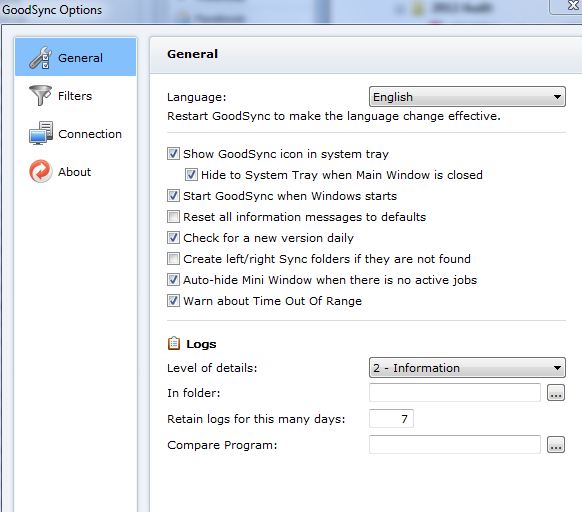
You can set GS to automatically start whenever your OS does. I strongly recommend this option:
GoodSync has a web server like VV Engine, but you don’t need to use it.
All in all, GoodSync is a pretty powerful program wrapped in a nice user interface, with well-chosen defaults so you don’t have to deal with the complexity if you don’t want to. I recommend it if you’re looking for a synch program to run on a Windows or Apple workstation.
I create the disks I store off-site on a server that has USB-attached boxes that accept bare drives. Whenever I load a brand new disk, I need to create the directory structure the Vice Versa expects. I used to do this manually, which was error-prone and boring. Now I use a script.
If you’re not familiar with scripts, they don’t have to be complicated (although they certainly can be if you want). Windows has an ancient scripting capability that dates back to MS-DOS. There is a more modern scripting language called PowerShell that’s supported by the later Windows OS’s.
The Mac OS X, being Unix with a pretty face, uses the Unix Bourne shell. Apple provides a very nice tutorial here.
If you run Linux, you probably know all about shell scripts.
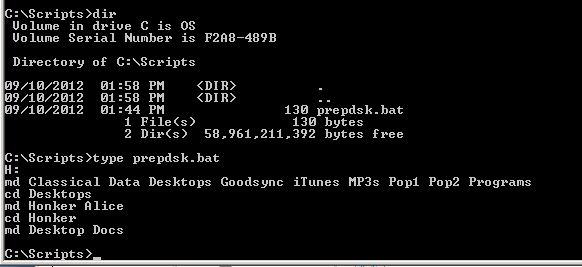
Here’s the script I use to create the directory structure for one of my off-site backup disks on a machine running Windows Server 2008R2:
You can create this file with any text editor that can write unformatted text files. You give it a file extension of .bat, so that the OS knows it’s a sequence of commands, and what language it’s written in. On Mac OS X and Linux machines, the details are different, but the idea is the same.
Here’s what the bat file does.
The first line changes to the H: disk, which is assumed to be freshly formatted.
The “md” (make directory) command creates a bunch of folders.
The “cd” (change directory) changes to one of the newly-created folders.
The next md command makes two more folders in the new directory.
The next cd command changes to one of the new folders.
The next md command creates two more folders in the new directory.
After I run the script, the directory structure on the disk looks like this:
Classical
Data
Desktops
…..Honker
……….Desktop
……….Docs
…..Alice
Goodsync
iTunes
MP3s
Pop1
Pop2
Programs
When working with computers, things go wrong sometimes, and backup is no exception. Disks fail. Software hangs. You need to know that your backups are being done.
Maybe you’re the kind of person who just has to make a mental note to check on the status of your backups every morning. If so, my hat’s off to you. Stop reading right now.
The rest of us need to be reminded, and reminded in a way that’s not so intrusive that we’ll ignore the reminders. Vice Versa and GoodSync have different ways of dealing with reminders. Other synch programs probably do something similar to one or the other of these programs.
VV Engine, since it’s a web server, has the ability to offer Really Simple Syndication (RSS) feeds for each profile. It can send only when there’s an error, whenever an active profile runs, or when any profile, active or not, is scheduled to run.
You don’t want to have it send you a feed only when there’s an error. In backup, you can’t count on no news being good news. You might not be getting any messages because there haven’t been any errors, but you might not be getting any messages because VV Engine failed to start, or abended.
You don’t want to get a bunch of messages about profiles that you’ve disabled. You’ll be swamped by so many messages that you’ll start ignoring all of them.
The Goldilocks solution is to get a message every time a profile runs. That’s still a lot of messages. but you can tell by the header whether or not there was an error, which makes it likely that you’ll a least scan the list. I use Outlook as my RSS client. It sets up a separate folder for VVEngine feeds, and if I haven’t read all the items in that folder, it appears in bold text in the filter list. I wish there were an option to get a daily message from VV Engine that summarized the status of all the active profiles, but VV Engine can’t do that yet.
Here’s what one of the feeds looks like:
GoodSync doesn’t speak RSS, but it can send you emails, either by MAPI or SMTP. Forget MAPI; if your email client is set up properly, it’ll ask you if it’s OK every time GoodSync tries to send you an email. You won’t be able to put up with that for more than a day or two. Use SMTP.
Just like Vice Versa, GoodSync will not send you a summary email; it will only send you emails for each job (a job in GS is like a profile in VV). It makes you configure each job for when you want emails sent, and offers more choice than VV. You configure emails in two places. You set up the SMTP server in the Program Options menu, and you say when you want emails sent in the Job Options menu, in the Scripts tab. You might be tempted to say you want emails only after a synch, but that’s another case of expecting no news to be good news. I suggest you say you want emails after both analyses and synchs. It makes for a long email (what follows is most, but not all of one), but you only have to read the header most of the time:
If you don’t want your inbox cluttered with all these messages, you can write a rule to move them to a GoodSync folder. Just remember to check it.
Having these reminders is doubly important if you’re responsible for backing up workstations that are used by non-techies.





Jim,
I don’t think you gave enough consideration to cloud storage.
The fact that this article is even needed in the year 2016 (now 2019) speaks to the fact that most people abhor doing back up. It’s just too much of a pain and requires time/discipline/organization most people don’t have/want to devote to it.
Cloud backup solves that. It’s automatic, its off-site, and it’s very easy to set up and maintain.
With regard to the issue of it taking a month to download a terabyte, there are services such as Mozy which for a nominal fee will restore all your data to a USB drive and ship it to you.
Cloud storage can also offer the added benefit of being able to access your files from any device anywhere, keeping them in sync and accessible across all devices.
There are also cloud storage systems which work with devices such as a NAS so you can have local raid in addition to full cloud backup.
I agree, and since I’ve just installed 250 Mb/s Internet service, cloud backup is even more attractive.
Hi Jim, how has your backup solution changed in 2023 ?
What do you recommend as a workflow to backup legacy images and new 200mb images from 100mpx sensors ?
Thank you
Things have certainly changed. Maybe I should withdraw the post. I’m using GoodSync to back up files to local 18 TB drives, NAS boxes, Google Drive, and BackBlaze B2.
Have you considered Millenium Disks?
No. Should I?
BTW. this post is obsolete. I should probably remove it.
good if dated write up
1) On any backup you should have MD5 or SHA signatures for every file and run a compare after every back or sync and then every month on the backup or archive drive to make sure they are bit for bit valid.
I’ve had bit rot and caught that, but did not catch some OS file system corruption of individual files until after I rotated through my 3 sets of back up drives.. lost about 20 scattered random files.
2) online backup… they are not big enough and they go out of business faster than I track them!!!! … not to mention security of the file access…. I have 30-40TB of primary and that does not include my film to digital conversion project.
But: I’m always slow to do the offsite drive swap…
3) I use both backups for my primary images ( 3 copies) and archive where I no longer keep them online for “investigation studies” ( i.e af performance, image stabilization, flash setups, etc.) where I might come back to them when I get a new piece of equipment or as I age ( steadiness and eye sight declines with age…) but I still keep 2 copies of the archive.
Yes. I probably should take this down.