OK, now you’ve followed all the instructions here and here, and you got nine crops to look at. How do you use these to evaluate whether a lens is constructed properly? Before you read this, take a look at some example analyses.
Start with the center crop. It should look something like this:
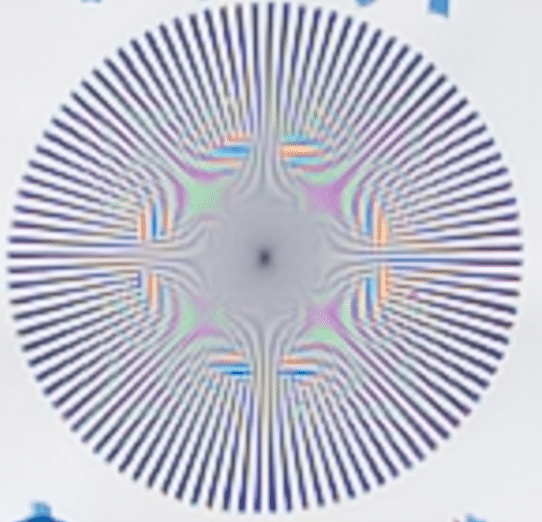
You’ve already picked this series as the sharpest one in the postproduction step, but now you want to ask yourself if it’s really well-focused. The best way to evaluate that is to look at the interaction of the Siemens Star image with the camera’s sensor. There are two main things to look for.
The first is false color. That’s caused by the image projected on the sensor by the lens having places that are so sharp that the offset of the three kinds of color filters in the Bayer color filter array on the camera cause the demosaicing program to make mistakes in figuring out what color some of the pixels in the output image should be.
Here’s a place in the above image that’s a riot of false color:
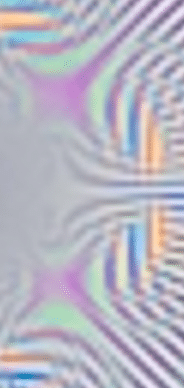
If you see a lot of false color, that’s good. The next thing to look for is a particular type of aliasing that causes lines that converge in the target to diverge in the captured image. Here’s an example, cropped from the above image:

Ignore the false color for now. See the vertical lines coming down from the top and getting closer together? Now look what happens about a third of the way down the above crop. The lines start to diverge. That means that the lens is protecting detail on the sensor that is beyond what engineers call the Nyquist limit, and the reconstructed image is wrong. In this case, that’s good, because this means the center image is in focus.
Don’t worry too much if you don’t see the diverging lines. Your lens may not be good enough for this to happen, or, with long lenses, vibration may be blurring the image just a bit. For good lenses — with the exception of some zooms and long lenses — you should see the false color. If you don’t, go back and shoot a few more series to make sure your center image is properly focused.
Now look at the crop from opposite sides of the sensor in pairs: the upper left and lower right corners, the top center and bottom center, the upper right and lower left corners, and the far right and far left sides. That’s four pairs of images to look at. Don’t expect any of them to be as sharp as the center image. Lenses are almost always designed so that they are sharpest on axis. In fact, if the center isn’t markedly sharper than any of the other images, that means that probably something went wrong during the capture phase, or that you mixed up which image was which (don’t laugh, I’ve done it myself). For examples of some of these pairs of images, start here.
You may not see either diverging lines or false color in these off-axis images. That’s OK. Judge how sharp they are by the diameter of the gray, totally-unresolved circle in the middle of the star. The bigger the circle, the softer the image. The smaller the circle, the sharper the image. You may also notice that the completely-blurred area is not circular. Some departure from circularity is nothing to worry about: it can come from target/camera alignment errors or normal lens aberrations. In fact, for wide-angle lenses and zooms, I’d be really surprised to see completely circular gray centers. Having markedly-elongated gray circles with completely different orientations on opposite sides of the sensor would be a concern, though.
If you have an exceptionally well-constructed lens and outstanding technique, the two images in each set of pairs will appear identical. In the real world, that’s not likely. You need to decide if the differences that you see are likely to affect your photography. Take a look at the good lens tests in the examples section and see the kind of differences to won’t adversely affect real-world images.
Another way to judge the images is to export them as layers into Photoshop, then make the canvas bigger, and move the images so that the orientation reflects the location of the target, as so:
![]()