My Drobo FS took itself offline last week. Again. Actually, it was only partly offline. A server that had mapped a network disk drive to it through the Drobo Dashboard could still see it and write to it, but no Drobo Dashboards on any computer could see it. I needed to shut it down to swap out a UPS. I couldn’t use the Dashboard, as Drobo recommends, so I used the momentary switch on the back.
After the swap, the FS seemed to come up, but none of the Dashboards could see it. I shut it down the “wrong” way again, restarted it, and all was well. At least, all was well with the FS, but not with me. The experience left a bad taste in my mouth. I’d have more tolerance if the Drobos in general, and the FS in particular, had been reliable up to now. That’s not been the case. Anyone with a long memory who’s been following this blog knows what I mean. The rest of you can look here, and here, and here.
I decided to try another NAS box. The Synology line has been getting good reviews, so I ordered a 1511+, which is as close to Synology gets to an equivalent of the FS.
What’s the same:
- Five slots for both.
What’s different:
- Dual, bondable gigabit Ethernet ports on the 1511+, one on the FS. The FS never came close to using the capacity of one port, poking along at barely over USB rates. I had higher hopes for the 1511+.
- The FS supports Drobo’s twist on RAID5 that allows different sizes of disks; the 1511+ does that, plus JBOD, striping, mirroring, and RAID 6 (which will protect your data even after two disk drives die).
- Active directory compatibility on the 1511+, not on the FS (a biggie for me; no need to install the Dashboard on computers that need to access the NAS).
- An unbelievable number of apps and services that run on the 1511+ (not just FTP, and music servers, but print, mail, and media servers, backup, surveillance camera management), while the FS is pretty vanilla.
- A comprehensive GUI accessible from anywhere through a browser for management of the 1511+, versus the much more limited Dashboard app.
- You can stick bare drives in the FS, but you need to screw the drives into plastic carriers to put them in the 1511+.
- The 1511+ has disk activity lights for each drive, an aid in troubleshooting (and a security blanket, at least for me), and the FS just has one activity light for the whole box.
- The 1511+ footprint is about half again the size to the FS’s.
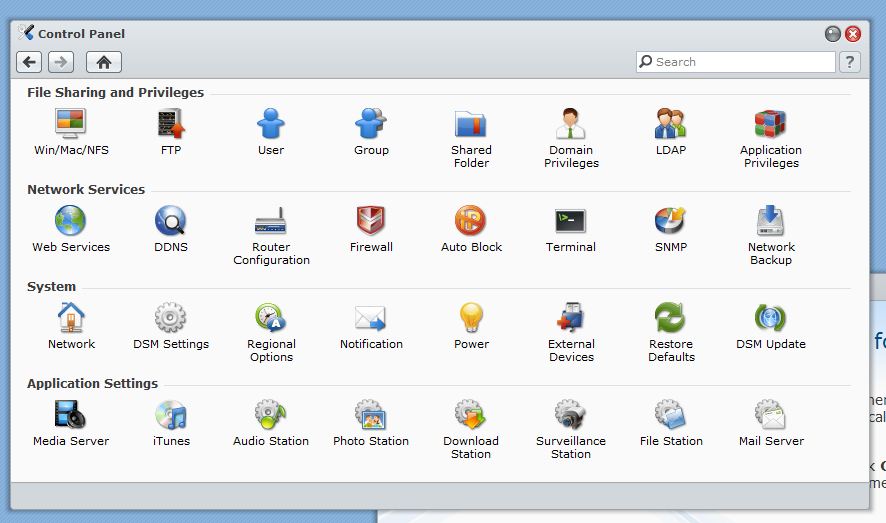
To give you an idea of the flexibility of the 1511+, here’s a screen shot of the top level of the control panel.
The 1511+ arrived in nicely shock resistant packaging. A folded cardboard insert contained everything but the chassis: standard IEC power cord (no power dongle), two Ethernet cables, screws to attach the drives to the carriers, warranty card, quick start instuctions, and a CD with the manual and software. I set up the box, and installed a Western Digital Green 2TB disk. I’d ordered five Hitachi 5400 rpm 3TB drives, but they hadn’t arrived, and I was eager to get started. The 1511+ comes with what amounts to a fancy network BIOS in ROM. In order to turn it into a NAS, you need to install one or more disks, and use a PC-based program to load a disk image with the OS (Linux) and the NAS apps onto that disk. That all worked pretty much as advertised. I had a little trouble finding the disk image on the CD, but I poked through the directory structure until I found a 180 MB file with 1511 in the name. After ten minutes or so, the NAS was up and running.
I used the self-explanatory tools to create, format, and check a simple volume. I set the 1511 to use NTP to get local time, and pointed it to the appropriate Windows Server. Then I joined the 1511 to the Windows domain, right from the NAS control panel. The NAS asked me for my administrator’s credentials just like a Windows OS machine would. Pretty slick. I set up a few shares, and set the permissions from the NAS control panel – it knew all about all the Windows domain users.
I ran the box for a day or two until the Hitachi disks arrived. Then I shut it down from the GUI, pulled out the WD 2 TG drive, and installed the five 3 TB drives. I powered up the box, and fired up the program that loads the disk image into the 1511. Problem: the loading program (Synology Assistant) thought the 1511 was running just fine, and wouldn’t let me load a new disk image. I restarted SA. No joy. I power cycled the 1511. No change. I wrote Synology a “what gives” note. Then I shut down and restarted SA one more time. Success. I loaded the disk image and told the NAS box to take all the disks and make them into a single RAID 5 volume.
The next morning, here’s what I saw:
This is really nice. Not only does the 1511 automatically do disk checking, it reports its progress in an easy-to-understand manner.
All in all, a very nice experience. A glitch here and there, but I’m not complaining.
Performance: I’m getting about 44 MB/s write throughput with big files using Windows Explorer with one Ethernet cable on the 1511+. More data later.


Leave a Reply