• site home
  • blog home
  • galleries
  • contact
  • underwater
  • the bleeding edge

the last word

Photography meets digital computer technology. Photography wins -- most of the time.

You are here: Home / The Last Word / A book report: gamut mapping example

A book report: gamut mapping example

May 7, 2015 JimK Leave a Comment

This is post nine in a series about my experiences in publishing a book. The series starts here.

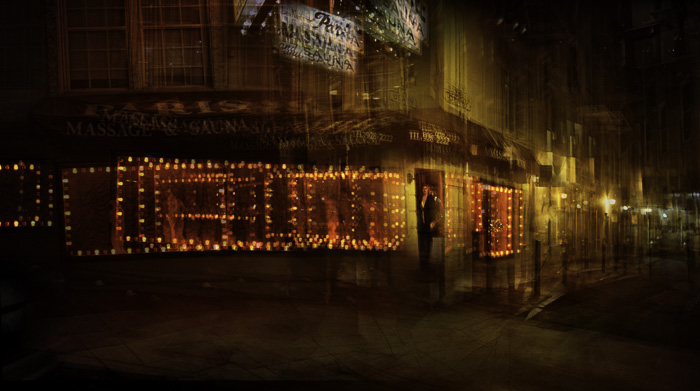
Let’s look at one of the images that has a large amount of important content outside the Coated GRACoL 2006 gamut:

Massage Parlor, San Francisco, 2010

This is in ProPhoto RGB. Since it was created in Lr, it is entirely within the PPRGB gamut.

However, there are pixels in the image that are outside of the sRGB gamut:

massage srgb

So that, when the image is but into sRGB, some of the reds lose chroma (you won’t be able to see this unless you have a color managed browser and a wide-gamut monitor):

Massage Parlor, San Francisco, 2010

Here’s what Lightroom has to say about what parts of the image are out-of-gamut (OOG) on the press:

massagegamut

Pretty much everything that’s important is OOG, except the woman.

If you convert the sRGB image to Coated GRACoL 2006 and back, you get this:

Massage Parlor, San Francisco, 2010

If you convert the PPRGB image to Coated GRACoL 2006 and back, you get this:

Massage Parlor, San Francisco, 2010

It’s not awful, but we’ve lost a lot of intensity. Note the (small) differences between the PPRGB and sRGB images. Even with a gamut as small as Coated GRACoL 2006, there is merit in using a large editing space.

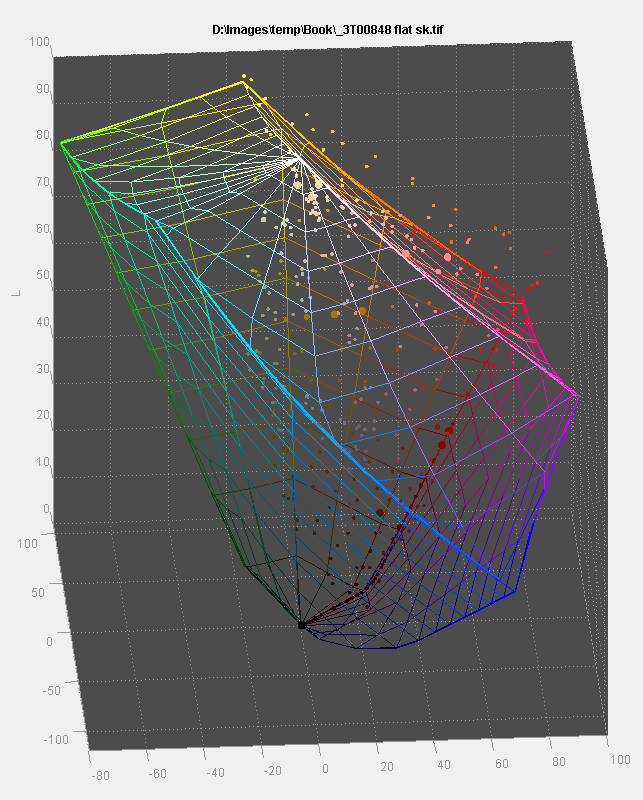
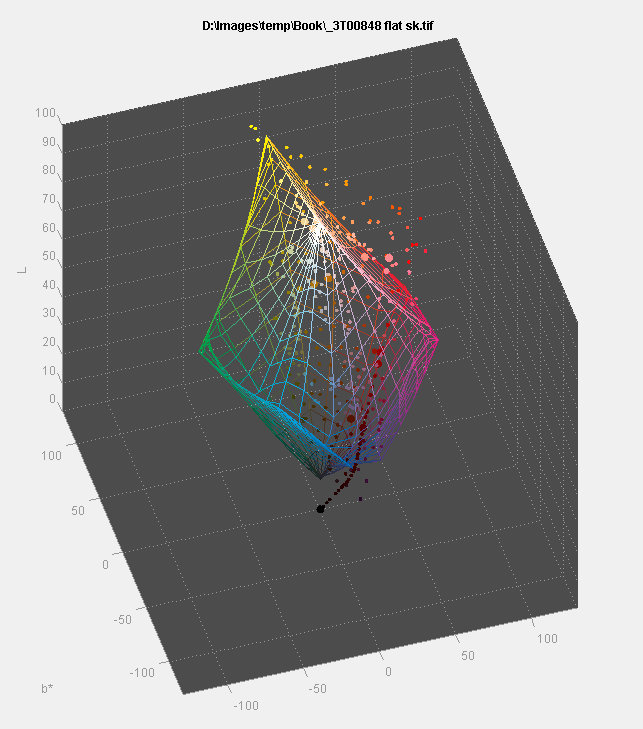
Looking at the relationship of the colors in the original image and teh Coated GRACoL 2006 gamut, we can see how far OOG some of the reds and yellows are.

First, from the top of the L* axis:

massage 3d gamut

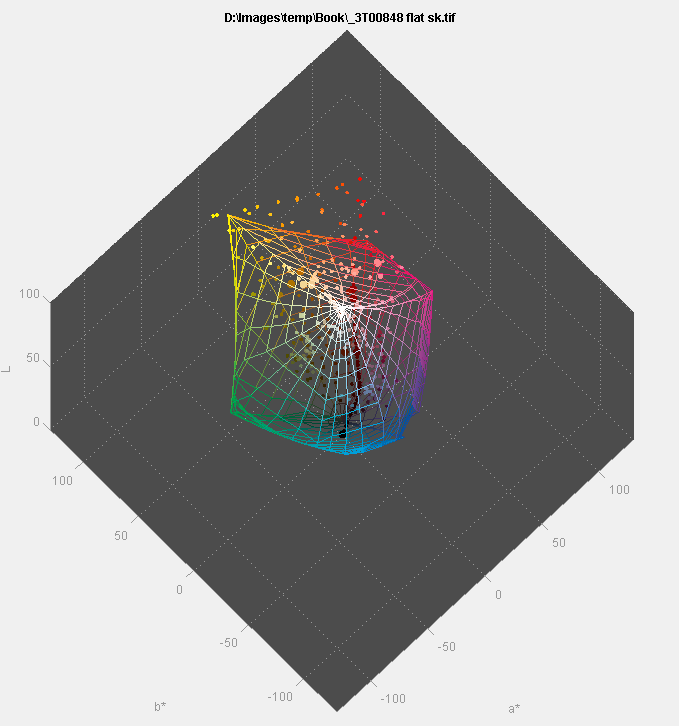
And then from a little ways to the side:

massage 3d gamut 2

Sometimes you can bring colors into gamut with a little hue shift. That’s not going to work here, since the gamut envelope is so flat. It looks like it’s a bit shorter to the gamut envelop to reduce the luminance of the OOG areas, so let’s try that. I only reduced the red areas, since I don’t find the yellow gamut mapping to be a cisual problem. I also left the very light areas virtually unchanged, since we’ve never going to get them into gamut by lowering luminance if we want to be true to the subject matter.

Here’s the edited image in PPRGB:

Massage Parlor, San Francisco, 2010

And here’s what it looks like after a round trip through Coated GRACoL 2006:

Massage Parlor, San Francisco, 2010

That may be somewhat better. We’ve lost those great expanses of hugely OOG pixels in the windows.

The Last Word

← A book report: organization A book report: proof sheets →

Leave a Reply Cancel reply

Your email address will not be published. Required fields are marked *

May 2025
S M T W T F S
 123
45678910
11121314151617
18192021222324
25262728293031
« Apr    

Articles

  • About
    • Patents and papers about color
    • Who am I?
  • How to…
    • Backing up photographic images
    • How to change email providers
    • How to shoot slanted edge images for me
  • Lens screening testing
    • Equipment and Software
    • Examples
      • Bad and OK 200-600 at 600
      • Excellent 180-400 zoom
      • Fair 14-30mm zoom
      • Good 100-200 mm MF zoom
      • Good 100-400 zoom
      • Good 100mm lens on P1 P45+
      • Good 120mm MF lens
      • Good 18mm FF lens
      • Good 24-105 mm FF lens
      • Good 24-70 FF zoom
      • Good 35 mm FF lens
      • Good 35-70 MF lens
      • Good 60 mm lens on IQ3-100
      • Good 63 mm MF lens
      • Good 65 mm FF lens
      • Good 85 mm FF lens
      • Good and bad 25mm FF lenses
      • Good zoom at 24 mm
      • Marginal 18mm lens
      • Marginal 35mm FF lens
      • Mildly problematic 55 mm FF lens
      • OK 16-35mm zoom
      • OK 60mm lens on P1 P45+
      • OK Sony 600mm f/4
      • Pretty good 16-35 FF zoom
      • Pretty good 90mm FF lens
      • Problematic 400 mm FF lens
      • Tilted 20 mm f/1.8 FF lens
      • Tilted 30 mm MF lens
      • Tilted 50 mm FF lens
      • Two 15mm FF lenses
    • Found a problem – now what?
    • Goals for this test
    • Minimum target distances
      • MFT
      • APS-C
      • Full frame
      • Small medium format
    • Printable Siemens Star targets
    • Target size on sensor
      • MFT
      • APS-C
      • Full frame
      • Small medium format
    • Test instructions — postproduction
    • Test instructions — reading the images
    • Test instructions – capture
    • Theory of the test
    • What’s wrong with conventional lens screening?
  • Previsualization heresy
  • Privacy Policy
  • Recommended photographic web sites
  • Using in-camera histograms for ETTR
    • Acknowledgments
    • Why ETTR?
    • Normal in-camera histograms
    • Image processing for in-camera histograms
    • Making the in-camera histogram closely represent the raw histogram
    • Shortcuts to UniWB
    • Preparing for monitor-based UniWB
    • A one-step UniWB procedure
    • The math behind the one-step method
    • Iteration using Newton’s Method

Category List

Recent Comments

  • JimK on How Sensor Noise Scales with Exposure Time
  • Štěpán Kaňa on Calculating reach for wildlife photography
  • Štěpán Kaňa on How Sensor Noise Scales with Exposure Time
  • JimK on Calculating reach for wildlife photography
  • Geofrey on Calculating reach for wildlife photography
  • JimK on Calculating reach for wildlife photography
  • Geofrey on Calculating reach for wildlife photography
  • Javier Sanchez on The 16-Bit Fallacy: Why More Isn’t Always Better in Medium Format Cameras
  • Mike MacDonald on Your photograph looks like a painting?
  • Mike MacDonald on Your photograph looks like a painting?

Archives

Copyright © 2025 · Daily Dish Pro On Genesis Framework · WordPress · Log in

Unless otherwise noted, all images copyright Jim Kasson.