This is a continuation of a series of posts on the Nikon D850. The series starts here. You should be able to find all the posts about that camera in the Category List on the right sidebar, below the Articles widget. There’s a drop-down menu there that you can use to get to all the posts in this series; just look for “D850”.
Several people have complained that the AF Adjust setting on the D850 that gives the right average correction for an object on the lens axis (in the center of the finder), gives wildly wrong values when the subject is off axis.
I’ve spent the last two days reworking my Matlab code for analyzing autofocus errors so that it corrects for, and is thus tolerant of, target/camera misalignments. This has the result of making my on-axis tests quite accurate when it comes to measuring focusing error.
Let me tell you a bit about how it works. When testing phase detection autofocus (PDAF) systems, I’ve added a step at the beginning where I make 32 contrast detection autofocus (CDAF) exposures at one of the lens-under-test’s best apertures. Then I go ahead and make 10 exposures at each aperture of interest using the PDAF system. I’ve set up the code to present me with a window where I can select the target area (in this case, the ramp of the LensAlign target) with the first CDAF image. I use that target area for all the images. The program measures the focal distance on the ramp for all 32 CDAF images. It throws out any points that are more than one standard deviation away from the mean and averages what’s left. That becomes the definition of zero focusing error. Of course, it’s only valid for the f-stop used for the CDAF images because of focus shift; I thought it would be too confusing — not to mention a PITA to execute — if I computed the zero focus shift point separately for each f-stop. I correct all the PDAF images with the data obtained from the CDAF one.
I do try to keep the lens axis perpendicular to the target, but it’s not critical anymore.
Here’s the setup that I used for today’s tests:
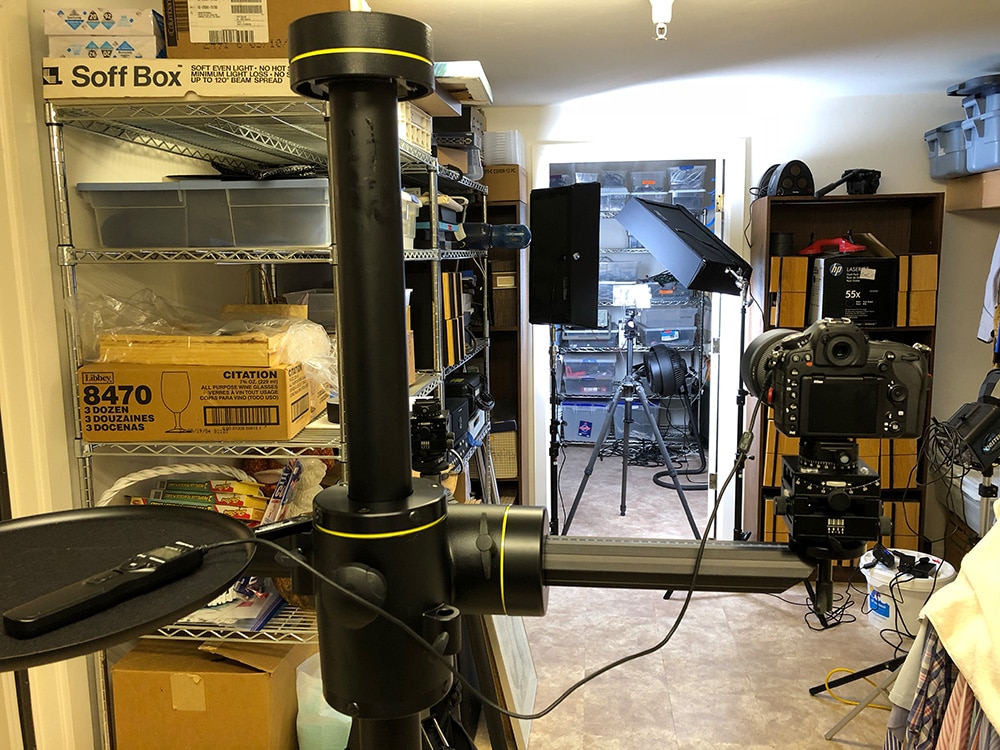
The LensAlign target is on the tripod in the distance, lit by two Westcott LED panels. The camera is mounted to a stand that allows easy up/down and left/right movement without major changes to the direction of the lens axis. The Nikon remote on the camera stand’s tray is used to minimize vibration. I’m a belt-and-suspenders kind of guy, so I use a 1-second shutter delay, too.
With the target in the center of the image, here are the results for the Adobe RGB green channel:
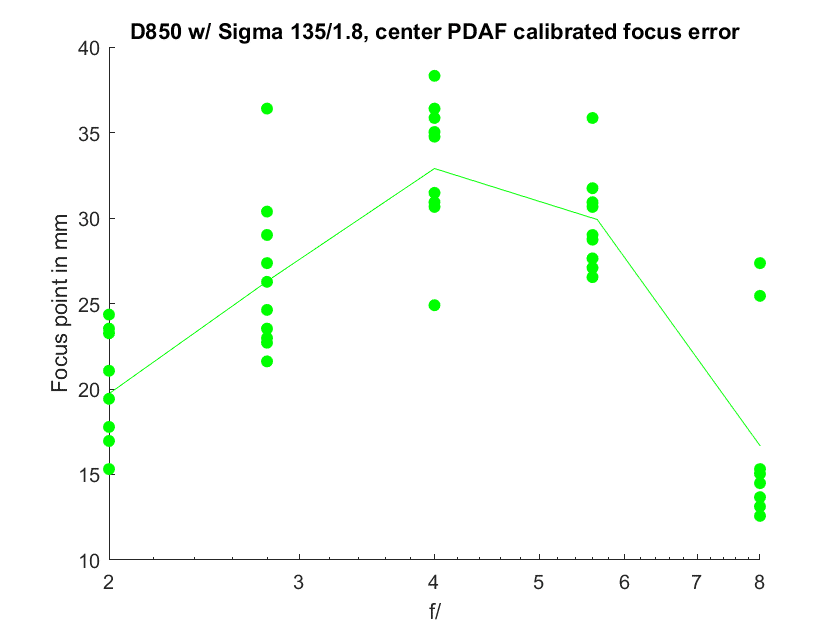
Positive numbers for the vertical axis indicate backfocusing, and there is a bit of it; I haven’t tried to tune this lens yet, and the AF Adjust setting is zero.
For all three color channels:
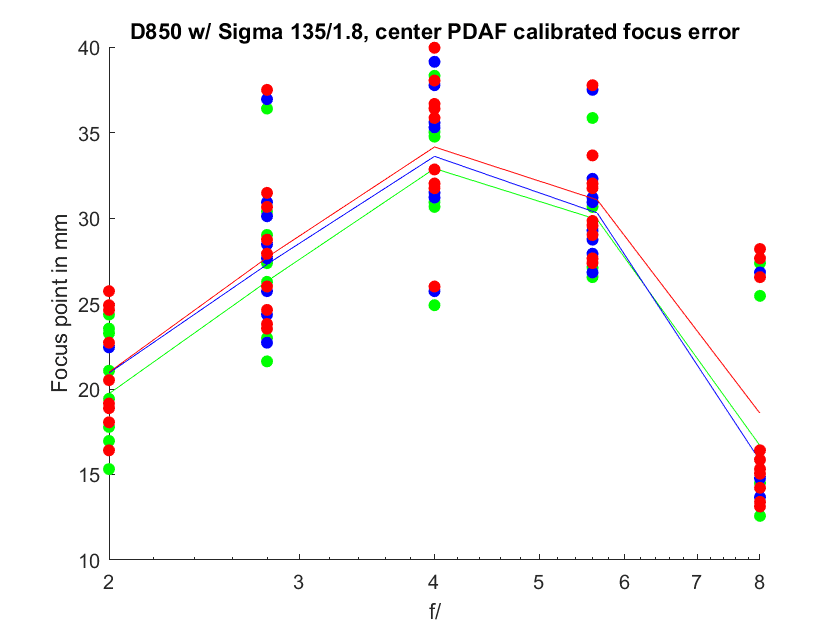
All three color channels focus in about the same place at all apertures tested; this lens has low longitudinal chromatic aberration (LoCA).
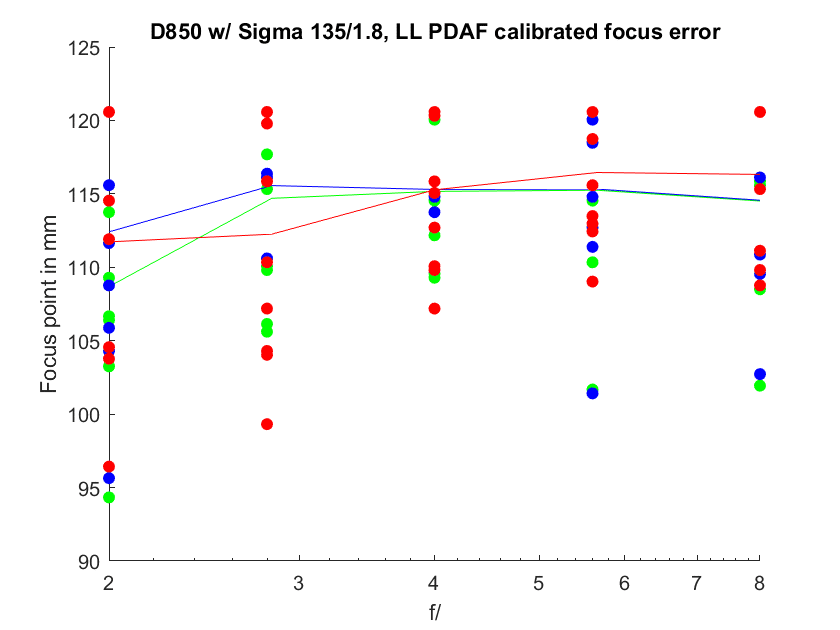
Now using the lower left PDAF focusing point:
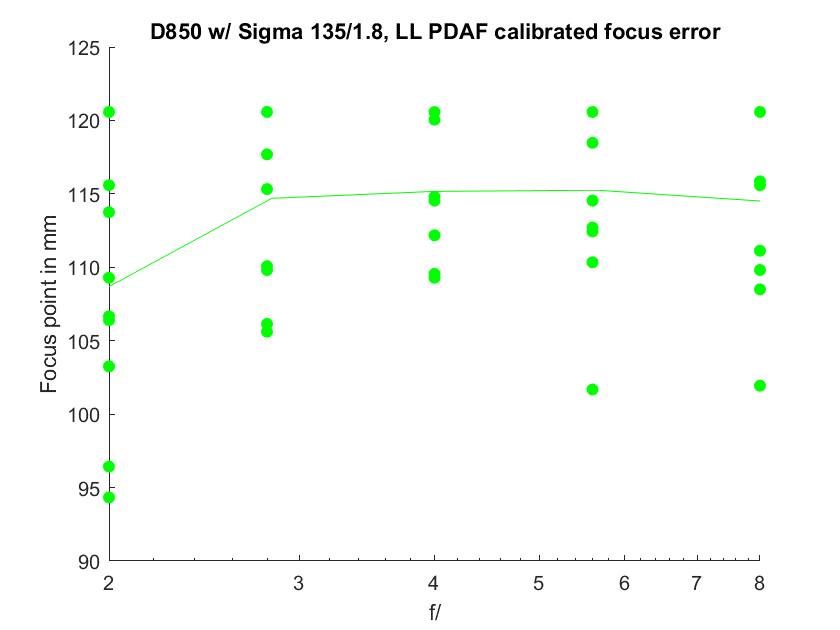
The focal plane has moved back dramatically. This is not the result of field curvature; we are focusing and measuring at the same place in the image, and the PDAF shift is measured from the CDAF analysis.
All the color channels:
Not much more to be learned from that, huh?
Next, I’ll do a similar test using a Nikon lens, probably the 105/4E.
Andre Y says
Very interesting results Jim! It sounds like you’re using the ramp instead of the focus plate for the input to the focus measure function?
I don’t know how focus measure functions work, but does it tell you how far out of focus something is? I know you have to calibrate it (with the CDAF images?) but after that, does it spit out a number you can automatically convert into a focusing distance?
JimK says
If the target is perfectly aligned, then the middle of the ramp — and the CDAF pruned mean — produce the same number except for a LoCA-induced difference. But if the target is misaligned, that’s no longer true. It’s hard to keep the target alignment perfect when the target is off-axis, so I came up with this tweak. There is a way to make the focus measures tell me how far out of focus something is, but it’s not in any calibrated way, and I’m ignoring it. I get focus distance by seeing what part of the ramp is the sharpest.
Frans van den Bergh says
Hi Jim,
I understand that you take 32 CDAF samples to estimate your “true zero” on the focus distance scale. I am rather curious about the following statistics / parameters:
1. What is the size of the ROI containing the scale (width/height in pixels)?
2. What is the standard deviation of the focus distance (in mm) of those 32 CDAF shots?
3. Lastly, how repeatable is FocusTune in its estimation of focus distance? If you choose a manual focus setting (say, close to zero on the scale), what is the standard deviation (and max-min) of FocusTune’s focus distance estimate over 10 repeated image captures at the chosen manual focus setting?
-Frans
JimK says
——————–unpruned mu px————pruned mu px————–sigma px
LL——————-124.332——————-124.056——————2.978
Center—————127.152——————-125.785——————3.824
——————ROI rows——-ROI cols
LL—————-918.000——–159.000
Center————881.000——–286.000
——–unpruned mu mm—-pruned mu mm——- sigma mm——correction mm
LL———-30.961———30.892————–0.742———0.069
Center——32.993———32.638————–0.992———0.355
I’m calling the operation that throws out the samples that are greater than one sigma from the mean (mu), pruning. The correction is the difference between the pruned mu and the unpruned mu.
Does that help?
I’m not using FocusTune anymore. I am using the code that I wrote that replicates some of that function, and does other stuff besides.
Frans van den Bergh says
Yes, thanks, that helps!
Your standard deviation on the focus distance (~0.75 mm to 1 mm) looks fairly good for such a small ROI. (although that standard deviation includes the repeatability of CDAF)
What are you using to find the sharpness peak? Tenegrad?
JimK says
This:
https://www.mathworks.com/matlabcentral/fileexchange/27314-focus-measure?focused=8113992&tab=function&s_tid=gn_loc_drop
with ‘BREN’.