This is one in a series of posts on the Sony a7III. You should be able to find all the posts about that camera in the Category List on the right sidebar, below the Articles widget. There’s a drop-down menu there that you can use to get to all the posts in this series; just look for “a7III”.
I’ve been posting information on the Nikon D850 and Sony a7RIII shadow noise characteristics versus ISO setting, and recommending exposu8re strategies for the two cameras. I haven’t done that for the Sony a7III, but it will probably come as no surprise to most of you that It behaves similarly to the other two cameras.
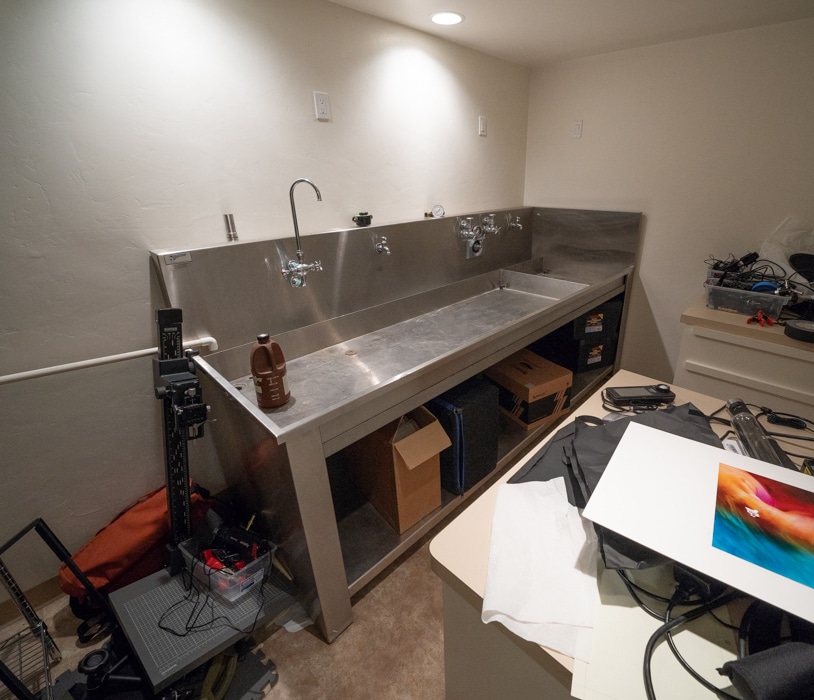
In this post, I’ll show you one exposure management strategy that works with these cameras in some situations. My task was to document the removal of my darkroom sink; I showed you those pictures in my last post. Now we’ll look at some of them again, albeit with tweaks to the postproduction. The difference is that I’ll be talking about the exposure and ISO settings I chose, and why I chose them.
I knew that the darkroom itself had a well-beyond-normal dynamic range. I also knew that there might be some images which were partly indies and partly outside, and they would likely have even greater dynamic range. Before the de-installation crew showed up, I went into the darkroom, set the camera ISO to 640, the f/stop to f/8, the exposure mode to A, the metering mode to matrix, and cranked in minus three stops of exposure compensation — that’s the most you can get without going into the camera’s menu system. The shutter speed read 1/100, which, for the 12-24 mm lens on the camera, was plenty fast enough. Three stops “underexposed” at ISO 640 is the same as the metered exposure at ISO 5000. I knew that meant that the shadows would not be too noisy with the images sized for web resolution.
I took the “before” shot:
I set the zebra threshold to 100+. EC = -3 gave me zebras at the top-center light and the tops of the wall washes from both ceiling lights.
Here are the Lightroom global control settings that were used to develop the above image (I used no local controls):
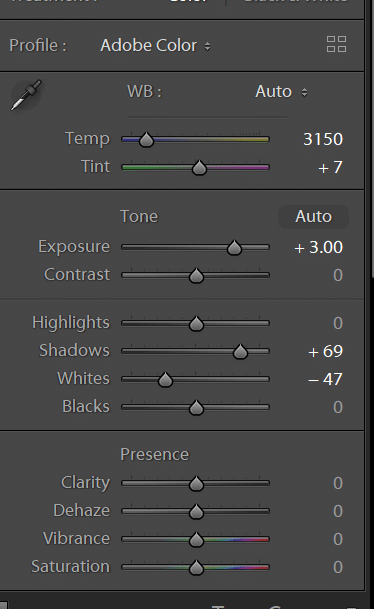
Note that the Exposure boost in Lr was exactly equal to the exposure reduction from the metered settings that the three stops of negative EC engendered. Did that re-create the highlight clipping that I avoided with exposure compensation? It did not. That’s because Lr, in PV 2012 and later, uses a different algorithm when the Exposure slider is set to a p[ositive value than the cameras does when the actual exposure is increased. Increasing the exposure in-camera can easily cause the highlights to be clipped. It’s nowhere near as easy in Lr, which creates a nonlinearity that moderates the clipping in much the same way as the “shoulder” in the DLogE plot of negative film.
I also applied a sizable shadow boost and cut the whites back a lot. This is a high-DR scene.
I left the camera set up the exact same way for all the other pictures in the series.
Here’s an indoor/outdoor one:
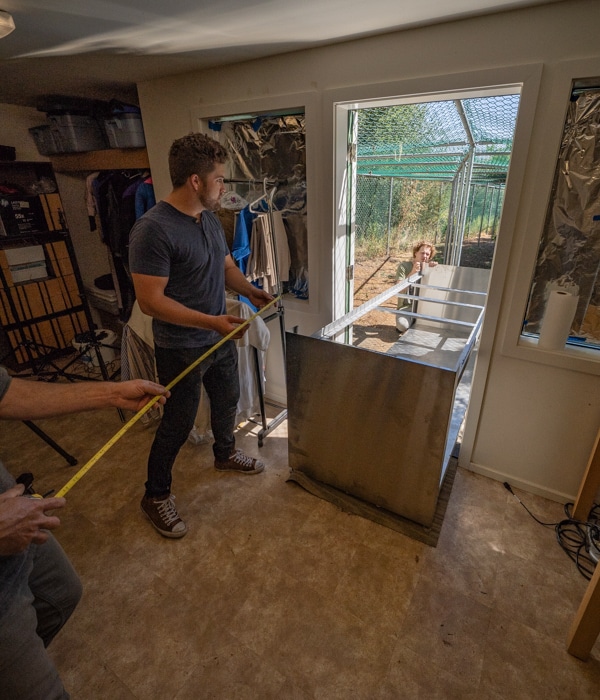
The camera picked a shutter speed of 1/1000 for this, so I left some light on the table. If I’d had time, I could have dropped the ISO to 100, and had less shadow noise. But remember that I’d already decided that the shadows would be adequately clean earlier, so I wasn’t worried about that.
Here are the development settings:
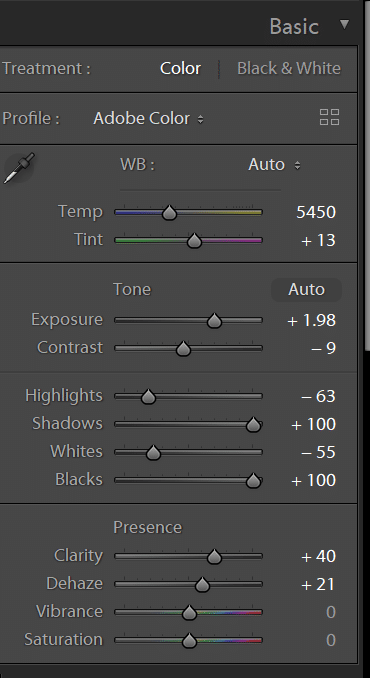
Two stop Exposure boost, big highlights and whites cuts, and mega shadow and highlight boosts. This is just about as heroic a set of adjustments as I’ve ever made. The tone mapping of the scene looks a bit unnatural because of the immense DR compression that’s going on; this really amounts to one-shot HDR.
Is there a way to set up the camera so it’s just as adjustment-free in fast-moving situations but you get greater exposure when the scene gets bright? Indeed there is: you can turn on auto-ISO and set the maximum ISO to 640.
I tied one hand behind my back by not allowing mysefl to use local manipulations in these images, but I think that is the way that many people edit photographs that are produced in volume.
What about the dark finder that -3 stop EC causes? I just lived with it; it was plenty bright enough to frame the shots. I could have turned Setting Effect to “Off”, but then the histogram and zebras would have been meaningless — not that I was looking at them much, anyway. Sony should really fix their firmware so that the histogram and zebras with Setting Effect turned off are meaningful.
Quote: ” What about the dark finder that -3 stop EC causes? I just lived with it; it was plenty bright enough to frame the shots.” Unqouote.
Can’t you adjust the viewer (and monitor) brightness on the a7iii? I can do it on my old a7rii.
And one more question: if you use auto_ISO why bother to set the maximum to 640? (I know the significant jump in the curves between 640 and 800.)
That jump is between 500 and 640. Hence, max ISO 640.
Yes, but the range is not enough to compensate for EC = -3.
Hi Jim!
Regarding the dark finder, there are a few options to help with that:
– Enable DRO level 5. No effect on highlight clipping display.
– Enable Picture Profile 10 (Hybrid Log Gamma) and set one of the custom Zebras to 95+ (Not the normal 95+ setting)
– Use an Slog3 picture profile, which has 3 stops of underexposure built in.
Also, have you considered using highlight priority metering? I use it with aperture priority, and auto ISO, usually with +1 exposure compensation. This gets you the lowest iso and fastest shutter speed possible to keep important highlights automatically. Works REALLY well, letting speculars blow out but not true highlights, unless they’re on the far edges of the frame.
Very interesting suggestion. But how is highlight metering with +1 EC any better a strategy than matrix metering with variable EC using ETTR principle? In either case, I assume you’re dialing up or down the EC (ie shutter speed in Aperture priority mode) until you no longer see zebras (using HLG2 and 95+ Zebras).
When shooting RAW I set my Custom Zebra to 109+. Then I can genuinely see when clipping RAW highlights in camera . The histogram is always 2/3 stop under.
I make the creative decision on which parts of the scene I’m actually happy to blow . Take it from there on ISO/Shutter/Aperture. ISO is at mercy of acceptable shutter speed.
The other real problem with letting your preview go dark by underexposing is that the focus system can end up suffering.
I have found that the zebras are pessimistic in that situation.