The Zeiss/Sony cobranded Distagon T* FE 35mm f/1.4 ZA lens gets some digital ink for its quality, but gets a lot more for its supposedly horrid copy variation. Those of you who are regulars readers her know that I believe that many, if not most, of the lenses returned by customers as decentered, tilted, or otherwise misassembled are perfectly good lenses that have been subjected to imperfect testing. I have embarked on a minor campaign to raise the quality of lens screening testing, and I’ve published a how-to guide here.
Terry Stahly, a reader here and a DPR participant, obtained three copies of the lens from three different sources: Best Buy, B&H, and Amazon. We made a deal: Terry agreed to perform my lens screening test on the three lenses and send me the raw files, and I agreed to analyze the files and tell him what I saw. We initially had an issue getting the target big enough because the Distagon is both short and fast, but I sent Terry a file which he printed out at 34×34 inches, and he backed up to 150 feet (luckily, considering the time of year, he has a place where he can do that indoors and stay warm), and he made some good captures. He used the Sony a7RIII for the images, and all the ones I’m going to show you were with the lens wide open.
I developed Terry’s images in Lightroom, with default settings except for eyedropper white balance on the Siemens Star background, and an exposure tweak. The same settings were used of all the images — I did not correct for corner falloff. I’m showing them to you at 200% magnification.
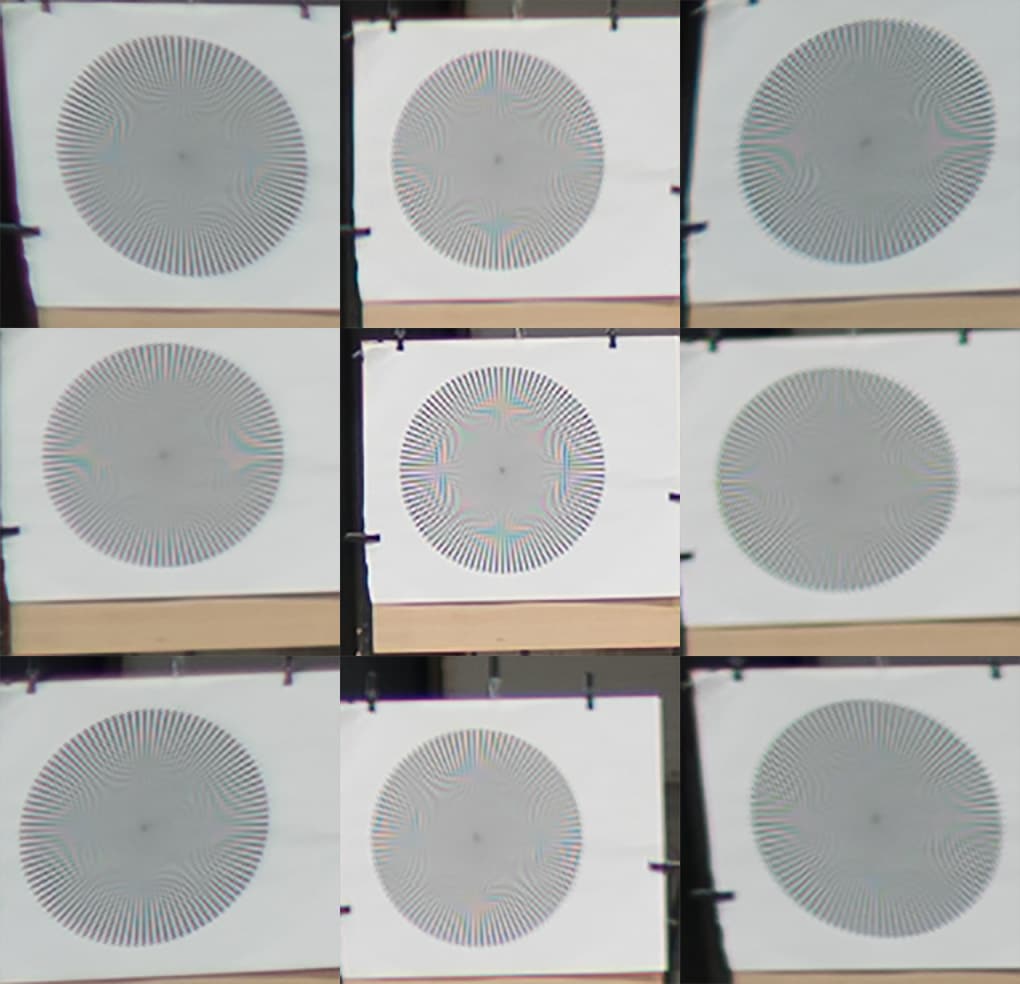
My test requires 9 images from each lens to be tested. With three lenses, that’s 27 in total. That’s a lot of images for you to look at, so in this post, I’ve combined the nine images from each camera into a single composite, with the each Siemens Star placed in the composite offset from the central image in the direction of the orientation of the original captures. Bear with me; it sounds complicated, but you’ll see how intuitive it is if you look at the composite image below.
My lens screening procedure tests for decentering, field tilt, general unsharpness, and field flatness. Using this test, it is possible to draw conclusions about lateral chromatic aberration, astigmatism, flare, coma, and several other aberrations, but those kinds of interpretations take some skill and are not the main focus of my interpretation here. One of the advantages of this procedure is that I can tell (and you can, too, if you have the patience to read all the test instructions) to a great extent if the test was conducted properly, so there’s a form of internal quality control.
See what I mean about the original direction of the captures being preserved in the composite? The upper left star is from the image with the star in the upper left corner, the top star is from the capture with the star at the top, the center star is from the photograph with the star in the center, and so on.
By looking at the center star above, we can see that Terry focused the lens well. There is a riot of false color artifacts and the converging lines towards the middle of the star diverge in the capture before that fade away to gray, indicating that the lens is delivering high contrast information at spatial frequencies above the Nyquist limit that defines the artifact-free resolving ability of the a7RIII sensor.
Looking at the surrounding eight stars, we can see that the contrast is lower, especially at the corners. That is mostly due to light falloff with this short, fast lens. We can also see aliasing in each and every image, showing that the lens is sharp compared to the abilities of the sensor, although not as sharp as in the center, as we’d expect. The opposing corners look about the same, indicating a centered and untilted lens.
The other two lenses:
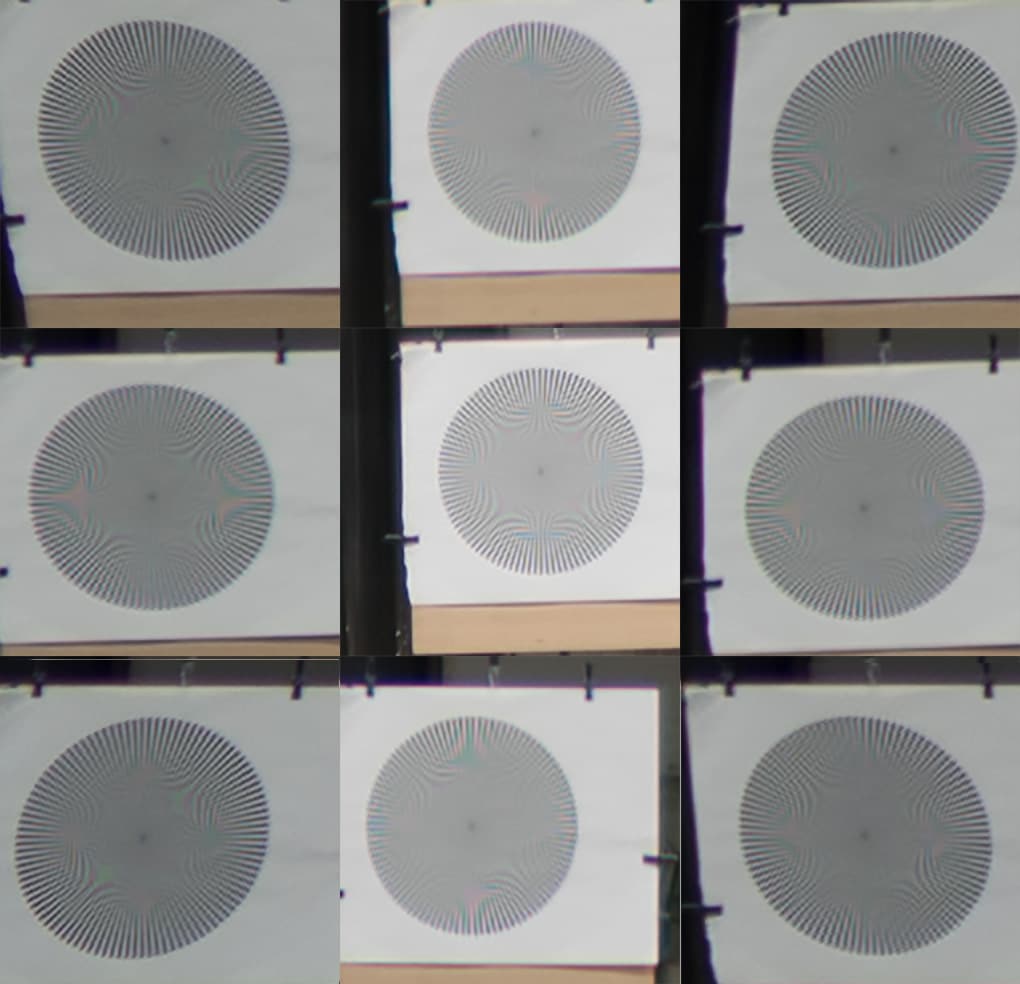
On the Amazon image above, I originally swapped the images in the lower right and lower left corners. I’ve fixed that.Sorry about that.
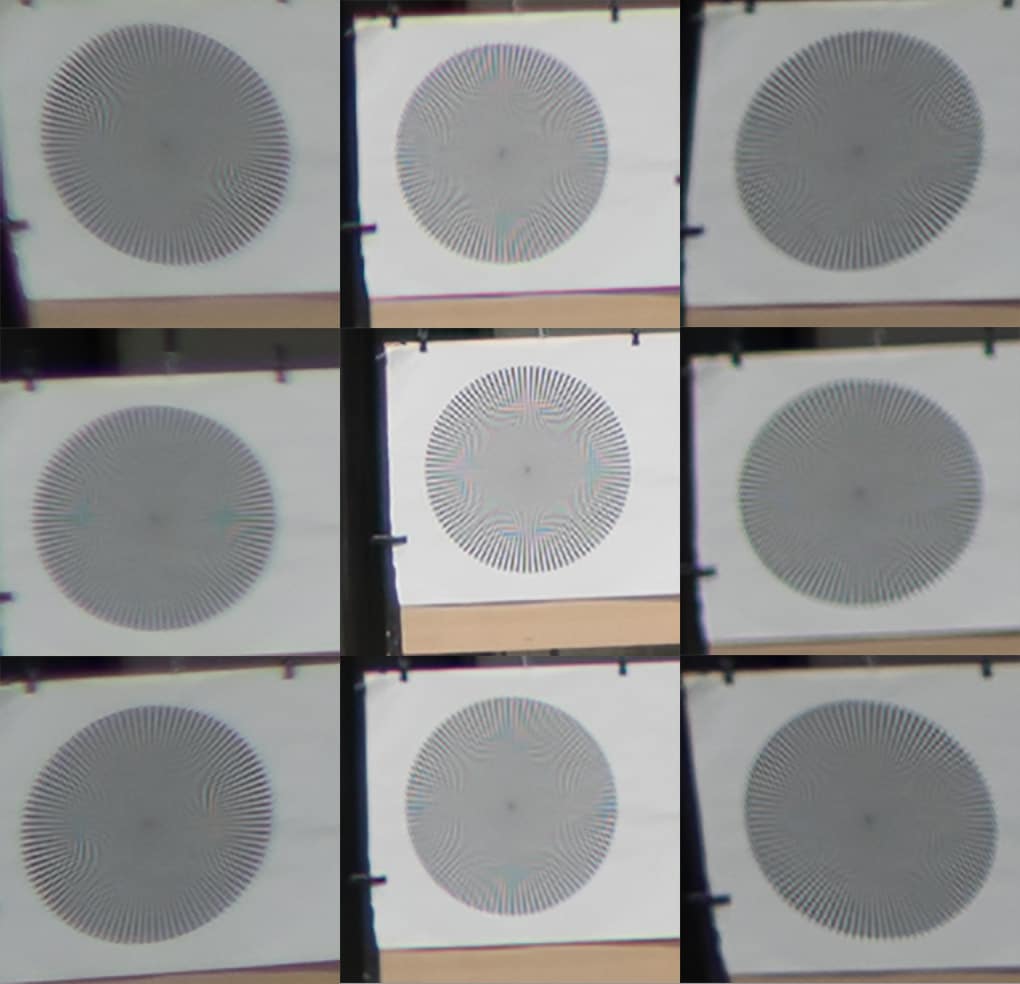
None of these are bad lenses. They are not all the same, and we shouldn’t expect them to be. I would call the B&H the best, followed closely by the one from Amazon, with the Best Buy lens bringing up the rear. You might net things out differently. But any of these lenses is capable of making superb photographs, even wide open as tested.
I would score them quite differently. B&H’s copy would fail based on too-large astigmatism in the top right and coma right center. Amazon’s has a bit lower overall contrast (more spherical aberration) but looks pretty well centered. Best buy’s would fail, simply soft all over. it seems like one of the groups is decentered towards frame lower right as it appears in the image (so frame upper left in world coordinates).
What’s up with Amazon’s copy seeming to have distortion of the opposite sign to the rest? It seems to have barrel distortion and the rest pincushion.
Thanks, Brandon Would you agree that any of these lenses would produce fine images in normal photographic usage?
I think any of them would take pretty pictures. I bet looking at a human face or other “real world” subject, you could distinguish the best buy lens from the Amazon or B&H lenses, and its look would be more hazy.
The reason I would reject the B&H lens is because its field curvature/astigmatism is disturbed enough to make it a pain in the ass to predict its behavior for e.g. landscapes.
I would accept the Amazon lens.
The best buy one I would reject if I knew lenses like the Amazon one existed since it is simply underperforming.
“What’s up with Amazon’s copy seeming to have distortion of the opposite sign to the rest? It seems to have barrel distortion and the rest pincushion.”
Uh, I swapped the lower left and lower right images in that set. Fixed now. Sorry.
If hallowed principles of rectilinear perspective are to be at all preserved, shouldn’t the lower left and lower right Amazon images be interchanged? Perhaps that is what Brandon is getting at.
Is subjective-impression-of-aliasing-on-the-star-chart a very good indication of performance? One finds oneself looking at the low-frequency info provided by the clips holding the paper to decide how sharp the corners are.
“If hallowed principles of rectilinear perspective are to be at all preserved, shouldn’t the lower left and lower right Amazon images be interchanged? Perhaps that is what Brandon is getting at.”
Thanks, Steve. I corrected the image.
This is primarily a screening test, so you’re looking for differences across the frame. If there’s no aliasing in the center image, that is an indication that the lens is very bad, or that it is misfocused.
Sweet holy moses! I never bothered to test my Contax Zeiss 35mm 1.4 but I doubt it would mess things up this badly.
Arthur, this is a very sensitive test. I’ve yet to encounter a lens that didn’t show some defects. Test half a dozen of your best lenses using this test and I’ll bet you’ll sing a different tune.
Hi,
My take is that as long as we see a symmetrical moiré pattern in the corner samples we can say:
– The lens outresolves the sensor
– The field is reasonably flat over the sample points. May indicate a field that is really flat
– The focal plane is not tilted
It is interesting to note the difference between Brandon’s and Jim’s interpretations, I would say both are right. 🙂
Best regards
Erik
Question: is this indicative of performance at closer ranges? Much closer ranges? 35mm isn’t really something I associate with focusing at 150 ft.
Hard to say for sure, but probably at least until the distances get to be less than 50x the focal length, or about five feet.
For me this is not a Zeiss performance or a lens with this price range… That is the reason I bought the Sigma Art. I have tested the Zeiss in the local shop and the copy there was so tilted and soft wide open that I was totally convinced that I will not even try to find a good copy. A friend of mine bought new Batis 12 2.8 and it was with an element gone lose inside… I think that the glue they are using is not corresponding to the price they ask for those lenses…
I want to buy this lens! But what should I do? Just keep buying and returning? I am a usual shopper on B&H. Any recommendations?
I wouldn’t worry too much about it. I think the sample variation is overstated by most Internet pundits.