• site home
  • blog home
  • galleries
  • contact
  • underwater
  • the bleeding edge

the last word

Photography meets digital computer technology. Photography wins -- most of the time.

You are here: Home / Nikon Z6/7 / Does the Z mount help with long lenses?

Does the Z mount help with long lenses?

September 9, 2018 JimK 4 Comments

Some have said that the New Nikon Z mount makes things better only for short lenses, and affords no advantage for long ones. In order to test that, I constructed the following model:

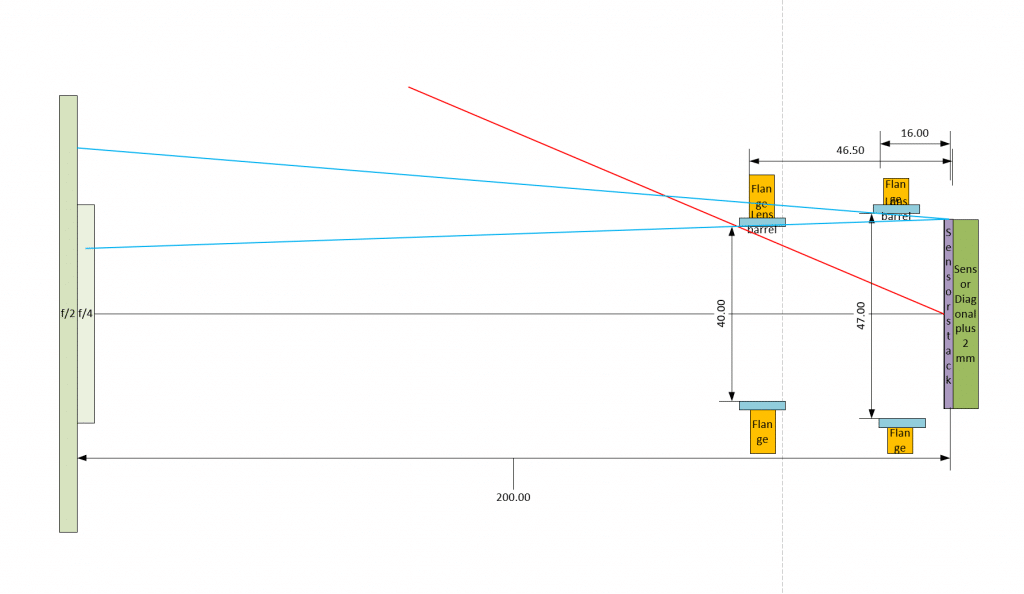
We are looking at the diagonal of the sensor, which is 42.3 mm. In order to get the opening available for the passage of light, I measured several Nikon F-mount lenses whose rear elements ended well outside of the flange (well, outside as viewed from the sensor; if you were looking at it from the perspective of the lens, the rear elements were well inside the lens). The lenses had light stops and space for contacts, so the openings weren’t round. I used size in the sensor diagonal direction. That gave me a diameter 4 mm smaller than the mount throat. I assumed the same reduction to get the clear opening for the Z mount lenses, since I don’t yet have one.

I then made an unrealistic assumption: that the long lens is a simple one, with a single symmetric element. Thus the exit pupil of the lens its focal length from the sensor when the lens is focused at infinity, and light travels in a straight line between the exit pupil and the sensor. I drew in the exit pupils for a 200 mm f/2 and a 200 mm f/4 lens.

Then I constructed some lines. The red one is from the center of the sensor to the diagonal extent of the F mount. The center of the sensor can clearly see the whole image circle. The clear opening is smaller in the horizontal and vertical directions, but there’s so much room here that those dimensions aren’t going to be a problem for the 200 mm f/2 case. Had I constructed the same line for the Z mount, it would be even more generous.

The problems start when we start to consider whether the corners of the sensor can see the whole exit pupil. Look at the blue lines. In the case of the F mount, the corners can’t even see the whole exit pupil of an f/4 200 mm lens. The Z mount can handle that, but can’t see the whole f/2 exit pupil.

The consequences of not being able to see the entirety of the exit pupil are darkening in the periphery of the image, and non-circular out-of-focus point spread functions off axis. We are used to both of those. The former is common in shorter focal length lenses where the light ray bundles impinge on the periphery of the sensor at significantly off-vertical angles. The latter often occurs when off-axis light is blocked inside the lens, before it ever gets to the mount. Neither is the end of the world.

Most long-focus lenses have negative elements towards the camera end, so in real life the effects won’t be as bad as what I show in the diagram above.


Nikon Z6/7

← Current work Z mount and long lenses — practical examples →

Comments

  1. Mike Nelson Pedde says

    September 9, 2018 at 1:44 pm

    This is probably a stupid question, but since an F-mount lens can only mount to a Z-mount camera with an adapter, did you guestimate the the thickness of the adapter from those you already own?

    Reply
    • JimK says

      September 9, 2018 at 1:48 pm

      If the F-mount FFD is 46.5 mm and the Z mount FFD is 16 mm, then the adapter has to be 30.5 mm flange to flange. Unless it’s deliberately too short to allow lenses to focus to infinity in the face of tolerance buildup.

      Reply
      • Mike Nelson Pedde says

        September 10, 2018 at 11:27 am

        Thx!!

        Reply
  2. syberman7 says

    September 13, 2018 at 1:08 am

    This is called ‘mechanical vignetting’.

    Reply

Leave a Reply Cancel reply

Your email address will not be published. Required fields are marked *

May 2025
S M T W T F S
 123
45678910
11121314151617
18192021222324
25262728293031
« Apr    

Articles

  • About
    • Patents and papers about color
    • Who am I?
  • How to…
    • Backing up photographic images
    • How to change email providers
    • How to shoot slanted edge images for me
  • Lens screening testing
    • Equipment and Software
    • Examples
      • Bad and OK 200-600 at 600
      • Excellent 180-400 zoom
      • Fair 14-30mm zoom
      • Good 100-200 mm MF zoom
      • Good 100-400 zoom
      • Good 100mm lens on P1 P45+
      • Good 120mm MF lens
      • Good 18mm FF lens
      • Good 24-105 mm FF lens
      • Good 24-70 FF zoom
      • Good 35 mm FF lens
      • Good 35-70 MF lens
      • Good 60 mm lens on IQ3-100
      • Good 63 mm MF lens
      • Good 65 mm FF lens
      • Good 85 mm FF lens
      • Good and bad 25mm FF lenses
      • Good zoom at 24 mm
      • Marginal 18mm lens
      • Marginal 35mm FF lens
      • Mildly problematic 55 mm FF lens
      • OK 16-35mm zoom
      • OK 60mm lens on P1 P45+
      • OK Sony 600mm f/4
      • Pretty good 16-35 FF zoom
      • Pretty good 90mm FF lens
      • Problematic 400 mm FF lens
      • Tilted 20 mm f/1.8 FF lens
      • Tilted 30 mm MF lens
      • Tilted 50 mm FF lens
      • Two 15mm FF lenses
    • Found a problem – now what?
    • Goals for this test
    • Minimum target distances
      • MFT
      • APS-C
      • Full frame
      • Small medium format
    • Printable Siemens Star targets
    • Target size on sensor
      • MFT
      • APS-C
      • Full frame
      • Small medium format
    • Test instructions — postproduction
    • Test instructions — reading the images
    • Test instructions – capture
    • Theory of the test
    • What’s wrong with conventional lens screening?
  • Previsualization heresy
  • Privacy Policy
  • Recommended photographic web sites
  • Using in-camera histograms for ETTR
    • Acknowledgments
    • Why ETTR?
    • Normal in-camera histograms
    • Image processing for in-camera histograms
    • Making the in-camera histogram closely represent the raw histogram
    • Shortcuts to UniWB
    • Preparing for monitor-based UniWB
    • A one-step UniWB procedure
    • The math behind the one-step method
    • Iteration using Newton’s Method

Category List

Recent Comments

  • JimK on Goldilocks and the three flashes
  • DC Wedding Photographer on Goldilocks and the three flashes
  • Wedding Photographer in DC on The 16-Bit Fallacy: Why More Isn’t Always Better in Medium Format Cameras
  • JimK on Fujifilm GFX 100S II precision
  • Renjie Zhu on Fujifilm GFX 100S II precision
  • JimK on Fuji 20-35/4 landscape field curvature at 23mm vs 23/4 GF
  • Ivo de Man on Fuji 20-35/4 landscape field curvature at 23mm vs 23/4 GF
  • JimK on Fuji 20-35/4 landscape field curvature at 23mm vs 23/4 GF
  • JimK on Fuji 20-35/4 landscape field curvature at 23mm vs 23/4 GF
  • Ivo de Man on Fuji 20-35/4 landscape field curvature at 23mm vs 23/4 GF

Archives

Copyright © 2025 · Daily Dish Pro On Genesis Framework · WordPress · Log in

Unless otherwise noted, all images copyright Jim Kasson.