• site home
  • blog home
  • galleries
  • contact
  • underwater
  • the bleeding edge

the last word

Photography meets digital computer technology. Photography wins -- most of the time.

You are here: Home / The Last Word / Handholding the a7 and a7R, part 2

Handholding the a7 and a7R, part 2

March 9, 2014 JimK 2 Comments

The cameras: the Sony a7 and a7R. The lens: the Sony/Zeiss (aka Zony) 55mm f/1.8 Sonnar FE. The lighting: a single Fotodiox LED-200WA-56 daylight balanced variable-power flood. ISO set to 400, f-stop set to 5.6, focusing in single shot AF mode with the small focus area setting, drive set to single, the exposure mode set to A. The protocol: light on full, adjust exposure compensation for 1/500 second, make 12 exposures with new focusing for each, light down a stop, make 12 exposures… until you get to 1/30 of a second or so.

Develop in Lightroom 5.3 with settings as in the previous post. Crop, export as TIFFs, analyze for horizontal edge MTF50 in Imatest. Export the results to Excel, crunch the stats, and graph.

Here are the results for the a7, with average, average plus two standard deviations, and average minus two standard deviations plotted. Don’t put too much emphasis on the standard deviation derived lines. If the stats were Gaussian, and I don’t know that it is, 96% of the outcomes would lie between those lines.

a7 mtf50

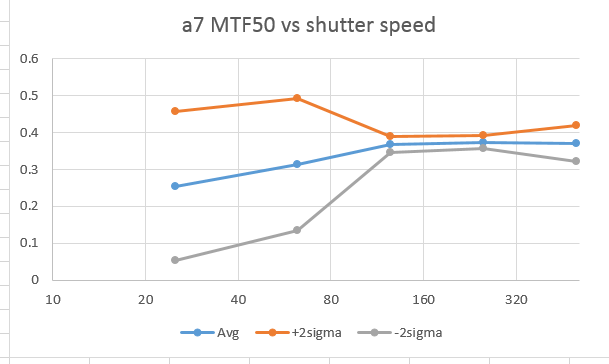
The statistical spread on the results fro 1/125 through 1/500 is surprisingly tight. It looks like the new digital-era rule of using a shutter speed where the denominator is at least twice the FF-equivalent focal length works for the a7, at least in my hands.

Here are the results for the a7R, with the MTF50 numbers corrected for the smaller pixel pitch of the camera, so that the unit of the denominator of MTF50 for both cameras is the pixel pitch of the a7’s sensor:

a7r BTF50

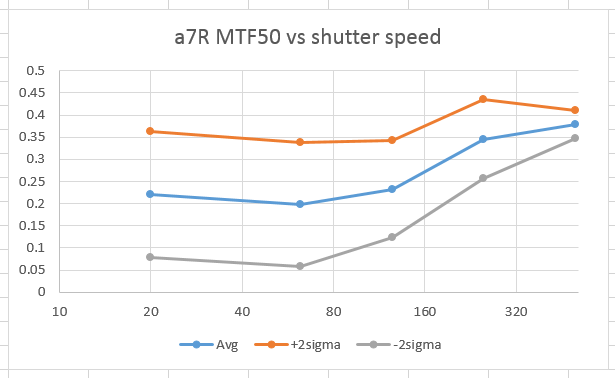
We can see variability at 1/250, but no material loss in average value.Still, because of the variability, I’d suggest 1/500 as the minimum a7R shutter speed for handheld work where sharpness is important. I almost said “where sharpness is critical” but you’d almost certainly have the camera on a tripod if that were the case.

And here are just the averages for both cameras plotted on the same graph, together with the numbers from the  electronic flash lit images from the previous post.  The strobe images are arbitrarily plotted at a shutter speed of 1/40:

a7 a7r mtf50 w EF

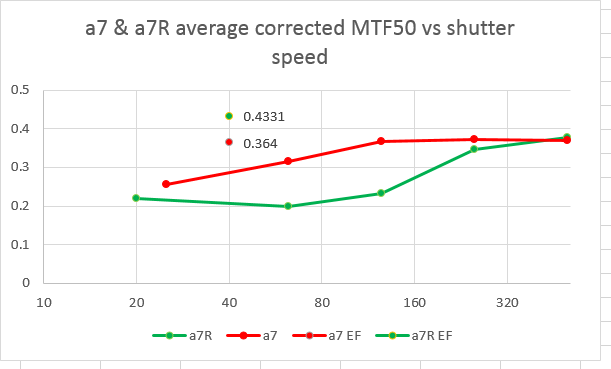
What’s it all mean? First, if I’m handholding this lens on the a7 and a7R, I’ll get sharper pictures (in the vertical direction, anyway) with the lower-resolution camera in the shutter speed range from 1/60 to 1/125, and probably a little bit on both sides of that range. Second, when using the a7R handheld, the shutter speed range most likely to give me trouble is the same range that is most problematic with this lens when the camera is mounted on a tripod. Third, the a7 handheld at shutter speeds of 1/125 and up can come quite close to its tripod-mounted, strobe-lit performance. That’s pretty remarkable, especially considering that I have difficulty wrapping my big hands around the camera as securely as I do with a big DSLR.

The Last Word

← Handholding the a7 and a7R, part 1 Handholding the a7 and a7R, part 3 →

Comments

  1. n/a says

    March 9, 2014 at 10:24 am

    if you can test @ which exposure time hand held (by your subjective hands) A7r might reasonably match those tripod mounted, strobe illuminated (1/5000 t1 duration) results ?

    Reply
    • Jim says

      March 9, 2014 at 10:44 am

      Unfortunately, I don’t have a continuous light bright enough to do that. On second thought, I could do it at a wider aperture, but the results might not be as accurate because the lens resolution will be lower. Hmm…

      Reply

Leave a Reply Cancel reply

Your email address will not be published. Required fields are marked *

May 2025
S M T W T F S
 123
45678910
11121314151617
18192021222324
25262728293031
« Apr    

Articles

  • About
    • Patents and papers about color
    • Who am I?
  • How to…
    • Backing up photographic images
    • How to change email providers
    • How to shoot slanted edge images for me
  • Lens screening testing
    • Equipment and Software
    • Examples
      • Bad and OK 200-600 at 600
      • Excellent 180-400 zoom
      • Fair 14-30mm zoom
      • Good 100-200 mm MF zoom
      • Good 100-400 zoom
      • Good 100mm lens on P1 P45+
      • Good 120mm MF lens
      • Good 18mm FF lens
      • Good 24-105 mm FF lens
      • Good 24-70 FF zoom
      • Good 35 mm FF lens
      • Good 35-70 MF lens
      • Good 60 mm lens on IQ3-100
      • Good 63 mm MF lens
      • Good 65 mm FF lens
      • Good 85 mm FF lens
      • Good and bad 25mm FF lenses
      • Good zoom at 24 mm
      • Marginal 18mm lens
      • Marginal 35mm FF lens
      • Mildly problematic 55 mm FF lens
      • OK 16-35mm zoom
      • OK 60mm lens on P1 P45+
      • OK Sony 600mm f/4
      • Pretty good 16-35 FF zoom
      • Pretty good 90mm FF lens
      • Problematic 400 mm FF lens
      • Tilted 20 mm f/1.8 FF lens
      • Tilted 30 mm MF lens
      • Tilted 50 mm FF lens
      • Two 15mm FF lenses
    • Found a problem – now what?
    • Goals for this test
    • Minimum target distances
      • MFT
      • APS-C
      • Full frame
      • Small medium format
    • Printable Siemens Star targets
    • Target size on sensor
      • MFT
      • APS-C
      • Full frame
      • Small medium format
    • Test instructions — postproduction
    • Test instructions — reading the images
    • Test instructions – capture
    • Theory of the test
    • What’s wrong with conventional lens screening?
  • Previsualization heresy
  • Privacy Policy
  • Recommended photographic web sites
  • Using in-camera histograms for ETTR
    • Acknowledgments
    • Why ETTR?
    • Normal in-camera histograms
    • Image processing for in-camera histograms
    • Making the in-camera histogram closely represent the raw histogram
    • Shortcuts to UniWB
    • Preparing for monitor-based UniWB
    • A one-step UniWB procedure
    • The math behind the one-step method
    • Iteration using Newton’s Method

Category List

Recent Comments

  • bob lozano on The 16-Bit Fallacy: Why More Isn’t Always Better in Medium Format Cameras
  • JimK on Goldilocks and the three flashes
  • DC Wedding Photographer on Goldilocks and the three flashes
  • Wedding Photographer in DC on The 16-Bit Fallacy: Why More Isn’t Always Better in Medium Format Cameras
  • JimK on Fujifilm GFX 100S II precision
  • Renjie Zhu on Fujifilm GFX 100S II precision
  • JimK on Fuji 20-35/4 landscape field curvature at 23mm vs 23/4 GF
  • Ivo de Man on Fuji 20-35/4 landscape field curvature at 23mm vs 23/4 GF
  • JimK on Fuji 20-35/4 landscape field curvature at 23mm vs 23/4 GF
  • JimK on Fuji 20-35/4 landscape field curvature at 23mm vs 23/4 GF

Archives

Copyright © 2025 · Daily Dish Pro On Genesis Framework · WordPress · Log in

Unless otherwise noted, all images copyright Jim Kasson.