You may have noticed that I haven’t posted much for the last week or so. I’ve spent the time trying to come up with a way to measure the absolute and relative image sharpness of a7 and a7R when not firmly mounted to a tripod. I had been resisting this exercise in the past because handheld images exhibit a lot of variability, and in order to make sense of things, I’d need to make a lot of exposures, do a lot of analysis, and compute statistics on the results. It sounded like a big time sink. The results would apply only to my handholding ability on that day with that many cups of tea in me. However, several people have been urging me to do some work on handheld use of the two cameras, so I set about developing a test protocol.
My first idea was to figure out a way to remove the variability from the testing by taking the living, breathing, shaking photographer – that would be moi – out of the picture. I experimented in mounting cameras wrapped in neoprene in a drill vise. That would simulate the soft, damped hold on the camera that a real person would have, but it wouldn’t shake like a real person. The results would reflect an upper bound to the sharpness that an actual user might experience. The project proceeded in a manner that gave me serious doubts that I was on the right track. The damping of the neoprene seemed to be less than one observes with real handholding. Also, I couldn’t figure out a way to simulate the way a photographer actually holds a camera, with force applied from the bottom and top as well as the sides. I abandoned that approach.
My second try was to make a series of images of the ISO 12233 test target, and analyze them by eye to find the point on the upper right resolution cross when the contrast just faded to zero, and compute statistics on the result. That produced interesting results, but there was sufficient variation that I knew I needed more samples, and it took so long that I knew I’d drive myself nuts if I persisted. I also thought the zero-contrast resolution was the wrong thing to measure. I really wanted the 50% contrast resolution, but I didn’t have a way to eyeball that.
I needed to find a way to have a machine analyze the test shots.
One big problem with computer image analysis of handheld images is what the folks in the machine vision biz call “region of interest (ROI) selection.” When you make a series of photographs from a tripod, you can find what you’re looking for in the first shot, and that’s where it is in all the others. When you handholding, that’s not true. Finding the ROI in a hundred images is a PITA. Doing that eight or ten times is something I wouldn’t wish on my worst enemy.
I like to write software, so I thought briefly – very briefly – about doing the analysis code myself. I’ve never written any machine vision code myself, but I’ve hung around people who have to have a healthy respect for their abilities and the difficulty of the problem. So I decided to look for an image analysis tool. It wasn’t much of a search. There is a well-respected, venerable tool available: Imatest.
I purchased the software, picked a likely target to use to get the 50% contrast resolution (or actually a related measure called MTF50), and made a series of images. The ROI moved around too much. SO I brought out the bid guns. There’s a series of test targets that Imatest calls SFRPlus. For those targets, Imatest will do automatic ROI identification.
I printed out an appropriate target at the right size, and did an initial series of test images, developed them in Lightroom, and set up the parameters for automatic analysis in Imatest. That looked good, and that’s what I’m doing in this and subsequent posts on this topic.
Before I post the results of handheld testing with the a7 and a7R, I needed to establish a baseline: a set of results that indicted what the cameras and lens – I used the same lens on both cameras – could do when camera motion was, ahem, out of the picture.
I set up an Arca Swiss C1 Cube and RRS TVC-44 legs. For illumination, I used a Paul Buff Einstein, set 6 stops down from full power for a t.1 of about 1/5000 seconds and triggered from the camera hot shoes through a PC adapter. I used a RRS L-bracket on the cameras, and set it up in landscape orientation. I used the Sony/Zeiss 55mm f/1.8 Sonnar FE, focused wide open on the Siemens star in the target and set to f/5.6. I used trailing curtain synch with a shutter speed of 1/25 second for the a7R so that any vibration could damp out. I set the shutter speed of the a7 to 1/125, since it doesn’t need any help in the vibration department for strobe images.
Here’s a sample image:
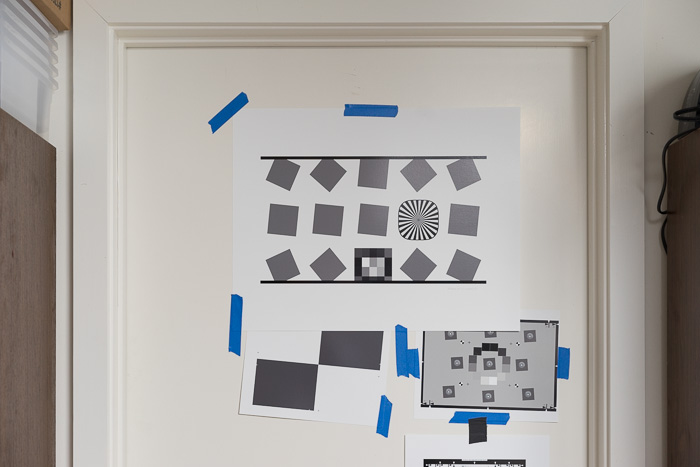
I brought the raw files into Lightroom 5.3, and developed them with the default settings except for white balance, which I set at the white of the target, and exposure, which I boosted fractionally. The default settings for Lr include some sharpening and some noise reduction, both of which can affect the MTF50 results. Rather than neutralize these settings, I left them at default, figuring that most people would use their raw developer with some sharpening and noise reduction. I cropped the files to the approximate location of the target, leaving it to Imatest find the ROI. I exported the files as 16-bit TIFFs.
In Imatest, I set up the program to look for horizontal edges, which are the most problematical for the a7R in landscape orientation, given the vertical motion of the camera’s shutter. Incidentally, these edges are the ones that the a7 handles with greater sharpness than the vertical edges, since the a7 anti-aliasing (AA) filter is stronger horizontally than vertically.
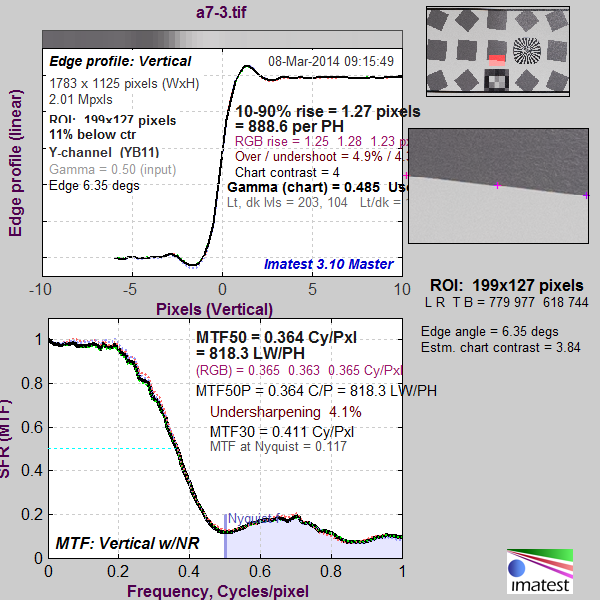
Here is an Imatest result for an a7 image:
And here’s the Imatest analysis of an a7R image:
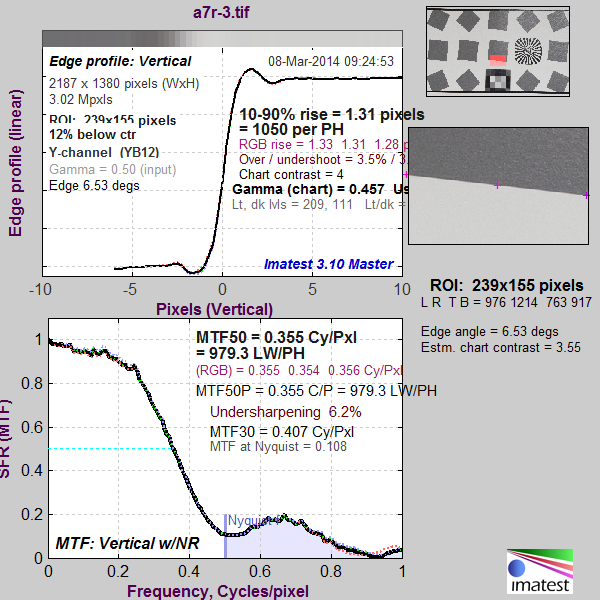
A lot of information, huh? The number that I’m concentrating on is MTF50, which is measured in cycles per pixel. For the a7, it’s 0.364, and for the a7R, it’s 0.355. However, since the cameras have different resolutions, that doesn’t tell the whole story. What we’d like, if we are to compare the sharpness of the two cameras, is the MTF50 measured as cycles per some length, where that length is the same proportion of the horizontal, vertical, or diagonal distance of the camera’s sensors. Let’s say that the length that we want is the pixel pitch of the a7’s sensor. Then we need to multiply the a7R number by the ratio of the two camera’s pixel pitch, or 1.22, to get an apples-to-apples number. That gives us 0.433 for the a7R, indicating that its corrected MTF50 is 19% higher than the a7’s.
Enough preliminaries. Next up, handheld results.
Leave a Reply