I’ve never owned a Foveon camera, but I’ve owned many cameras that could capture 3 color channels at each pixel location. The cameras I’ve owned don’t produce images that look like a lot of Foveon camera images I’ve seen. I’ve been curious as to why, and have reported in this blog on some of the things I’ve found out during my explorations. Purely out of intellectual curiosity, since I don’t like the look of many of the Foveon images I’ve seen, I downloaded Sigma PhotoPro 6 (SPP from now on), and used it on the DPR studio scene raw file from the Sigma DP1 Merrill.
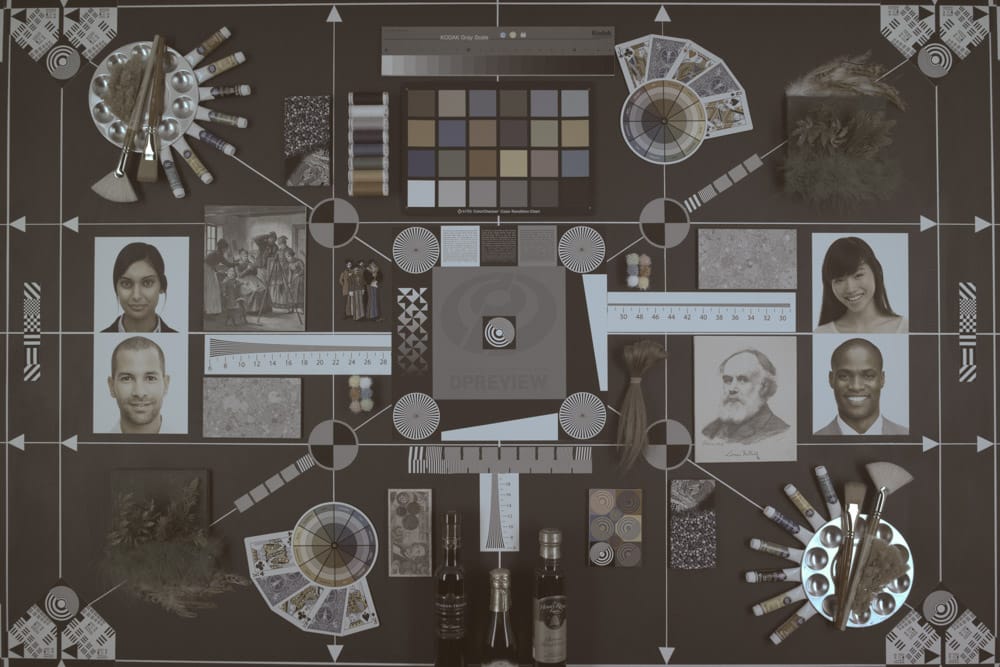
I’ll show you that, but first, I was curious as to what’s in the raw file, so I opened up the studio scene image in RawDigger and and exported it as a composite TIFF. Here’s what it looked like:

I white-balanced to the gray background in one of the portraits, and got this:
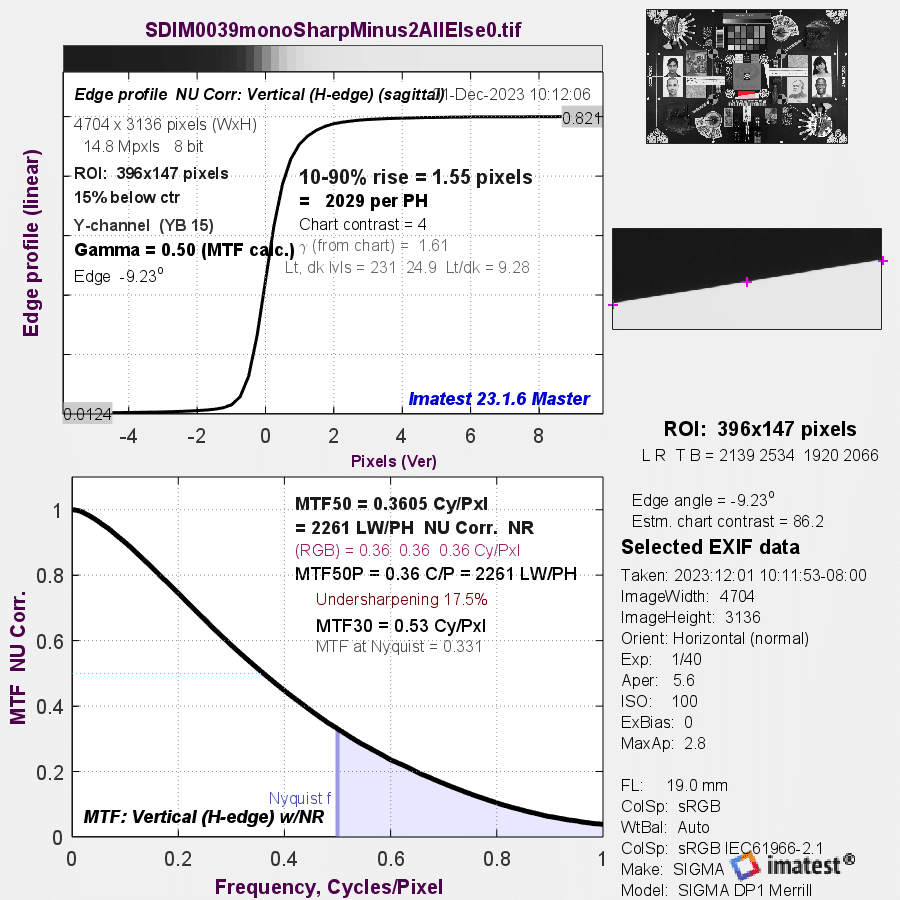
Then I ran the Imatest SFR test on the slanted edge in the lower center.
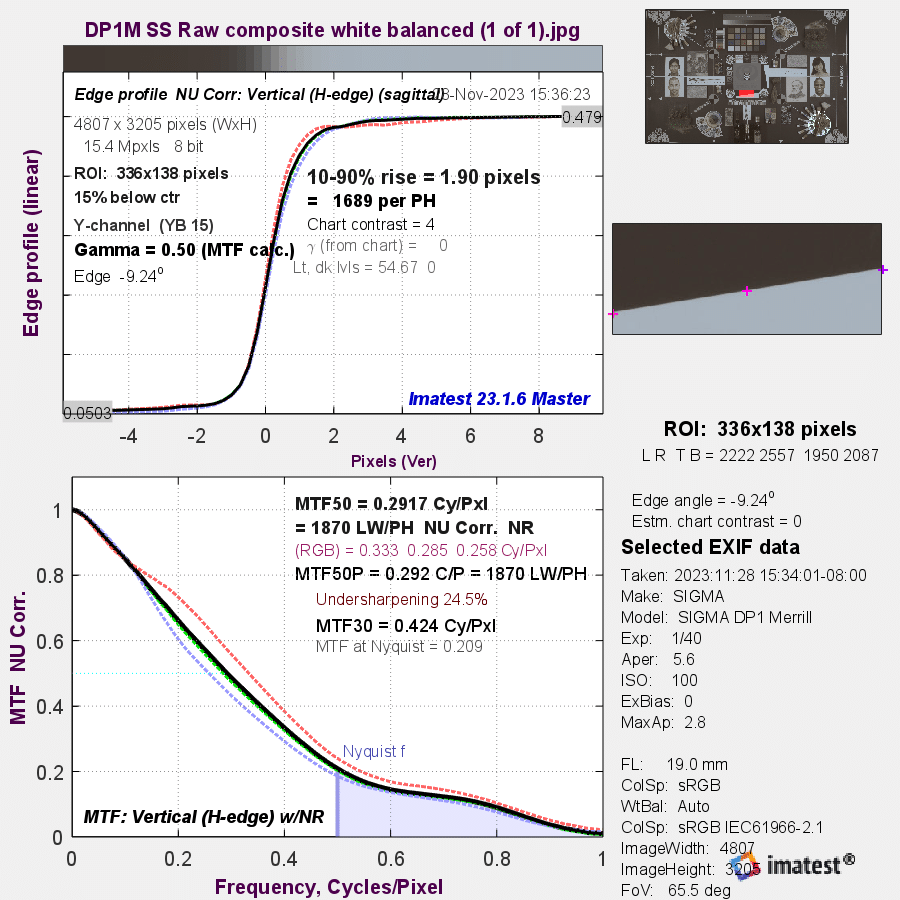
This is about what I would expect from such a camera. The MFT curve falls smoothly and monotonically from dc to the Nyquist frequency. There is no overshoot or undershoot on the edge profile. Contrast at the Nyquist frequency is a little higher than I’d like to see it, but this is a camera with a coarse pitch. The red and blue plane MTFs are differenet from the luminance MTF. I see nothing here that could cause the things I see in many Foveon images.
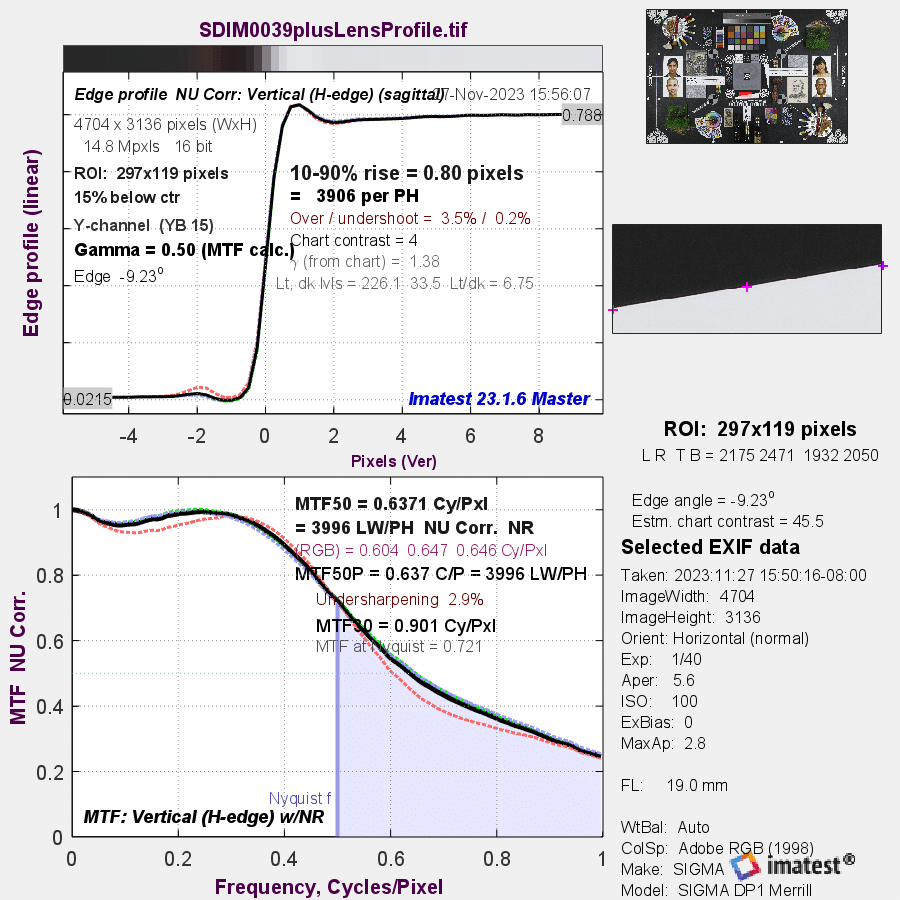
Now let’s look at the modulation transfer function of the same image developed in SPP:
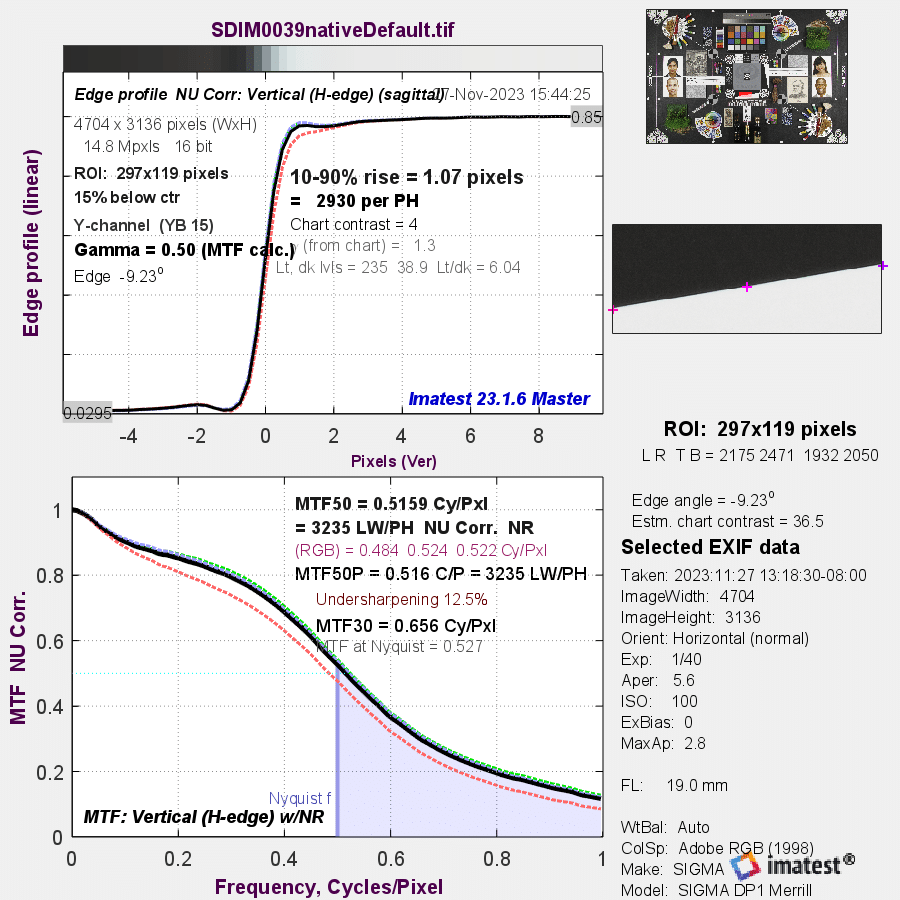
Whoa! The MTF has received an enormous boost at about a third of a cycle per pixel, and the contrast at the Nyquist frequency is over 50%.
Let’s look at the default settings:
![]()
Sharpness is set to minus two, which is as low as it can go. All of the noise adjustments are set to off. It appears that there is no way to defeat the gratuitous sharpening.
If we put SPP in custom mode and set all the sliders in the left panel to zero and leave the right panel alone, wh get this:
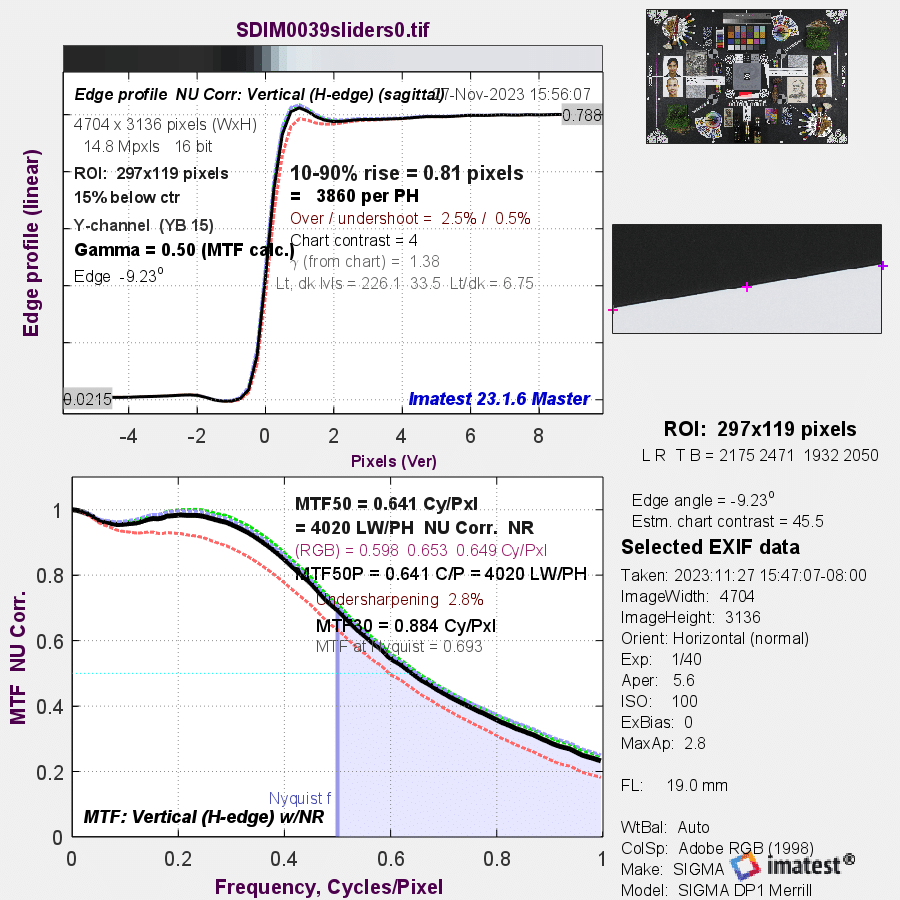
Now the sharpening is extreme, and the contrast at Nyquist is 64%.
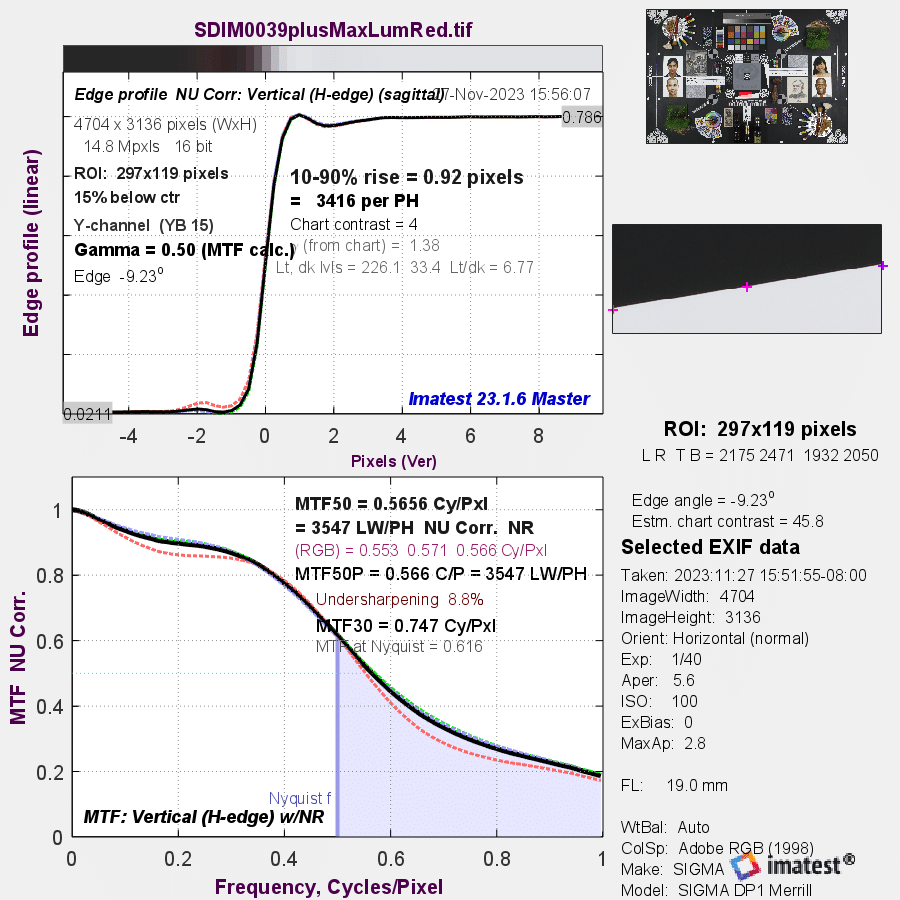
Adding lens profile correction, which is necessary to tame the lateral chromatic aberration (LaCA) at the periphery of the image:
That doesn’t change the MTF much.
Adding maximum chroma noise reduction:

Also little MTF effect.
Adding maximum luminance noise reduction:
Things are a tiny bit better.
Adding maximum banding noise reduction:

Still about the same.
So the oversharpening isn’t coming from the camera itself, it’s coming from SPP. And I can’t figure out how to get SPP to stop oversharpening.
If you put SPP in monochromatic mode, zero all the sliders but sharpness, and set sharpness to -2, you get an image with little or no gratuitous sharpening:
Anton says
Hey Jim,
Have you tried putting noise cancelling in 2, 3, and 4th positions and measuring MTF?
I am suspecting Sigma welded together several algorithms into one set of sliders and you might be able to find the least “affected” position by testing each one separately.
You can probably ask Sigma to put a “bypass noise cancelling/sharpness algorithms” button somewhere on the UI for the next release, but given that it is Merrill sensor, I doubt they will spend time on this.
JaapD says
Hi Jim, regarding SPP oversharpening: have you tried to de-activate the lens corrections / lens profile? This may initially sound weird but I’ve seen similar things from DXO’s lens profiles, implementing a kind of a reciprocal optics correction curve.
All their best!
JaapD.
JimK says
Lens profile correction was deactivated for the first two SPP MTF curves.
Nikojorj says
SPP is not an obligation : the sigma raws can generally be converted to DNG with the kalpanika scripts, and then processed by your software of choice.
https://github.com/Kalpanika/x3f
JimK says
Is that what most people do? I’m looking for the source of the oversharpening that I see in a lot of Foveon images posted on line.
Nikojorj says
I don’t think so either, and many people seem to appreciate the high acutance.
I hesitated to buy a DP2M, and the possibility to process photos in Lightroom was an important criteria.