• site home
  • blog home
  • galleries
  • contact
  • underwater
  • the bleeding edge

the last word

Photography meets digital computer technology. Photography wins -- most of the time.

You are here: Home / The Last Word / Nikon 28mm f/1.4 D on Sony a7 in infrared and mixed light

Nikon 28mm f/1.4 D on Sony a7 in infrared and mixed light

January 25, 2015 JimK Leave a Comment

I tested the 28mm f/1.4 Nikkor-D on the Lifepixel-modified Sony alpha 7. The Lifepixel filter I chose was the Super Color one, which passes some visible light. That makes the job of focusing more difficult for the lens, since it needs to simultaneously bring visible and infrared light to the same focus point. The Coastal Optical 60mm f/4 that I tested earlier is designed specifically to do just that. The Nikon 28 that I’m testing now make no such pretensions. It has a little dot on the barrel indicating the infinity focus point for IR; it appears to be about where the f/8 depth of field marker would be if there were one. You could conclude that stopping down the lens to f/8 or so would allow enough depth of field to simultaneously focus IR and visible light. Of course, the zone of sharpness would still be different for the two parts of the spectrum, so that wouldn’t be a complete solution.

I made two series of tests to see what I could find out about this. I made the first one with no filter over the lens, and another with a visible-light-blocking R72 filter.

I mounted a RRS L-plate to the a7, clipped it in landscape orientation into an Arca Swiss C1 head which was attached to a set of RRS TVC-44 legs. When focusing, I lit an Imatest SFRPlus target with a Fotodiox LED flood, which, like the strobe I used for the photographs, is balanced for 5500K. However, I don’t know the relative mix of IR to visible light for the two sources. If there’s less IR in the LED source, my focusing will be more weighted towards getting visible light sharp. If there’s more IR in the LED source, the situation will be reversed.

There are a few unknowns. Ignoring them for the time being, I blithely pressed on.

I focused the lens at the taking aperture for series without the filter, but the light was too dim to do that when the filter was on the lens, so I focused at f/2.8 for that series. For the exposures, I turned off the LED source, and lit the target with a Paul Buff Einstein strobe set to 2.5 watt-seconds, for the f/2.8 shots, 5 ws for the f/4 ones, 10 ws for the f/5.6 ones, following that progression until I got to f/16. At least that’s what I did for the pictures without the r72 filter. For the ones with the filter, I turned up the strobe power by two stops, I set the ISO to 100, the shutter speed to 1/125 second, the shutter mode to 3-second delay and electronic first curtain shutter (EFCS). I made both series with the target centered.

I developed the images in Lightroom 5.7.1 with default settings, exported them as TIFFs, and measured on-axis MTF50 for horizontal edges.

The results:

a7ir 28,, Nikkor R72 and not

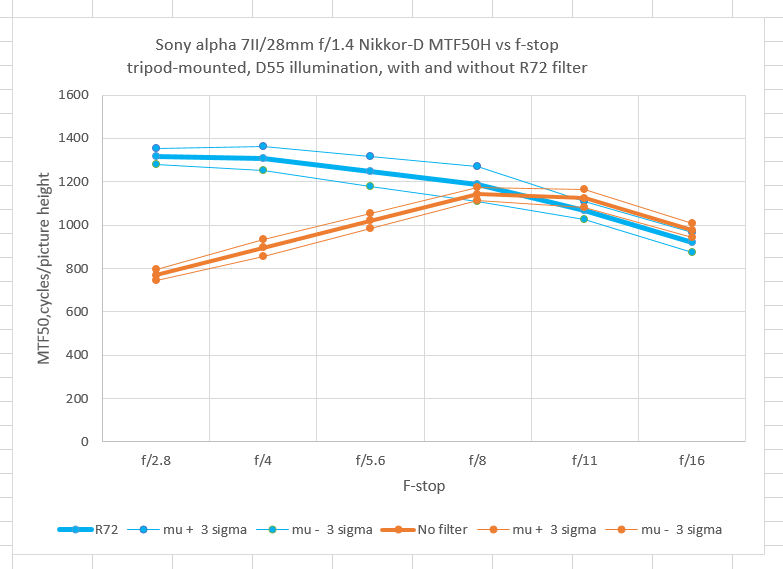
The blue lines are for the exposures through the R72 filter, and the orange lines are for the images made with no filter. It looks like f/8 is indeed the aperture needed to allow the depth of focus to smear over the difference between the visible and infrared light focus planes, Past that point, the greater diffraction of infrared light versus visible light makes the case with the R72 filter slightly, but not materially, sharper. I’m thinking that, for lansscapes with some depth to thm, that f/11 is probably the sweet spot for the no-filter case, and f/8 with the R72 filter.

The Last Word

← Focusing strategies for the 28mm f/1.4 Nikkor D on a Sony a7II Sony a7II IBIS with 28mm lens →

Leave a Reply Cancel reply

Your email address will not be published. Required fields are marked *

May 2025
S M T W T F S
 123
45678910
11121314151617
18192021222324
25262728293031
« Apr    

Articles

  • About
    • Patents and papers about color
    • Who am I?
  • How to…
    • Backing up photographic images
    • How to change email providers
    • How to shoot slanted edge images for me
  • Lens screening testing
    • Equipment and Software
    • Examples
      • Bad and OK 200-600 at 600
      • Excellent 180-400 zoom
      • Fair 14-30mm zoom
      • Good 100-200 mm MF zoom
      • Good 100-400 zoom
      • Good 100mm lens on P1 P45+
      • Good 120mm MF lens
      • Good 18mm FF lens
      • Good 24-105 mm FF lens
      • Good 24-70 FF zoom
      • Good 35 mm FF lens
      • Good 35-70 MF lens
      • Good 60 mm lens on IQ3-100
      • Good 63 mm MF lens
      • Good 65 mm FF lens
      • Good 85 mm FF lens
      • Good and bad 25mm FF lenses
      • Good zoom at 24 mm
      • Marginal 18mm lens
      • Marginal 35mm FF lens
      • Mildly problematic 55 mm FF lens
      • OK 16-35mm zoom
      • OK 60mm lens on P1 P45+
      • OK Sony 600mm f/4
      • Pretty good 16-35 FF zoom
      • Pretty good 90mm FF lens
      • Problematic 400 mm FF lens
      • Tilted 20 mm f/1.8 FF lens
      • Tilted 30 mm MF lens
      • Tilted 50 mm FF lens
      • Two 15mm FF lenses
    • Found a problem – now what?
    • Goals for this test
    • Minimum target distances
      • MFT
      • APS-C
      • Full frame
      • Small medium format
    • Printable Siemens Star targets
    • Target size on sensor
      • MFT
      • APS-C
      • Full frame
      • Small medium format
    • Test instructions — postproduction
    • Test instructions — reading the images
    • Test instructions – capture
    • Theory of the test
    • What’s wrong with conventional lens screening?
  • Previsualization heresy
  • Privacy Policy
  • Recommended photographic web sites
  • Using in-camera histograms for ETTR
    • Acknowledgments
    • Why ETTR?
    • Normal in-camera histograms
    • Image processing for in-camera histograms
    • Making the in-camera histogram closely represent the raw histogram
    • Shortcuts to UniWB
    • Preparing for monitor-based UniWB
    • A one-step UniWB procedure
    • The math behind the one-step method
    • Iteration using Newton’s Method

Category List

Recent Comments

  • JimK on Calculating reach for wildlife photography
  • Geofrey on Calculating reach for wildlife photography
  • Javier Sanchez on The 16-Bit Fallacy: Why More Isn’t Always Better in Medium Format Cameras
  • Mike MacDonald on Your photograph looks like a painting?
  • Mike MacDonald on Your photograph looks like a painting?
  • bob lozano on The 16-Bit Fallacy: Why More Isn’t Always Better in Medium Format Cameras
  • JimK on Goldilocks and the three flashes
  • DC Wedding Photographer on Goldilocks and the three flashes
  • Wedding Photographer in DC on The 16-Bit Fallacy: Why More Isn’t Always Better in Medium Format Cameras
  • JimK on Fujifilm GFX 100S II precision

Archives

Copyright © 2025 · Daily Dish Pro On Genesis Framework · WordPress · Log in

Unless otherwise noted, all images copyright Jim Kasson.