• site home
  • blog home
  • galleries
  • contact
  • underwater
  • the bleeding edge

the last word

Photography meets digital computer technology. Photography wins -- most of the time.

You are here: Home / The Last Word / Sony a7S read noise in single-shot mode

Sony a7S read noise in single-shot mode

July 4, 2014 JimK Leave a Comment

it’s amazing what you can learn about a camera with the lens cap on. In this post, I’m going to talk about what happens when you set the shutter mode to single shot and use the electronic first curtain to open the shutter and the mechanical (probably Copal) shutter to close it. The shutter speed was set to 1/8000 second to minimize the integration time (anything faster than the flash synch speed would probably yield the same result). I mounted  a Zony 55mm lens to get a better light seal than a body cap would likely provide. I set the lens to f/22 to block most of the photons that managed to get past the lens cap.

Sounds like a recipe for boring black-cat-in-a-coal-bin picture, doesn’t it? Enter Rawdigger, the great raw image analysis tool.

First, the histogram of an image with the camera’s ISO set to 400K (I am not going to use the ridiculous number of supposedly-significant figures that Sony does to describe ISO settings in the nosebleed region:

iso 400K histo ss


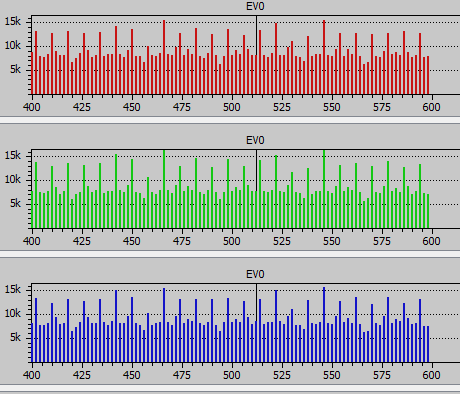
Note that I’m only showing one of the green channels. I will continue to do that unless they are different in some material way. Note also that there is no cutoff of the noise at the left side of the histogram. That’s because I told Rawdigger to ignore Sony’s black compensation, which would normally clip the left side of the histogram at 512.

What can we learn from this histogram? The first thing is that, like all the cameras in the alpha 7 series, the 14th bit is AWOL. We know that because every other bucket is empty. I don’t know how Sony can call these 14-bit cameras. Not that it matters much; 13 bits seems to be plenty. The 14th bit does not appear at any other ISO setting.

The next thing is that there appears to be no digital gain applied to the signal. This is unusual, but not unheard of, in digital cameras, which often stop changing amplifier settings after a certain ISO and just shift the ADC output to the left.

There’s something else wonky about the histogram, but the import is more obscure; Note that every 8th bucket is fuller than its neighbors. What’s with that? At this point, I don’t know.

Next, the histogram with the ISO set to 50K:

iso 50K histo ss


The weird quasi-combing is gone, and, if we ignore the buckets that now are less filled than their neighbors, we can see that the read noise is Gaussian. Nice.

At ISO 6400:

iso 6400 histo ss

The histogram is tightening up nicely, and there is no combing.

At ISO 3200:

iso 3200 histo ss

Pretty much what you’d expect, right? Just wait.

At ISO 1600:

iso 1600 histo ss

What the hay? The read noise actually got worse! How could that be? Hang in there, I speculate on that further down the page.

At ISO 800:

iso 800 histo ss

Now the read noise returns to more-or-less normal behavior, shrinking as the ISO knob (or, in this case, wheel) is turned down. This continues all the way to ISO 100:

iso 100 histo ss

What are we to make of the funny business between ISO 1600 and ISO 3200? I believe that the camera is reconfiguring the chip to change the conversion gain. If that doesn’t mean anything to you, take a look at this white paper by a sensor company:

http://www.aptina.com/products/technology/DR-Pix_WhitePaper.pdf

If you want a deeper dive into this stuff, here’s a PhD thesis by a guy whose designed a chip that has dual conversion gain as part of his Doctorate program:

http://cmosedu.com/jbaker/students/MOSFET%20Modulated%20Dual%20Conversion%20Gain%20CMOS%20Image%20Sensors.pdf

There’s a bonus at the beginning of the above paper: a very good summary of the way a CMOS digital sensor works, albeit aimed at a working electrical engineer. If you’re not one of those, it’s worth skimming — just ignore the math.

The Last Word

← Sony a7S testing Sony a7S read noise in continuous mode →

Leave a Reply Cancel reply

Your email address will not be published. Required fields are marked *

May 2025
S M T W T F S
 123
45678910
11121314151617
18192021222324
25262728293031
« Apr    

Articles

  • About
    • Patents and papers about color
    • Who am I?
  • How to…
    • Backing up photographic images
    • How to change email providers
    • How to shoot slanted edge images for me
  • Lens screening testing
    • Equipment and Software
    • Examples
      • Bad and OK 200-600 at 600
      • Excellent 180-400 zoom
      • Fair 14-30mm zoom
      • Good 100-200 mm MF zoom
      • Good 100-400 zoom
      • Good 100mm lens on P1 P45+
      • Good 120mm MF lens
      • Good 18mm FF lens
      • Good 24-105 mm FF lens
      • Good 24-70 FF zoom
      • Good 35 mm FF lens
      • Good 35-70 MF lens
      • Good 60 mm lens on IQ3-100
      • Good 63 mm MF lens
      • Good 65 mm FF lens
      • Good 85 mm FF lens
      • Good and bad 25mm FF lenses
      • Good zoom at 24 mm
      • Marginal 18mm lens
      • Marginal 35mm FF lens
      • Mildly problematic 55 mm FF lens
      • OK 16-35mm zoom
      • OK 60mm lens on P1 P45+
      • OK Sony 600mm f/4
      • Pretty good 16-35 FF zoom
      • Pretty good 90mm FF lens
      • Problematic 400 mm FF lens
      • Tilted 20 mm f/1.8 FF lens
      • Tilted 30 mm MF lens
      • Tilted 50 mm FF lens
      • Two 15mm FF lenses
    • Found a problem – now what?
    • Goals for this test
    • Minimum target distances
      • MFT
      • APS-C
      • Full frame
      • Small medium format
    • Printable Siemens Star targets
    • Target size on sensor
      • MFT
      • APS-C
      • Full frame
      • Small medium format
    • Test instructions — postproduction
    • Test instructions — reading the images
    • Test instructions – capture
    • Theory of the test
    • What’s wrong with conventional lens screening?
  • Previsualization heresy
  • Privacy Policy
  • Recommended photographic web sites
  • Using in-camera histograms for ETTR
    • Acknowledgments
    • Why ETTR?
    • Normal in-camera histograms
    • Image processing for in-camera histograms
    • Making the in-camera histogram closely represent the raw histogram
    • Shortcuts to UniWB
    • Preparing for monitor-based UniWB
    • A one-step UniWB procedure
    • The math behind the one-step method
    • Iteration using Newton’s Method

Category List

Recent Comments

  • JimK on How Sensor Noise Scales with Exposure Time
  • Štěpán Kaňa on Calculating reach for wildlife photography
  • Štěpán Kaňa on How Sensor Noise Scales with Exposure Time
  • JimK on Calculating reach for wildlife photography
  • Geofrey on Calculating reach for wildlife photography
  • JimK on Calculating reach for wildlife photography
  • Geofrey on Calculating reach for wildlife photography
  • Javier Sanchez on The 16-Bit Fallacy: Why More Isn’t Always Better in Medium Format Cameras
  • Mike MacDonald on Your photograph looks like a painting?
  • Mike MacDonald on Your photograph looks like a painting?

Archives

Copyright © 2025 · Daily Dish Pro On Genesis Framework · WordPress · Log in

Unless otherwise noted, all images copyright Jim Kasson.