Based on the testing that I’ve done so far, I have identified two possible cameras for the firehouse series.
- The Sony alpha 7R with electronic flash lighting, using rear-curtain synch at 1/25 second or longer to mitigate the effects of that camera’s shutter vibration.
- The Nikon D800E with available light.
I’d use Nikon F-mount lenses on both bodies, although I’m a little worried about the weight of the Zeiss 135mm APO Sonnar on the Sony. I’m pretty sure each would give me good results. It’s a lot easier to focus the Sony, but dragging studio lighting equipment around wouldn’t be much fun.
However, the idea of working with ancillary equipment gave me another idea: a scanning back. It probably would be less hassle to shoot on location with a back and a tethered computer than it would be to set up light stands, reflectors, and diffusers. I have a scanning back that I used for the Timescapes series, so I gave it a try on the ISO 12233 target.
I set up this gear: Nikkor 120mm f/5.6 AM ED macro lens with a IR/UV cut filter on a Linhof Master Technika, RRS plate, RRS clamp, Arca Swiss C1 Cube, RRS TVC-44 legs. ISO 200, lens set at f/11. Betterlight Super 6K back, set for a 6000×7998 (48 megapixel) image. ISO 12233 target with the camera at a distance to yield an active area about 550 pixels high. Thus, the lines between those labeled “5” and “6” represent 1 line pair per pixel pair. The 120mm lens is the equivalent of a 38mm lens on a 35mm camera, and is marginal at covering a 4×5 negative when focused at infinity, but does just fine with the Betterlight imaging area. Target illumination for the images was provided by a single Fotodiox LED-200WA-56 lamp using the supplied reflector. The camera was set to 1/60 second per scan line with the Fotodiox at maximum output.
I focused manually, wide open using the ground glass and the 14-diopter loupe that I was born with. There is no question that this is a less accurate way to focus than using live view on the a7R, or even on the D800E. I used the standard Betterlight tone curves, brought the TIFF into Photoshop, and did a minor white balance adjustment.
Here’s a crop from the upper right-hand corner, enlarged 3x using nearest neighbor, and JPEG’d:
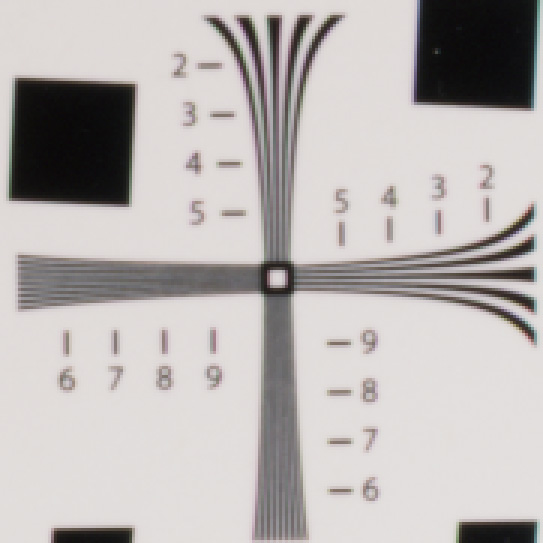
Several things are worth noting.
- The horizontal and vertical lines are both resolved to the sensel level, even though the lens is 25 years old and was not constructed with the high resolution of digital sensors in mind. However, the contrast at that resolution is not quite up to the best of today’s lenses.
- There is no false color in the horizontal lines, in spite of the lack of an antialiasing filter. This is because the red, green, and blue color planes each have their own line sensor one horizontal pixel apart, and the Betterlight firmware de-skews the column data so that the RGB values in any column are those of one pixel location. If there’s no subject motion and sufficiently low camera vibration, as there is here, it works perfectly.
- There is a small amount on false color in the vertical lines. Those near the “2” have red or green tinges to their edges. I believe this is due to camera vibration. The Betterlight line sensor is driven by a motor, which introduces some vibration, and we have seen that the tripod/head assembly that I’m using is less resistant to horizontal vibration than vertical vibration. The level of vibration is, however, small enough to be only of academic interest.
These results are better than they appear, since the camera as tested has 48 megapixels of resolution, and we’re looking at (blown up) individual pixels. In similar-sized prints, the sensor pixels from the Betterlight back will be smaller on the paper than those from the a7R or D800E.
This is worth a little more exploration. More later.
Leave a Reply