• site home
  • blog home
  • galleries
  • contact
  • underwater
  • the bleeding edge

the last word

Photography meets digital computer technology. Photography wins -- most of the time.

You are here: Home / The Last Word / The Sony a7S AA filter

The Sony a7S AA filter

July 14, 2014 JimK Leave a Comment

The a7R has no anti-aliasing (AA) filter. The a7 has one that’s pretty weak, and mostly operates in one direction. With its big fat pixels, the a7S would seem to be prone to aliasing. What did Sony do about that when they designed the camera?

I set out to learn.

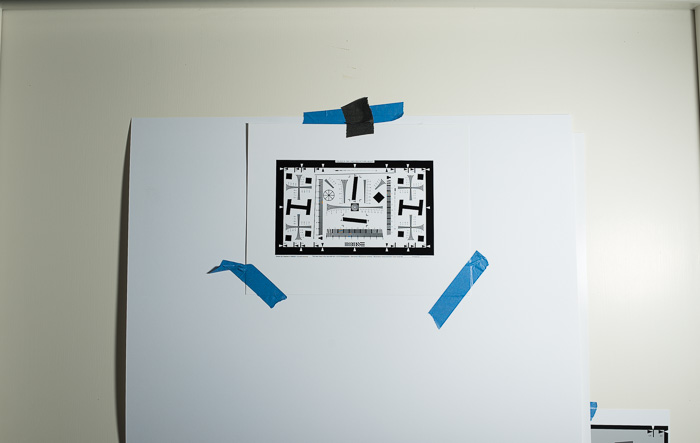
I put the sharpest lens I’ve got, the Zeiss 55mm f/1.4 Otus, If any lens can cause aliasing, this one will. I set up the ISO 12233 target and put the camera on a tripod so that the target’s vertical extent was 473 pixels — more on that later. I put a PC connector adapter in the hot shoe and connected a synch cord between that and a Paul Buff Einstein electronic flash. I set the color mode to 5500 K, and the output to 1 watt-second, giving me a flash duration of a bit more than 1/10,000 second.

I set the camera to mechanical shutter, single shot, self timer, and EFCS. ISO was 100. Shutter speed was 1/250. I made exposures at f/8, f/11. and f/16. I would have liked to use f/5.6, which is a sharper aperture on this lens, but the light was too bright. No matter; with these big pixels, I saw aliasing and false color even at f/16.

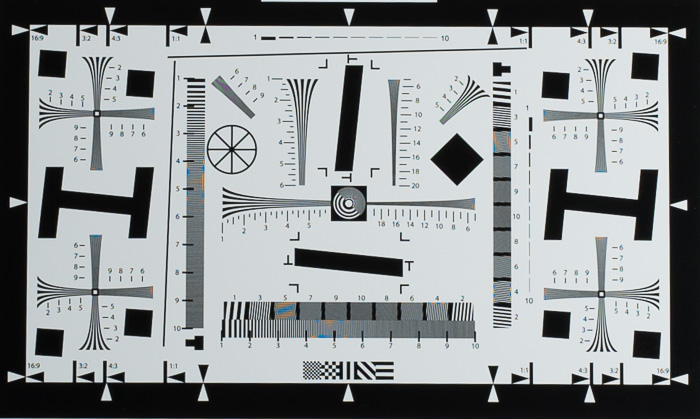
Here’s the whole image, at f/8:

_DSC3001-2

And just the target area:

_DSC3001

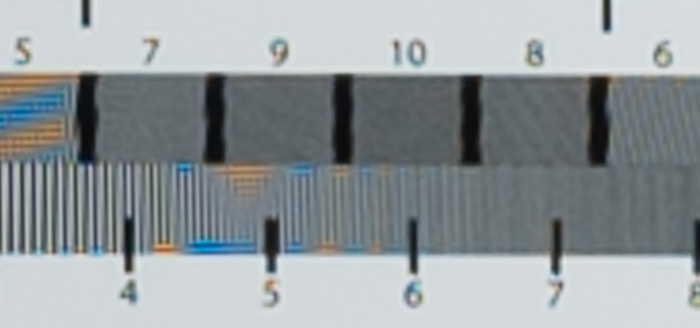
Now let’s look closely at some features. The cross at the upper right is instructive:

_DSC3001-3

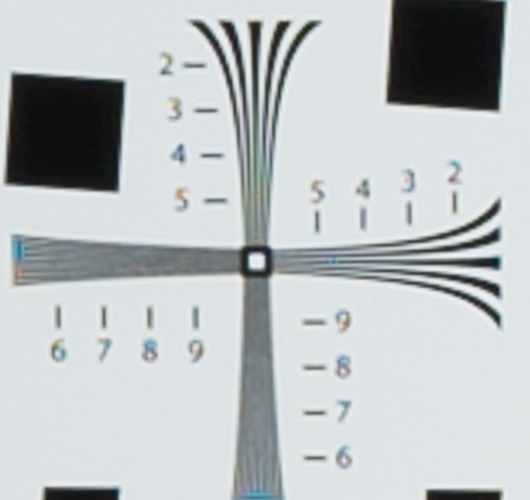
You can see that we get resolution, albeit at low contrast, until the place marked “7”. That means 700 lines per target height. Since the target is 473 pixels high, the point marked 7 is 700/473 = 1,47 lines/pixel; that’s above the Nyquist frequency, so the AA filter on the a7S isn’t super-strong.

You will also note that the vertical and the horizontal resolution are the same. Apparently the a7S’s AA filter operates equally  in both directions, unlike the one in the a7.

Note the spreading of the lines between the ends of the crosses and “6”. That’s aliasing; they should be converging. This is to be expected above the Nyquist frequency, which occurs near the points marked “5”.

You can also see some false color artifacts at 500 lines per target height. Those are actually fairly mild considering how fat the a7S’s pixels are.

The central area of the ISO 12233 target is prone to generating false color:

_DSC3001-5

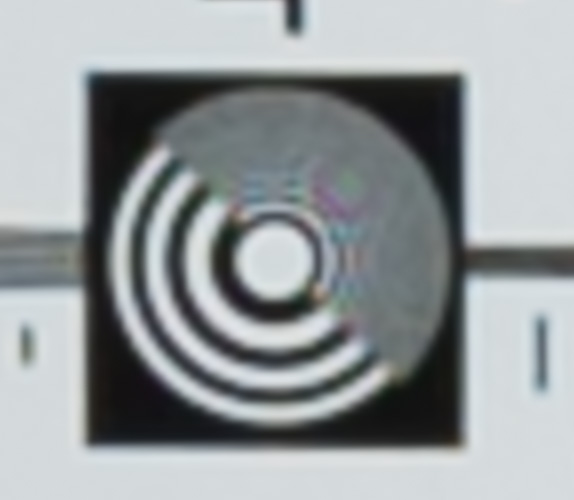
In this case, there’s not much of it.

There’a a strip across the bottom that often trips up Bayer sensors:

_DSC3001-4

The a7S is not immune,

All in all, I consider the a7S AA filter a good compromise.

The Last Word

← How fast is the Sony a7S silent shutter? Sony a7S handling →

Leave a Reply Cancel reply

Your email address will not be published. Required fields are marked *

May 2025
S M T W T F S
 123
45678910
11121314151617
18192021222324
25262728293031
« Apr    

Articles

  • About
    • Patents and papers about color
    • Who am I?
  • How to…
    • Backing up photographic images
    • How to change email providers
    • How to shoot slanted edge images for me
  • Lens screening testing
    • Equipment and Software
    • Examples
      • Bad and OK 200-600 at 600
      • Excellent 180-400 zoom
      • Fair 14-30mm zoom
      • Good 100-200 mm MF zoom
      • Good 100-400 zoom
      • Good 100mm lens on P1 P45+
      • Good 120mm MF lens
      • Good 18mm FF lens
      • Good 24-105 mm FF lens
      • Good 24-70 FF zoom
      • Good 35 mm FF lens
      • Good 35-70 MF lens
      • Good 60 mm lens on IQ3-100
      • Good 63 mm MF lens
      • Good 65 mm FF lens
      • Good 85 mm FF lens
      • Good and bad 25mm FF lenses
      • Good zoom at 24 mm
      • Marginal 18mm lens
      • Marginal 35mm FF lens
      • Mildly problematic 55 mm FF lens
      • OK 16-35mm zoom
      • OK 60mm lens on P1 P45+
      • OK Sony 600mm f/4
      • Pretty good 16-35 FF zoom
      • Pretty good 90mm FF lens
      • Problematic 400 mm FF lens
      • Tilted 20 mm f/1.8 FF lens
      • Tilted 30 mm MF lens
      • Tilted 50 mm FF lens
      • Two 15mm FF lenses
    • Found a problem – now what?
    • Goals for this test
    • Minimum target distances
      • MFT
      • APS-C
      • Full frame
      • Small medium format
    • Printable Siemens Star targets
    • Target size on sensor
      • MFT
      • APS-C
      • Full frame
      • Small medium format
    • Test instructions — postproduction
    • Test instructions — reading the images
    • Test instructions – capture
    • Theory of the test
    • What’s wrong with conventional lens screening?
  • Previsualization heresy
  • Privacy Policy
  • Recommended photographic web sites
  • Using in-camera histograms for ETTR
    • Acknowledgments
    • Why ETTR?
    • Normal in-camera histograms
    • Image processing for in-camera histograms
    • Making the in-camera histogram closely represent the raw histogram
    • Shortcuts to UniWB
    • Preparing for monitor-based UniWB
    • A one-step UniWB procedure
    • The math behind the one-step method
    • Iteration using Newton’s Method

Category List

Recent Comments

  • JimK on How Sensor Noise Scales with Exposure Time
  • Štěpán Kaňa on Calculating reach for wildlife photography
  • Štěpán Kaňa on How Sensor Noise Scales with Exposure Time
  • JimK on Calculating reach for wildlife photography
  • Geofrey on Calculating reach for wildlife photography
  • JimK on Calculating reach for wildlife photography
  • Geofrey on Calculating reach for wildlife photography
  • Javier Sanchez on The 16-Bit Fallacy: Why More Isn’t Always Better in Medium Format Cameras
  • Mike MacDonald on Your photograph looks like a painting?
  • Mike MacDonald on Your photograph looks like a painting?

Archives

Copyright © 2025 · Daily Dish Pro On Genesis Framework · WordPress · Log in

Unless otherwise noted, all images copyright Jim Kasson.