Introduction Black point subtraction is a critical but mostly invisible part of RAW file processing. When done correctly, it ensures that the darkest tones in your image are neutral and retain subtle detail. When it’s wrong, shadow tones can become visibly tinted, with green or magenta casts that are especially noticeable when shadows are lifted during editing. While Lightroom doesn’t offer direct control over per-channel black level subtraction, its Calibration panel—specifically the Shadows Tint control—can be used effectively to compensate for these errors.
What is Black Point Subtraction? In a digital image sensor, even “zero light” doesn’t correspond to a digital value of zero. There is always some baseline signal—read noise, bias, dark current—that must be subtracted to establish true black. This baseline is referred to as the “black level,” and it can differ slightly across the red, green, and blue channels. During RAW processing, the converter subtracts this black level before scaling and assigning color to the data.
Sources of Error Black point errors usually result from:
- Incorrect or ignored black level metadata in the RAW file
- Channel imbalances not fully compensated by the converter
- Firmware that clips or zeroes out low-end data in one or more channels
- RAW developers that assume uniform black levels or apply tone curves too early
When You’re Likely to See Problems The effects of black level error tend to surface when:
- Lifting deep shadows (e.g., +2 stops or more)
- Using linear or flat tone profiles
- Editing files from older or less-supported cameras
- Working with backlit or high dynamic range scenes
How Errors Manifest The most common visible symptom is a green or magenta tint in deep shadows. This happens when one color channel—often green—starts from a lower digital baseline than the others, and that offset is not corrected during RAW development. When tone curves are applied or shadows are brightened, the imbalance becomes visible.
What Lightroom’s Calibration Tool Does Lightroom’s Calibration panel includes a “Shadows: Tint” slider that allows adjustment of the green/magenta balance in the shadow regions. It was originally intended for fine-tuning camera profile response, but it can also act as a workaround for per-channel black level imbalances—essentially allowing you to visually rebalance the shadows.
How to Use It to Correct Black Point Errors
- Select an image that shows visible color tinting in the shadows, especially after lifting blacks or shadows.
- Go to the Develop module and scroll to the Calibration
- Use the Shadows: Tint slider to neutralize the cast:
- Move it toward Magenta if shadows appear too green
- Move it toward Green if shadows appear too magenta
- Watch neutral areas in the shadow region (e.g., pavement, gray fabric, walls) while adjusting.
- Subtle adjustments (+/- 10 to 40) are often enough to balance the channels visually.
Conclusion While Lightroom does not give you direct control over sensor-level black level subtraction, the Calibration panel—particularly the Shadows Tint control—offers a practical and effective tool for compensating visually for black point imbalances. If you’ve ever seen unexplained color casts in your shadows, especially with older or unusual cameras, this may be the fix you’ve been looking for.
Example. Here’s an image with a lot of dynamic range, taken with the Leica M240, a camera that subtracts the black point before it writes the raw file, and does it wrong:
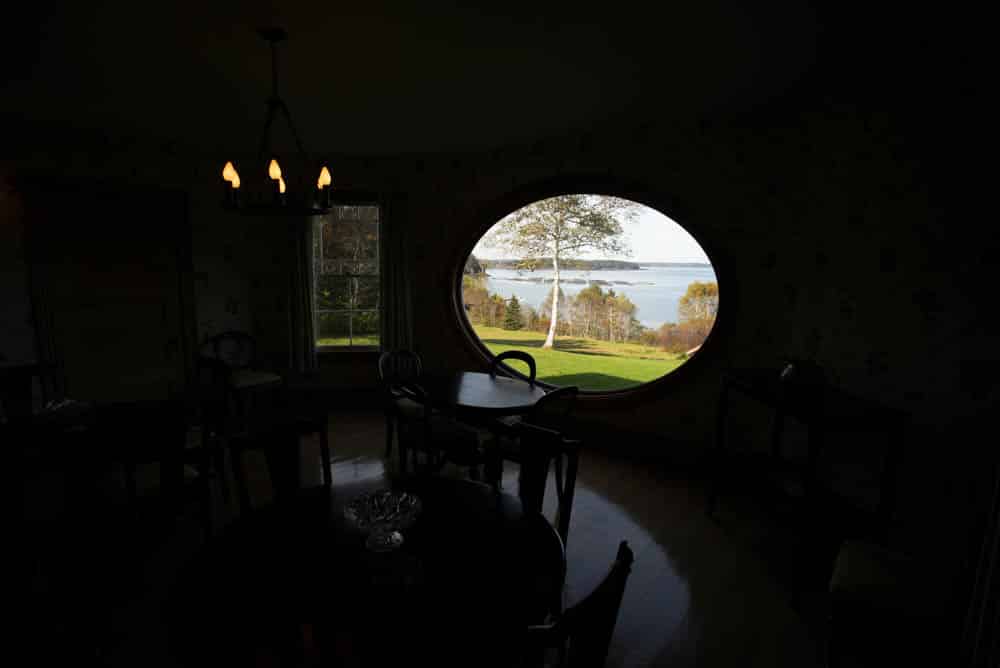
Here’s that image with a heroic shadow lift. Note the green shadows.
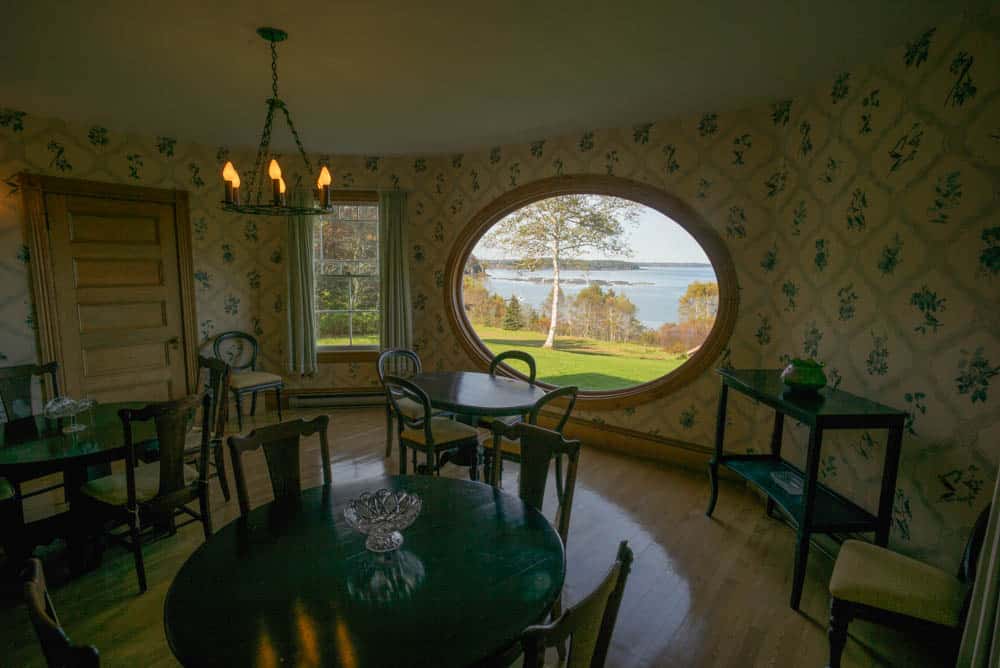
Here’s that image with a correction to the shadows performed using the Lightroom calibration panel.
The color of the highlights is somewhat affected, but most of the change is in the shadows.
Leave a Reply