• site home
  • blog home
  • galleries
  • contact
  • underwater
  • the bleeding edge

the last word

Photography meets digital computer technology. Photography wins -- most of the time.

You are here: Home / The Last Word / Shutter slap testing with ISO 12233, part 2

Shutter slap testing with ISO 12233, part 2

January 3, 2014 JimK Leave a Comment

Let’s take a break from the simulations to look at some real pictures. I got a 77mm Heliopan ND 0.3 to ND 1.8 variable neutral density filter and some adapter rings. I screwed the 49/77mm ring onto the Sony/Zeiss 55mm f/1.8 Sonnar FE and aimed it at the ISO 12233 target, which ended up being a bit smaller in the frame than it was with the 58mm f/1.4 Nikkor of a couple of posts back. I used a RRS TVC-34L Versa Series 3 tripod with an Arca Swiss Cube head and a generic RRS plate directly attached to the a7R.

Here’s the whole image:

_DSC3087

I made some series at the same f-stop and shutter speeds from 1/500 to 1/15. Here’s how I did it.

  1. I set the filter for minimum absorption
  2. I opened the lens to f/1.8.
  3. I focused manually
  4. I set the exposure mode to A
  5. I set the f-stop to the desired f-stop
  6. I set the ISO so that the shutter speed read 1/500
  7. I made an exposure with a 2-second self-timer delay
  8. I set the filter so that the shutter speed got 1/3 stop longer
  9. If the shutter speed was faster than 1/15 second, I went to step 7

As an aside, it was much easier to focus the 55mm FE by wire than the 58mm Nikkor with a mechanical connection.

I brought the raw files into Lightroom, made no adjustments from the Adobe defaults, and exported them as layers to Photoshop. That got me a 16-layer file. I labeled the layers by shutter speed so I wouldn’t’ get confused. I added a white-balance-correcting  adjustment layer on top. Then I pixel-peeked.

Here’s what I found for the series at f/5.6 with ISO 2000 in open shade on a cloudy day (I’d have liked it brighter):

  • 1/500 is the sharpest shutter speed.
  • 1/400 is the next best, equaling 1/500 in the sharpness of horizontal lines, but falling behind in the sharpness of vertical lines.
  • 1/320 is about the same as 1/400
  • At 1/250 we start to see some softening of horizontal lines, and a little bit more in the verticals.
  • 1/200 shows similar degradation over 1/250 as 1/250 did over 1/320.
  • 1/160 is about the same for horizontal lines but a hair worse for verticals.
  • 1/125 is about the same for horizontals but worse in the verticals.
  • 1/100 is about the same for horizontals but worse in the verticals.
  • 1/80 is about the same for vertical but worse in the horizontals.
  • 1/60 is about the same for horizontals but better in the verticals.
  • 1/50 is about the marginally better in the horizontals but marginally worse in the verticals.
  • 1/40 is about the same in the horizontals but marginally better in the verticals.
  • 1/30 is a little better in both
  • 1/25 is a little better in both
  • 1/20 is a maybe a tad better in both
  • 1/15 is a just a tiny bit better in both, giving about the same sharpness as 1/200.

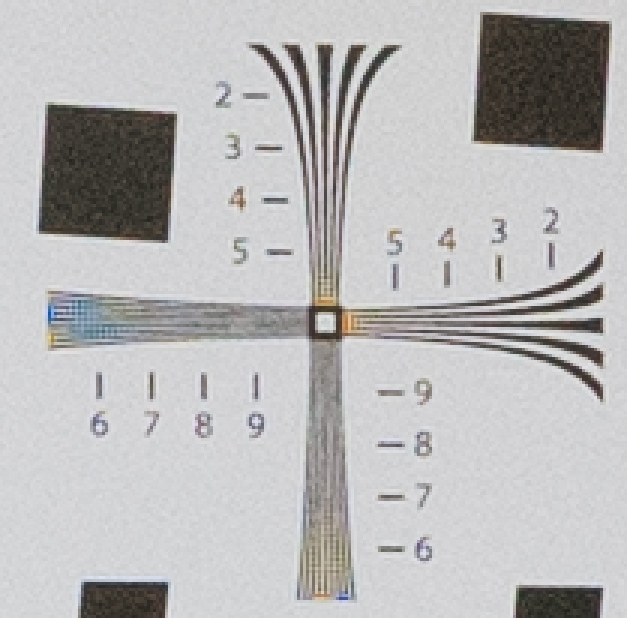
I’m not going to post 16 jpegs that are nearly all alike, so here’s the best (1/500), blown up 3x with nearest neighbor:

f56 500th 55mm cr

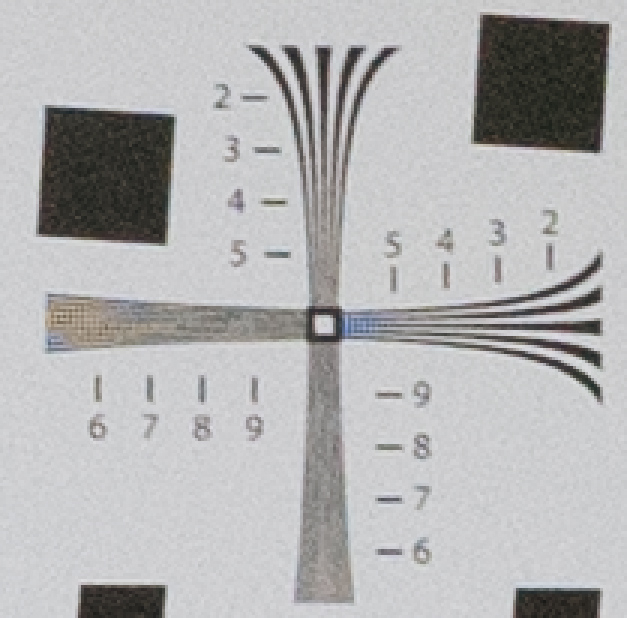
And the worst (1/80):

f56 80th 55mm cr

You will note that the differences aren’t all that striking, and that they’re mostly in the vertical lines, although the shutter is moving parallel to those lines. I’m thinking that’s because the tripod is stiffer up and down than side to side, and expect when we look at pictures of the ISO 12233 target with the camera in portrait mode, we’ll see nearly all the motion parallel to the ground, as the shutter will be moving in the direction to which the tripod has the least resistance.

If anyone want to see the Photoshop file with all the layers, contact me (menu item at the top of the right-hand column) and I’ll oblige.

Future work will involve making images in bright light for greater resolution, and, if I can, making high-shutter-speed images with the filter set to 5-stop differential absorption to make sure it’s not degrading sharpness itself.

The Last Word

← Shutter slap simulation with ISO 12233, part 2 Shutter slap testing with ISO 12233, part 3 →

Leave a Reply Cancel reply

Your email address will not be published. Required fields are marked *

June 2025
S M T W T F S
1234567
891011121314
15161718192021
22232425262728
2930  
« May    

Articles

  • About
    • Patents and papers about color
    • Who am I?
  • How to…
    • Backing up photographic images
    • How to change email providers
    • How to shoot slanted edge images for me
  • Lens screening testing
    • Equipment and Software
    • Examples
      • Bad and OK 200-600 at 600
      • Excellent 180-400 zoom
      • Fair 14-30mm zoom
      • Good 100-200 mm MF zoom
      • Good 100-400 zoom
      • Good 100mm lens on P1 P45+
      • Good 120mm MF lens
      • Good 18mm FF lens
      • Good 24-105 mm FF lens
      • Good 24-70 FF zoom
      • Good 35 mm FF lens
      • Good 35-70 MF lens
      • Good 60 mm lens on IQ3-100
      • Good 63 mm MF lens
      • Good 65 mm FF lens
      • Good 85 mm FF lens
      • Good and bad 25mm FF lenses
      • Good zoom at 24 mm
      • Marginal 18mm lens
      • Marginal 35mm FF lens
      • Mildly problematic 55 mm FF lens
      • OK 16-35mm zoom
      • OK 60mm lens on P1 P45+
      • OK Sony 600mm f/4
      • Pretty good 16-35 FF zoom
      • Pretty good 90mm FF lens
      • Problematic 400 mm FF lens
      • Tilted 20 mm f/1.8 FF lens
      • Tilted 30 mm MF lens
      • Tilted 50 mm FF lens
      • Two 15mm FF lenses
    • Found a problem – now what?
    • Goals for this test
    • Minimum target distances
      • MFT
      • APS-C
      • Full frame
      • Small medium format
    • Printable Siemens Star targets
    • Target size on sensor
      • MFT
      • APS-C
      • Full frame
      • Small medium format
    • Test instructions — postproduction
    • Test instructions — reading the images
    • Test instructions – capture
    • Theory of the test
    • What’s wrong with conventional lens screening?
  • Previsualization heresy
  • Privacy Policy
  • Recommended photographic web sites
  • Using in-camera histograms for ETTR
    • Acknowledgments
    • Why ETTR?
    • Normal in-camera histograms
    • Image processing for in-camera histograms
    • Making the in-camera histogram closely represent the raw histogram
    • Shortcuts to UniWB
    • Preparing for monitor-based UniWB
    • A one-step UniWB procedure
    • The math behind the one-step method
    • Iteration using Newton’s Method

Category List

Recent Comments

  • JimK on Sony 135 STF on GFX-50R, bokeh visuals
  • Manu on Sony 135 STF on GFX-50R, bokeh visuals
  • John Griffin on The 16-Bit Fallacy: Why More Isn’t Always Better in Medium Format Cameras
  • JimK on How Sensor Noise Scales with Exposure Time
  • Štěpán Kaňa on Calculating reach for wildlife photography
  • Štěpán Kaňa on How Sensor Noise Scales with Exposure Time
  • JimK on Calculating reach for wildlife photography
  • Geofrey on Calculating reach for wildlife photography
  • JimK on Calculating reach for wildlife photography
  • Geofrey on Calculating reach for wildlife photography

Archives

Copyright © 2025 · Daily Dish Pro On Genesis Framework · WordPress · Log in

Unless otherwise noted, all images copyright Jim Kasson.