This is one in a series of posts on the Sony alpha 7 R Mark IV (aka a7RIV). You should be able to find all the posts about that camera in the Category List on the right sidebar, below the Articles widget. There’s a drop-down menu there that you can use to get to all the posts in this series; just look for “A7RIV”.
So far, I’ve tested the Sony a7RIV IBIS system with 135 mm and 85 mm optically stabilized lenses, and with a 180 mm unstabilized one. There has been some interest in shorter focal lengths, and in this post I’ll show you what happens with a Sony/Zeiss (Zony) Distagon 35 mm f/1.4 on the camera.
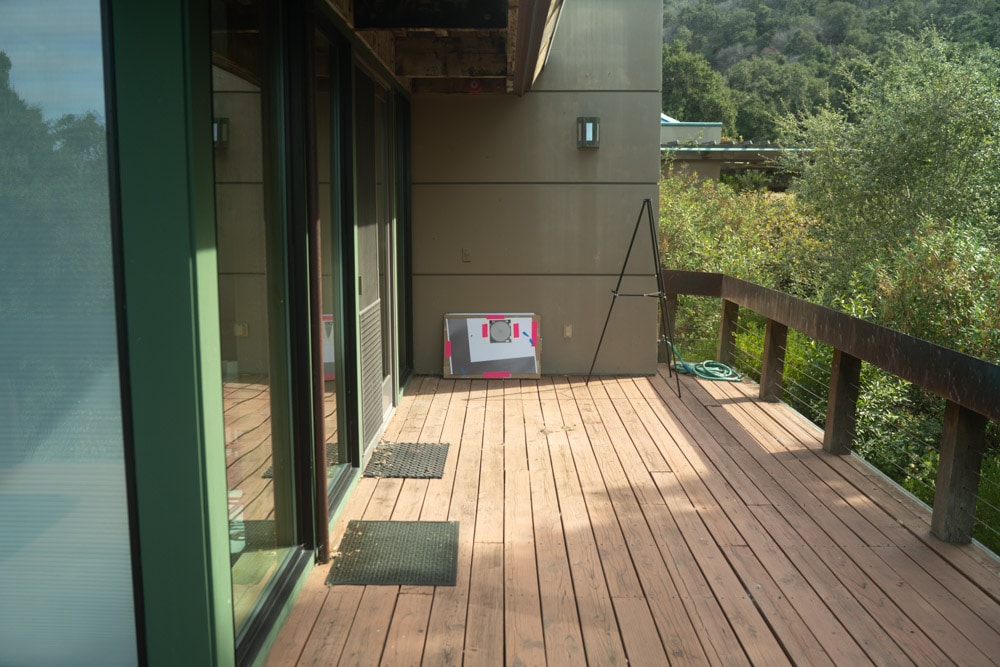
The shooting position is an important component of the absolute numbers in this test. I stood, stabilizing my body by leaning back against a railing. This is what the camera saw:
I used the following test conditions:
- AF-C
- Flexible spot
- Medium spot size
- Continuous low drive mode
- Electronic shutter
- Lossless compressed Raw
- ISO 100
- f/4
- Exposure mode A, center weighting
- Heliopan 77 mm variable neutral-density filter
- 72/77 mm step up ring
With IBIS on, I set the ND filter to a stop from minimum attenuation, which gave me a shutter speed of about 1/200 second. I made about 25 continuous-drive exposures, turned the ND filter down about a stop, and did it again. I kept on doing that until 1/3second, then turned IBIS off and ran the series again, this time setting the filter to minimum at the beginning, and stopping at .
I ended up with about 300 images. I developed them in Lightroom, with default settings except for the following:
- White balance to grey below the horizontal slanted edge
- Adobe monochrome profile
- Sharpening turned off
- Noise reduction turned off
Using my automatic registration program, I adjusted the cropping in Lightroom for each image so that they were centered. I computed the MTF50 — a proxy for sharpness — for all the images with Imatest with the region of interest being a horizontal edge (Just to make sure, I also looked at vertical edges, with about the same results, but those data aren’t presented here). Imatest spit out the data in cycles per pixel. With my new Matlab code, I converted that to cycles per picture height. For the statistics calculations, I removed outliers, which I defined as points more than two standard deviations away from the mean after conversion of the MTF50 samples with a logarithmic nonlinearity.
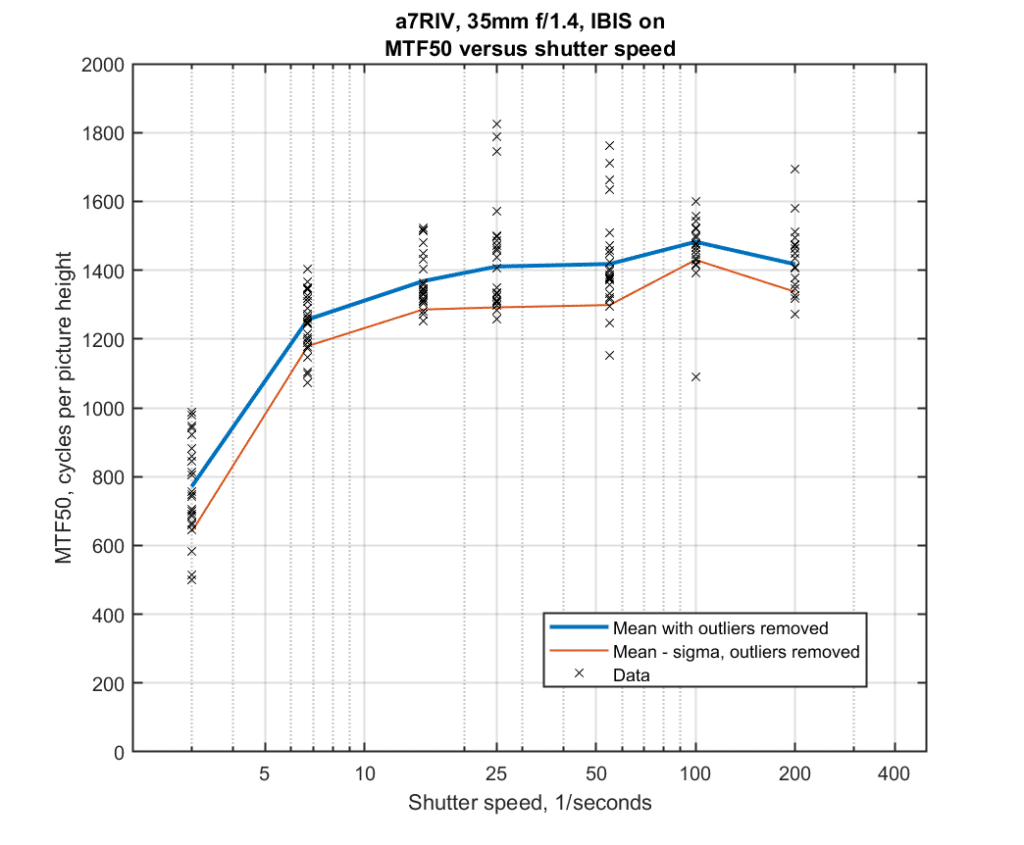
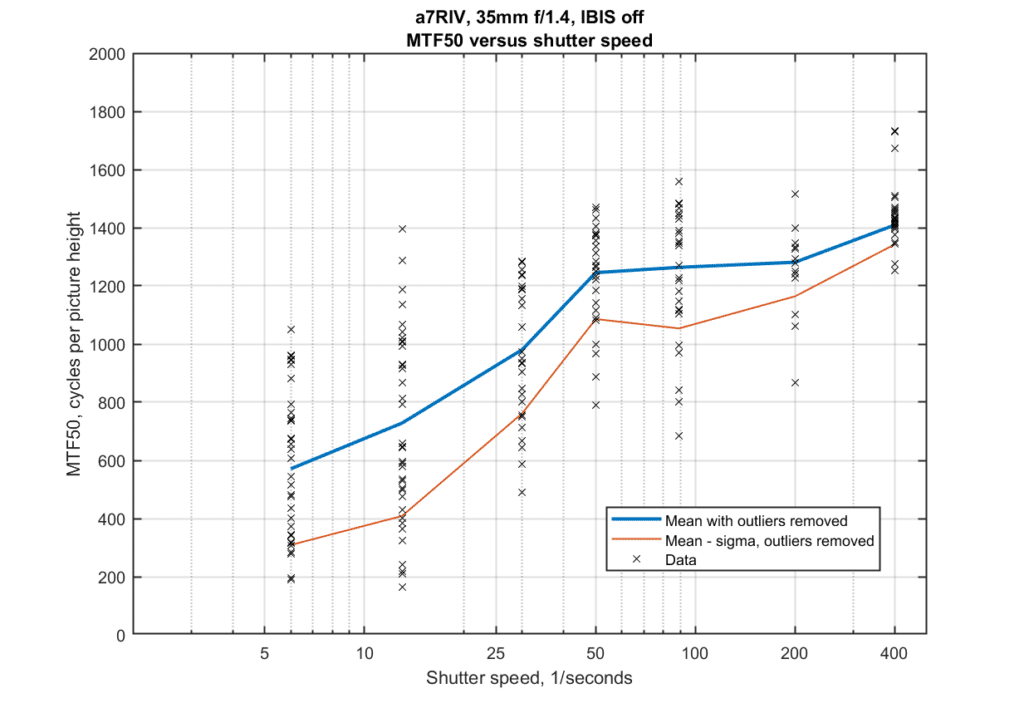
The vertical axis is the MTF50 in cycles per picture height. The horizontal axis is the denominator of the shutter speed — 1/100 second is plotted as 100. The heavy lines are the mean (aka mu, aka average) values. The thinner lines are the mean minus the standard deviation (aka sigma). The black x’s are the individual exposures, including the outliers removed from the data set used for the statistical calculations. Image quality is good down to 1/8 second.
I wouldn’t want to use shutter speeds of shorter than 1/50 second without IBIS.
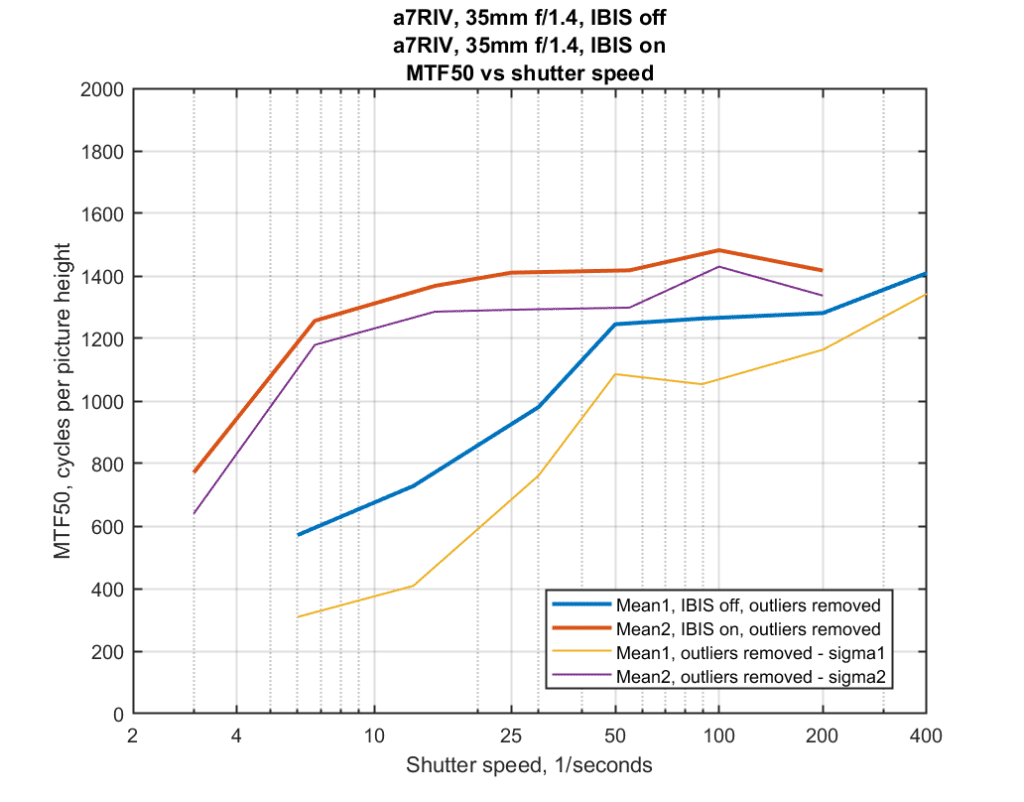
Looking at the statistics for both runs on the same graph:
The IBIS cases have at least a three stop advantage, and maybe four.


CarVac says
One thing I’ve been curious about is whether IBIS is fully effective at the image periphery of wide angle lenses. Could you test that?
JimK says
It cannot be fully effective in the center and the corners at the same time.
Den says
Just curious – so the 50mm at 1/16 is safe with IBIS. If I use this lens in crop mode (75mm) would I need to be at 1/25 ?
JimK says
To convert the full frame MTF50 plots to APS-C, divide all the numbers on the vertical axis by 1.5. The shape of the curve won’t change.
David Braddon-Mitchell says
Can you expand on your comment about centre and corners? Some people I think of as usually reliable claim that IBIS seems to make things worse rather than better at the periphery of wide lenses. Do you just mean that you expect improvement everywhere, but less at the periphery.
George says
You indicate “Lossless compressed Raw” as a test condition. Is this correct? My undestanding is that A7RIV does not have a lossless compression option for RAW files. It only has uncompressed or lossy-compressed RAW.
JimK says
That was the case with some earlier a7 cameras, but not with the a7RIV.
George says
Sony Support have confirmed that compressed RAW on the A7RIV is in fact lossy. The A7RV does have options for lossless compressed RAW, explicitly termed as such.
As you have said elsewhere, their usual documentation is opaque on such details.
JimK says
Thank you. I no longer use Sony cameras, and my memory about when lossless compressed raw showed up could easily be faulty. Lossy compression wouldn’t affect these test results, but at this point I can’t reconstruct which compression I used.