• site home
  • blog home
  • galleries
  • contact
  • underwater
  • the bleeding edge

the last word

Photography meets digital computer technology. Photography wins -- most of the time.

You are here: Home / a9 / Sony a9 has an AA filter

Sony a9 has an AA filter

April 4, 2018 JimK 8 Comments

Last week, I wrote this post with some surprising news: the Sony a9 has no antialiasing (AA) filter. I was flabbergasted. Turns out, I was wrong. The a9 has a perfectly normal two-way (4-stop) AA filter.

So there’s no real news here. Everybody thought the a9 had an AA filter before I shot off my mouth last week, and everybody was right. But I need to eat some humble pie. I’m going to explain to you how I went so wrong, what I should have done to double-check, and how I know I’m right now.

If you go back to the mistaken post, you’ll see the first thing I did was run a visual test with a Siemens Star. I was looking for a lack of radial symmetry since I was looking for an asymmetric AA filter. When I saw a symmetric result, I knew that either there was no AA filter, or that it was right/left, top/bottom symmetric.

I then looked at the modulation transfer function in both right/left and top/bottom directions. For that, I used a portion of Imatest that I’d never used before, one that plotted all four raw channels on a single graph:

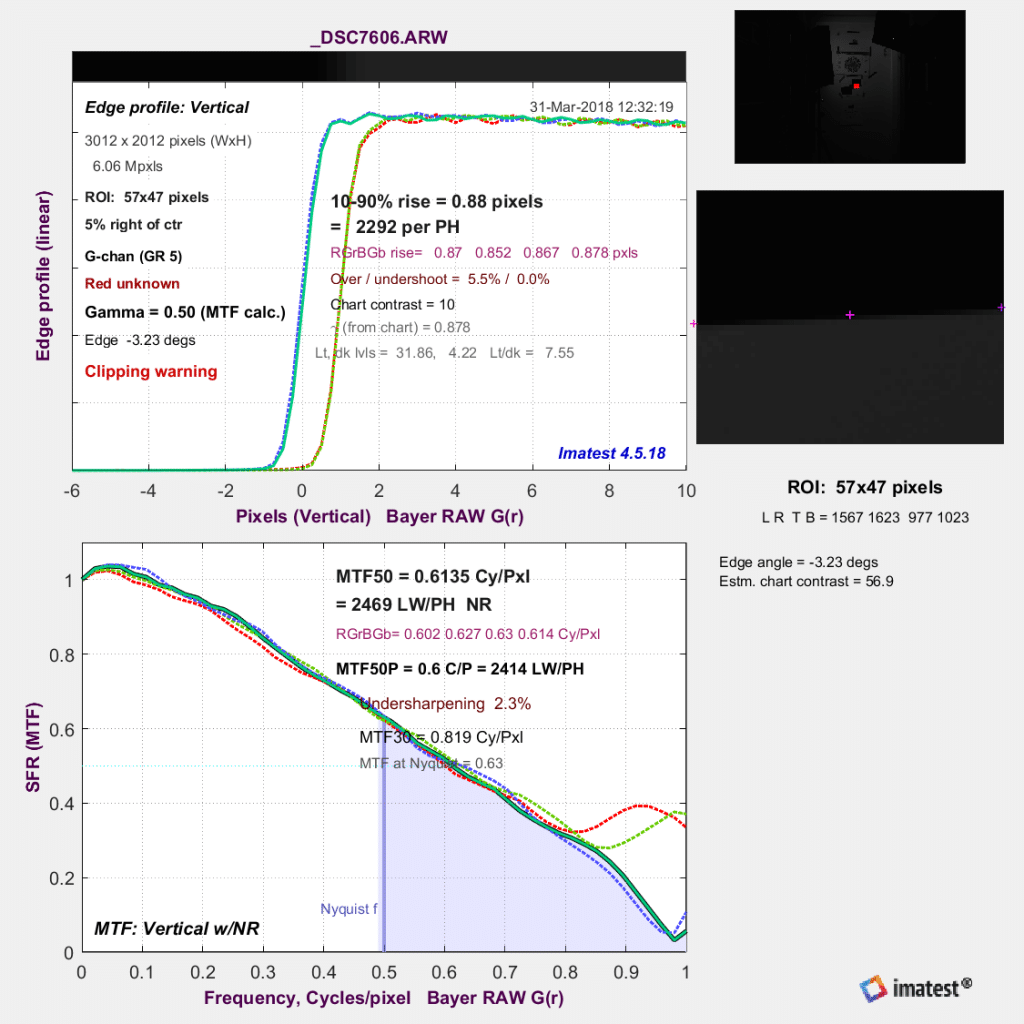
I saw the surprising strength of the MTF at Nyquist, and noted the absence of the zero between 0.6 and 0.7 cycles/pixel, and said that there can’t be an AA filter.

But I was wrong, and I was wrong because I interpreted the graph incorrectly. It turns out that Imatest, when plotting the raw channels, for the purpose of the frequency calculations, considers a pixel to be a pixel in each on the raw channel images, not a pixel in the mosaiced image. Since each raw channel has a quarter of the number of pixels as the mosaiced image (half the resolution), then the point labled 0.5 cy/px on the above graph is 0.25 cy/px if you consider the entire mosacied image. I find this a little odd, but I want to emphasize that it represents a completely legitimate way of interpreting the situation, just not the way that I’d choose. I can’t blame Imatest for my screw-up.

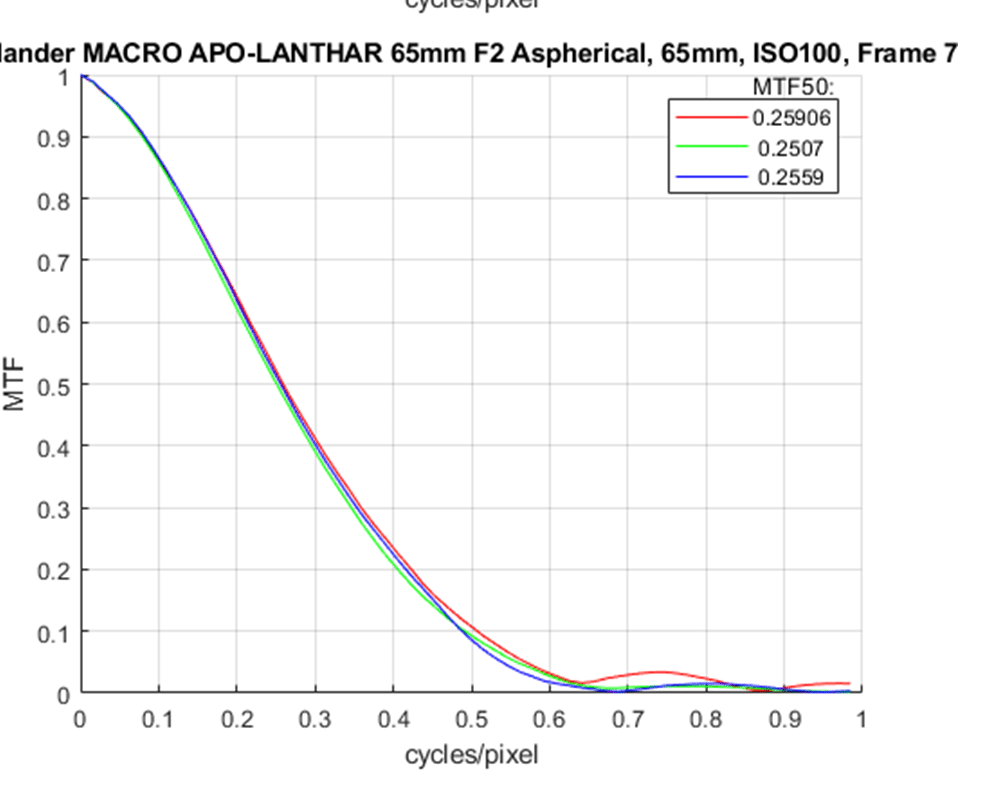
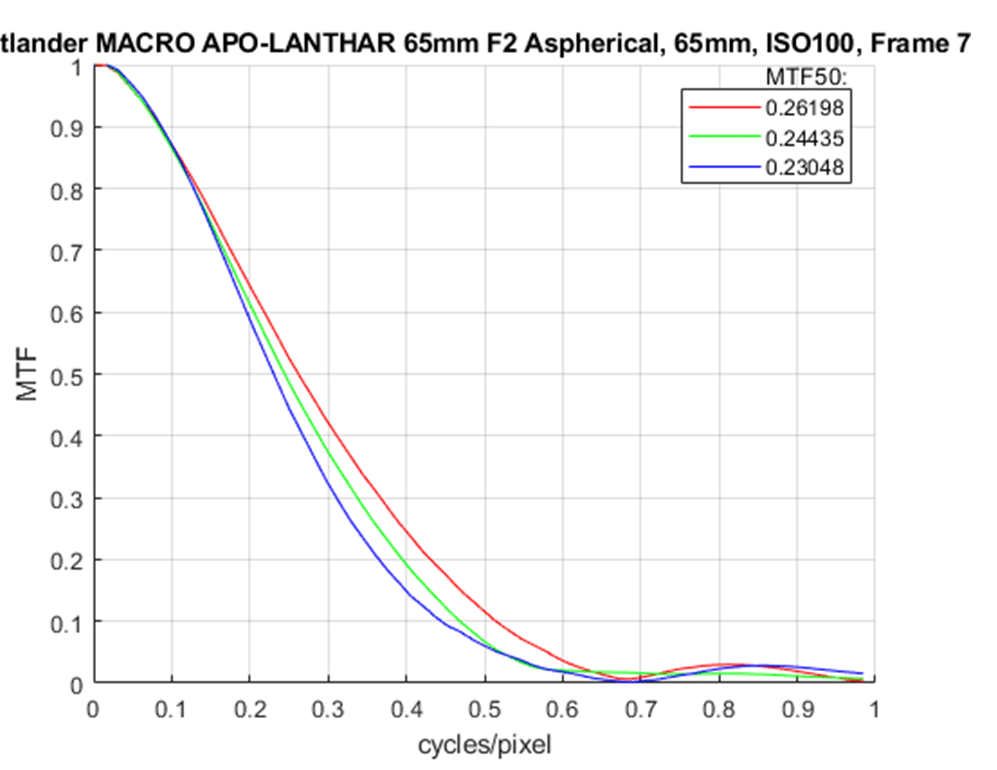
How did I come to discover my error? Yesterday, I got an email from my sometime collaborator, Jack Hogan. He said that he had looked at the DPR studio image for the a9, and it looked to him that it had a normal 4-spot AA filter. After some backing and forthing, I sent him a sample raw. He analysed it with MTFMapper, and produced these plots.

Vertical edge, horizontal MTF


Horizontal edge, vertical MTF

I then realized what had happened with my interpretation of the Imatest results, and checked by looking at an Imatest plot of a dcraw-demosaiced image:

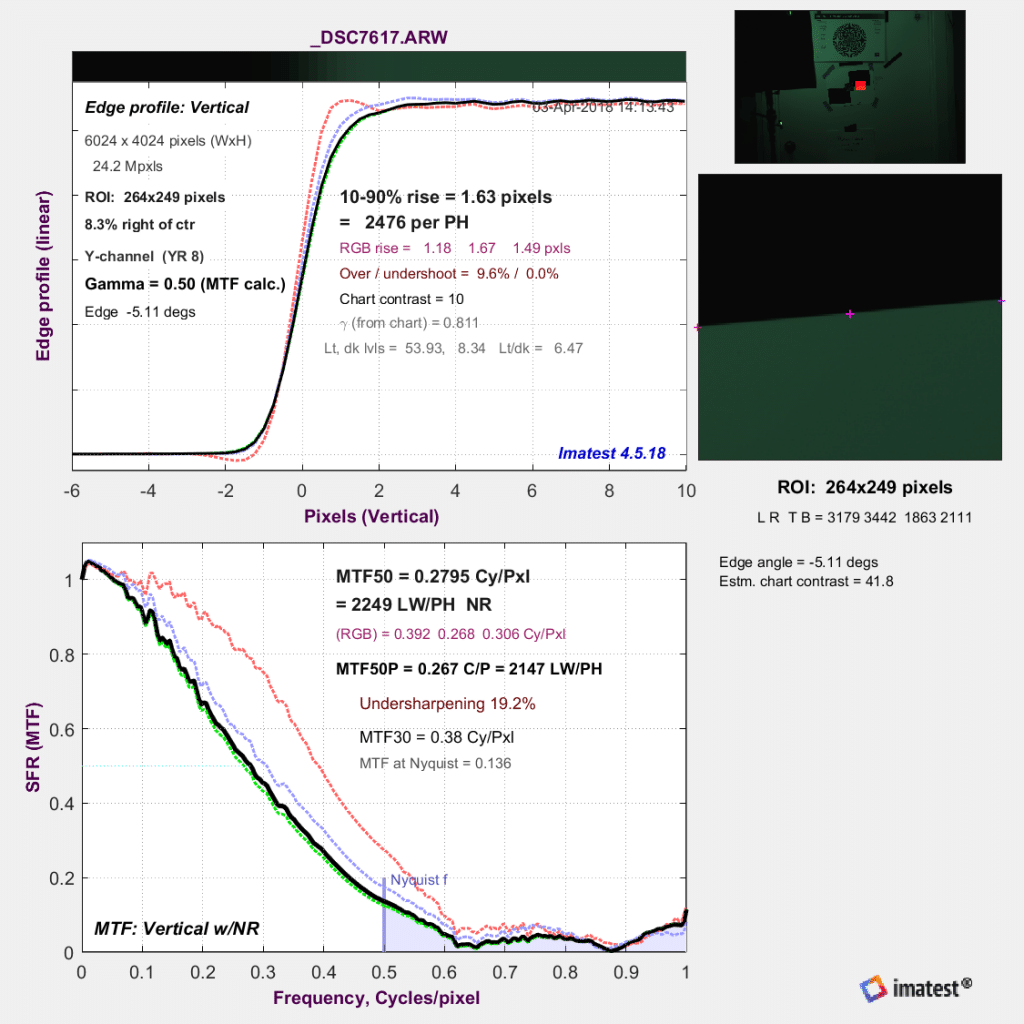
Now we see the expected result.

Lessons learned:

  • If I’m going to use a new tool for a test, be sure to cross-check the results with another tool.
  • Compare the camera in question with one known to have an A filter. (Unfortunately, I’ve sold all those off.)
  • As Carl Sagan said, “Extraordinary claims require extraordinary evidence”. I should have done more checking.
  • Thank goodness for Internet collaboration.
  • And thanks for, and to, Jack Hogan.


a9

← Speeding up a web site Sony a7III raw filtering →

Comments

  1. Brandon Dube says

    April 4, 2018 at 11:45 pm

    Any idea why the demosaicing so strongly accentuates the red channel? +20% MTF at 0.3cy/px is a huge boost…

    Reply
    • JimK says

      April 5, 2018 at 6:39 am

      I wondered that myself…

      Reply
  2. Tiny Tim says

    April 9, 2018 at 9:46 pm

    This site has more irrelevant BS ostensibly concerning photography than any I’ve run into to date. It’s almost as bad as the photobaters at dpreview who enjoy just about anything to do with photography other then taking photos.

    Reply
    • JimK says

      April 10, 2018 at 6:49 am

      Nobody’s making you read it, Tim.

      Maybe this is more to your taste:

      http://www.kasson.com/gallery/

      Reply
    • Arthur says

      April 11, 2018 at 9:38 am

      Let’s see your product Tiny and let us judge what is and isn’t — ” irrelevant BS”

      Reply
  3. pimuk rakkanam says

    April 27, 2018 at 11:28 pm

    Um, someone hasn’t seen the whole elephant.

    Reply
    • JimK says

      April 28, 2018 at 9:22 am

      What do you mean by that? I know the parable, but don’t get the connection.

      Reply

Trackbacks

  1. Sony a9 has no AA filter says:
    April 4, 2018 at 10:26 am

    […] post is completely wrong! For the real story, look here. I’ll leave it up for a few more weeks for context, but then it’s coming […]

    Reply

Leave a Reply Cancel reply

Your email address will not be published. Required fields are marked *

May 2025
S M T W T F S
 123
45678910
11121314151617
18192021222324
25262728293031
« Apr    

Articles

  • About
    • Patents and papers about color
    • Who am I?
  • How to…
    • Backing up photographic images
    • How to change email providers
    • How to shoot slanted edge images for me
  • Lens screening testing
    • Equipment and Software
    • Examples
      • Bad and OK 200-600 at 600
      • Excellent 180-400 zoom
      • Fair 14-30mm zoom
      • Good 100-200 mm MF zoom
      • Good 100-400 zoom
      • Good 100mm lens on P1 P45+
      • Good 120mm MF lens
      • Good 18mm FF lens
      • Good 24-105 mm FF lens
      • Good 24-70 FF zoom
      • Good 35 mm FF lens
      • Good 35-70 MF lens
      • Good 60 mm lens on IQ3-100
      • Good 63 mm MF lens
      • Good 65 mm FF lens
      • Good 85 mm FF lens
      • Good and bad 25mm FF lenses
      • Good zoom at 24 mm
      • Marginal 18mm lens
      • Marginal 35mm FF lens
      • Mildly problematic 55 mm FF lens
      • OK 16-35mm zoom
      • OK 60mm lens on P1 P45+
      • OK Sony 600mm f/4
      • Pretty good 16-35 FF zoom
      • Pretty good 90mm FF lens
      • Problematic 400 mm FF lens
      • Tilted 20 mm f/1.8 FF lens
      • Tilted 30 mm MF lens
      • Tilted 50 mm FF lens
      • Two 15mm FF lenses
    • Found a problem – now what?
    • Goals for this test
    • Minimum target distances
      • MFT
      • APS-C
      • Full frame
      • Small medium format
    • Printable Siemens Star targets
    • Target size on sensor
      • MFT
      • APS-C
      • Full frame
      • Small medium format
    • Test instructions — postproduction
    • Test instructions — reading the images
    • Test instructions – capture
    • Theory of the test
    • What’s wrong with conventional lens screening?
  • Previsualization heresy
  • Privacy Policy
  • Recommended photographic web sites
  • Using in-camera histograms for ETTR
    • Acknowledgments
    • Why ETTR?
    • Normal in-camera histograms
    • Image processing for in-camera histograms
    • Making the in-camera histogram closely represent the raw histogram
    • Shortcuts to UniWB
    • Preparing for monitor-based UniWB
    • A one-step UniWB procedure
    • The math behind the one-step method
    • Iteration using Newton’s Method

Category List

Recent Comments

  • JimK on How Sensor Noise Scales with Exposure Time
  • Štěpán Kaňa on Calculating reach for wildlife photography
  • Štěpán Kaňa on How Sensor Noise Scales with Exposure Time
  • JimK on Calculating reach for wildlife photography
  • Geofrey on Calculating reach for wildlife photography
  • JimK on Calculating reach for wildlife photography
  • Geofrey on Calculating reach for wildlife photography
  • Javier Sanchez on The 16-Bit Fallacy: Why More Isn’t Always Better in Medium Format Cameras
  • Mike MacDonald on Your photograph looks like a painting?
  • Mike MacDonald on Your photograph looks like a painting?

Archives

Copyright © 2025 · Daily Dish Pro On Genesis Framework · WordPress · Log in

Unless otherwise noted, all images copyright Jim Kasson.