• site home
  • blog home
  • galleries
  • contact
  • underwater
  • the bleeding edge

the last word

Photography meets digital computer technology. Photography wins -- most of the time.

You are here: Home / GFX 100 / Fuji GFX 100 dark-field pattern noise

Fuji GFX 100 dark-field pattern noise

August 4, 2019 JimK 4 Comments

This is one in a series of posts on the Fujifilm GFX 100. You should be able to find all the posts about that camera in the Category List on the right sidebar, below the Articles widget. There’s a drop-down menu there that you can use to get to all the posts in this series; just look for “GFX 100”.

In the previous post I showed an analysis of frame-to-frame-invariant pattern noise that is almost certainly related to the GFX 100’s on-sensor phase-detection autofocus (OSPDAF) system. I used base-ISO captures near sensor clipping. Now I’d like to do the same sort of analysis for dark-field images, using the random read noise to probe the camera’s systematic pattern noise. I set the ISO to 1000, the shutter speed to 1/1000, and made 128 exposures in 14-bit raw precision with the electronic shutter (ES).

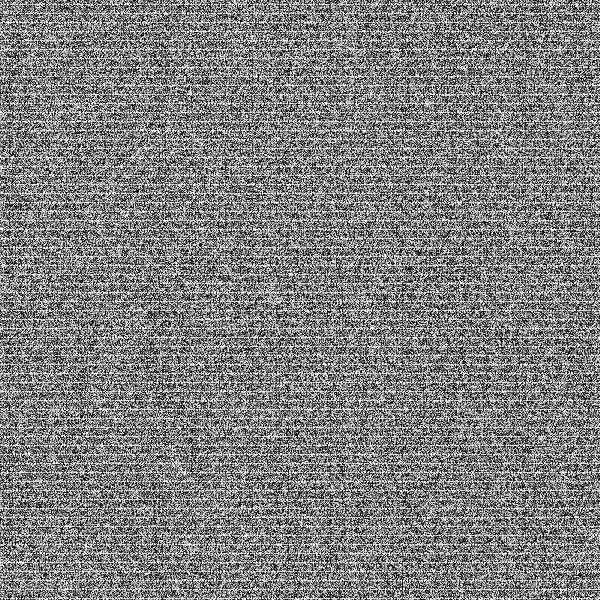
I looked at the spectra of 600×600-pixel crops of all four raw planes. Here’s the first green plane:

G1

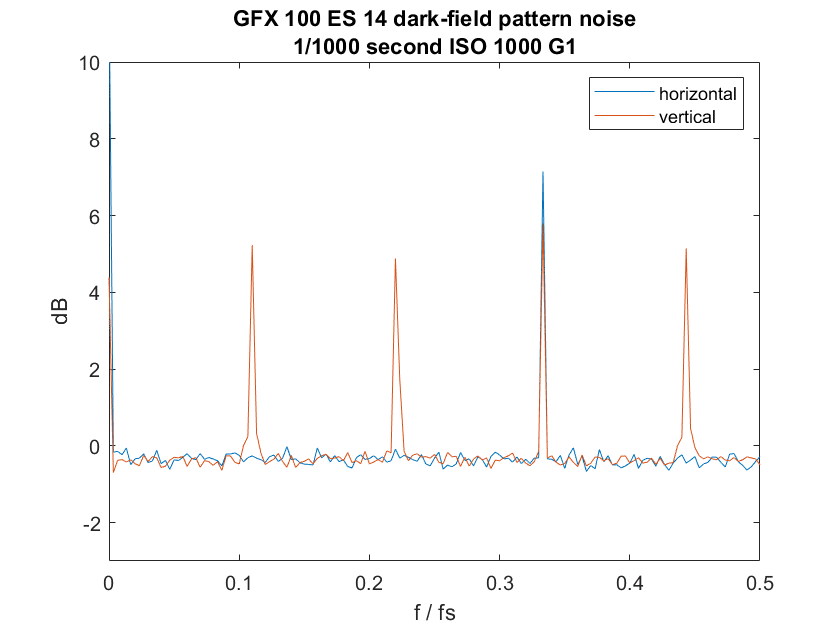
fs is the camera’s sampling frequency (two over the pixel pitch, which is 3.76 micrometers (um). It’s not one over the pixel pitch because each raw plane samples at twice the total pitch).  Note the spikes. As with the light-field test in the previous post, there is a horizontal-direction spike at 1/3 the sampling frequency, or every 6 pixels in the mosaiced raw file. That spike indicated vertically-oriented artifacts. There are vertical-direction spikes at a bit under 1/2 fs, 1/3 fs, a bit under 1/4 fs, and 1/9 fs. The last one indicates a horizontally-oriented artifact ever 18 rows in the mosaiced raw file.

The periodic artifacts in that graph look similar to, but smaller than, the ones we saw in the light-field tests. But the other channels don’t follow that trend.

B

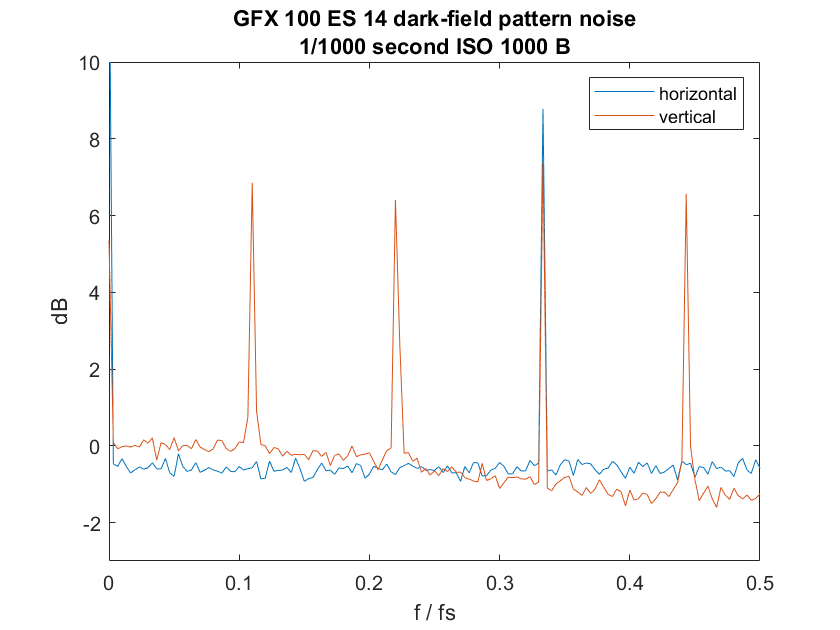
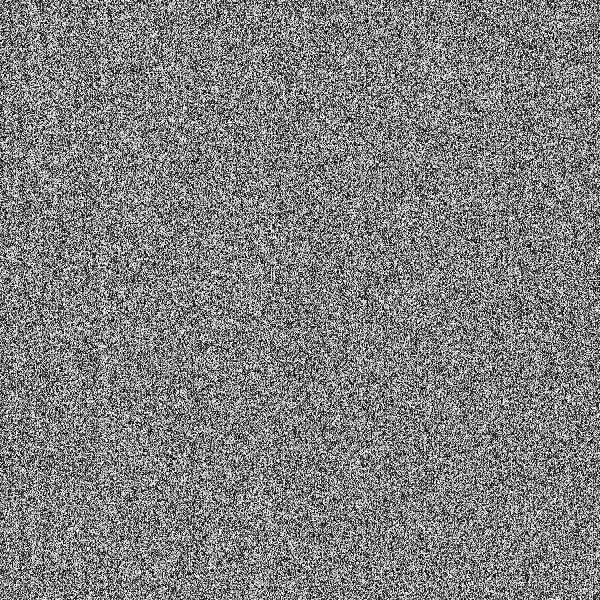
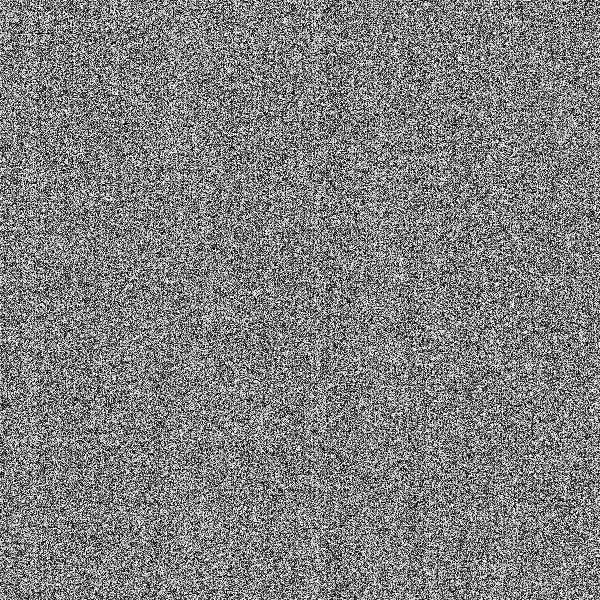
There is quite a bit of periodic noise in the blue channel, even though the light-field image of that channel was pretty clean.

R


G2

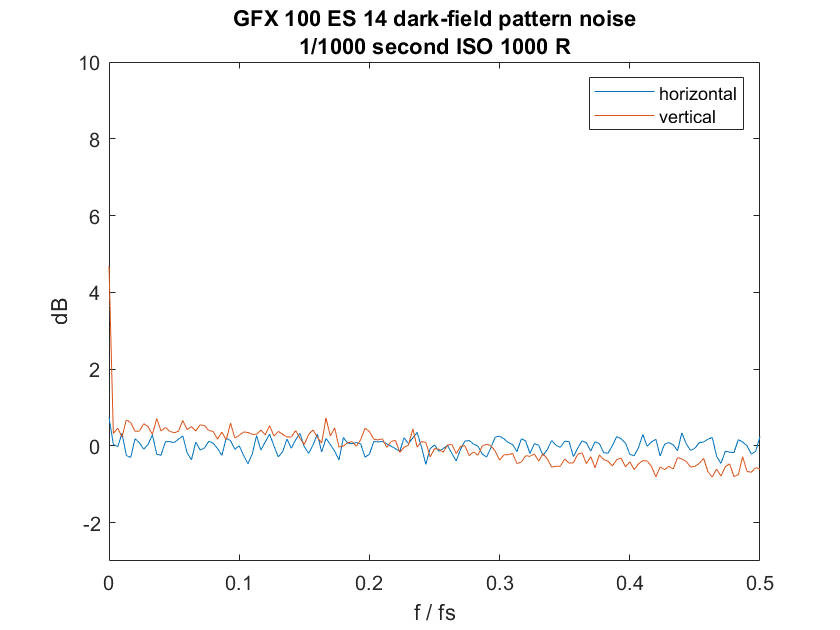
The red and second green channel are free of periodic artifacts.

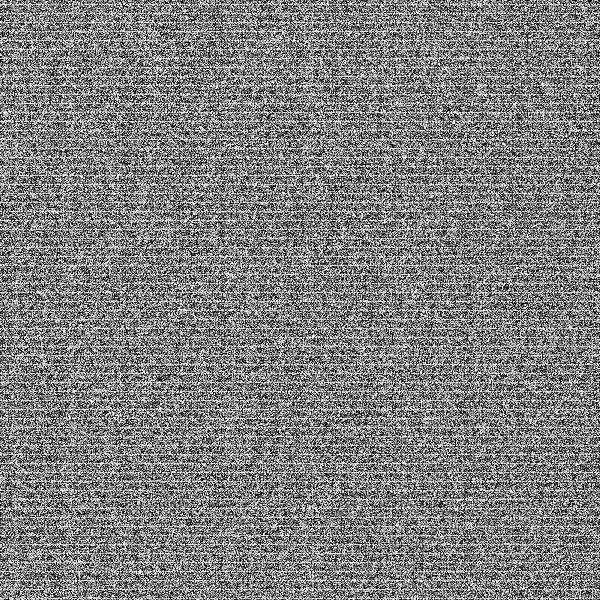
I made histogram-equalized crops of the averaged images to show the artifacts more clearly.

G1


B


R


G2

As with the previous post, further testing will need to be done to determine the significance of these anomalies on real-world photography, but it’s clear that the bright and dark portions of the image are affected differently.

GFX 100

← Fuji GFX 100 light-field pattern noise Adobe DNG Converter performance improvements →

Comments

  1. Isee says

    August 5, 2019 at 12:36 pm

    This apparently aligns what I found via editing the sample RAWs. The banding is more prominent in the highlights than the shadows.

    I find it odd how there’s such difference between color channels between light and dark frame, but I guess it is due to filtering that Fuji does to remove the striping?

    Somehow this looks like Fujifilm could do better job here.

    I tried mitigating the banding via some common image processing approaches on TIFF files without much success. The best way I found to mitigate the light frame banding was to add noise on green channel.

    Nevertheless, the highlight banding is quite difficult to get visible, unless heavily pulling back exposure. But to me, it seems like ETTR and pulling back in postprocessing is not a good advice for GFX100. Better just expose for the final highlights.

    Reply
    • JimK says

      August 5, 2019 at 12:50 pm

      I expect that Raw Therapee will update their OSPDAF-pixel tool to deal with the GFX 100; it already does a good job with SOny and Nikon MILCs.

      Reply
      • pippo_27 says

        August 9, 2019 at 5:47 am

        if someone can identify the pattern (or provide raw files suitable for doing that), adding the support shouldn’t take long

        Reply
        • JimK says

          August 9, 2019 at 8:07 am

          The row spacing is regular, every 18 rows. I put 14 and 16 bit files in our shared Dropbox folder. Thanks.

          Reply

Leave a Reply Cancel reply

Your email address will not be published. Required fields are marked *

May 2025
S M T W T F S
 123
45678910
11121314151617
18192021222324
25262728293031
« Apr    

Articles

  • About
    • Patents and papers about color
    • Who am I?
  • How to…
    • Backing up photographic images
    • How to change email providers
    • How to shoot slanted edge images for me
  • Lens screening testing
    • Equipment and Software
    • Examples
      • Bad and OK 200-600 at 600
      • Excellent 180-400 zoom
      • Fair 14-30mm zoom
      • Good 100-200 mm MF zoom
      • Good 100-400 zoom
      • Good 100mm lens on P1 P45+
      • Good 120mm MF lens
      • Good 18mm FF lens
      • Good 24-105 mm FF lens
      • Good 24-70 FF zoom
      • Good 35 mm FF lens
      • Good 35-70 MF lens
      • Good 60 mm lens on IQ3-100
      • Good 63 mm MF lens
      • Good 65 mm FF lens
      • Good 85 mm FF lens
      • Good and bad 25mm FF lenses
      • Good zoom at 24 mm
      • Marginal 18mm lens
      • Marginal 35mm FF lens
      • Mildly problematic 55 mm FF lens
      • OK 16-35mm zoom
      • OK 60mm lens on P1 P45+
      • OK Sony 600mm f/4
      • Pretty good 16-35 FF zoom
      • Pretty good 90mm FF lens
      • Problematic 400 mm FF lens
      • Tilted 20 mm f/1.8 FF lens
      • Tilted 30 mm MF lens
      • Tilted 50 mm FF lens
      • Two 15mm FF lenses
    • Found a problem – now what?
    • Goals for this test
    • Minimum target distances
      • MFT
      • APS-C
      • Full frame
      • Small medium format
    • Printable Siemens Star targets
    • Target size on sensor
      • MFT
      • APS-C
      • Full frame
      • Small medium format
    • Test instructions — postproduction
    • Test instructions — reading the images
    • Test instructions – capture
    • Theory of the test
    • What’s wrong with conventional lens screening?
  • Previsualization heresy
  • Privacy Policy
  • Recommended photographic web sites
  • Using in-camera histograms for ETTR
    • Acknowledgments
    • Why ETTR?
    • Normal in-camera histograms
    • Image processing for in-camera histograms
    • Making the in-camera histogram closely represent the raw histogram
    • Shortcuts to UniWB
    • Preparing for monitor-based UniWB
    • A one-step UniWB procedure
    • The math behind the one-step method
    • Iteration using Newton’s Method

Category List

Recent Comments

  • bob lozano on The 16-Bit Fallacy: Why More Isn’t Always Better in Medium Format Cameras
  • JimK on Goldilocks and the three flashes
  • DC Wedding Photographer on Goldilocks and the three flashes
  • Wedding Photographer in DC on The 16-Bit Fallacy: Why More Isn’t Always Better in Medium Format Cameras
  • JimK on Fujifilm GFX 100S II precision
  • Renjie Zhu on Fujifilm GFX 100S II precision
  • JimK on Fuji 20-35/4 landscape field curvature at 23mm vs 23/4 GF
  • Ivo de Man on Fuji 20-35/4 landscape field curvature at 23mm vs 23/4 GF
  • JimK on Fuji 20-35/4 landscape field curvature at 23mm vs 23/4 GF
  • JimK on Fuji 20-35/4 landscape field curvature at 23mm vs 23/4 GF

Archives

Copyright © 2025 · Daily Dish Pro On Genesis Framework · WordPress · Log in

Unless otherwise noted, all images copyright Jim Kasson.