Warning! This post was created before I realized that the CC24 patches in the CCSG had different values than the CC24 patches in a real CC24 target.
https://blog.kasson.com/the-last-word/cc24-vs-ccsg-spectra-and-cielab-values/
Yesterday I posted about my experiences using the X-Rite CC24 and CCSG targets and X-Rite’s Color Checker Camera Calibration program in diffuse illumination. Before that test, I made a profile with the CCSG target in direct sunlight at a 45-degree angle to the target. The colors were overly chromatic. Several people said that the CCSG target might be more sensitive to glare than the CC24 — the SG does stand for semigloss — leading to dulling of the patches when the capture used to make the profile is exposed, leading to overly saturated colors when the profile is used.
That makes a kind of internal sense. I did some testing this morning to find out if it’s right. Spoiler: not even close.
I set up the target lit at approximately a 45-degree angle (maybe a bit more oblique than that) by early morning (shortly after eight at about the 35th parallel) sunlight. Here’s the spectrum of the sunlight:
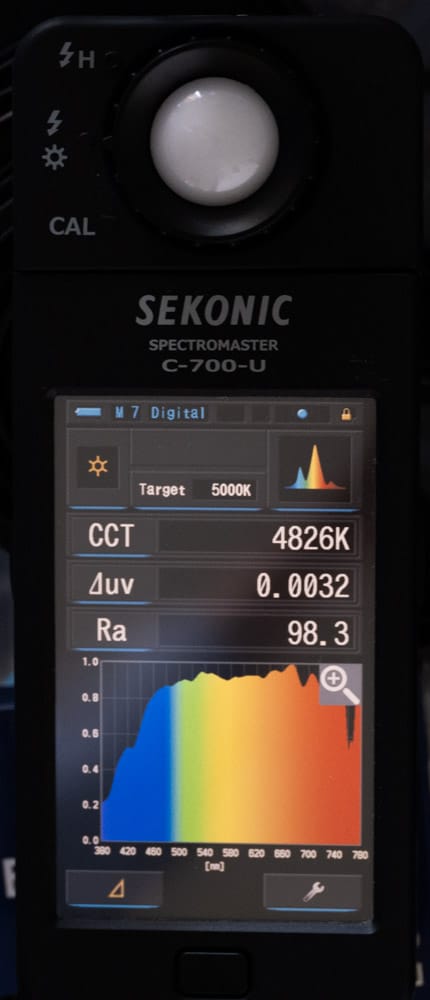
Since the illumination is so close to 5000K blackbody radiation, I defeated the Bradford adaptation in my analysis software. I used Color Checker Camera Calibration to make profiles for the camera, using both the CC24 and CCSG targets. Then I analysed the accuracy of those profiles, throwing Adobe Color Profile into the mix.
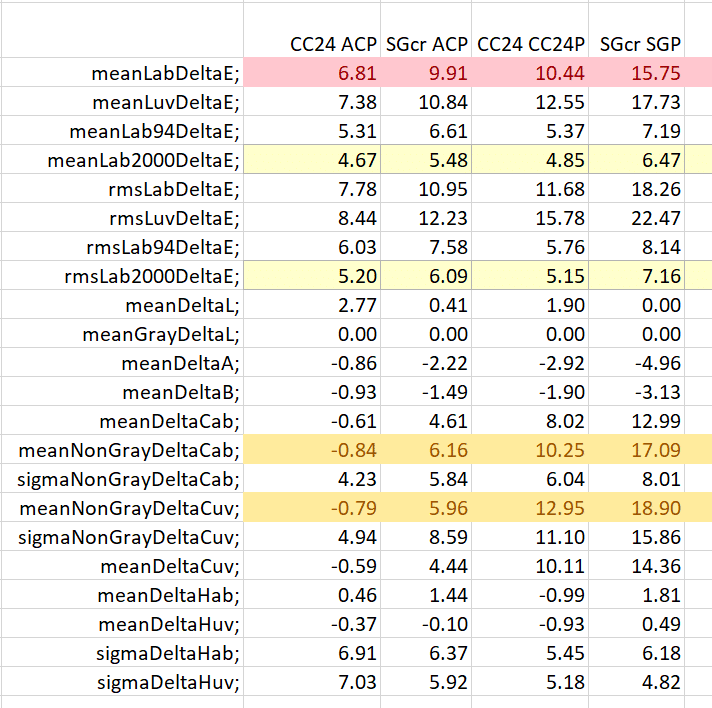
- The first column of numbers is the CC24 patches processed using the Adobe Color Profile
- The second column is the cropped CCSG patches processed using the Adobe Color Profile
- The third column is the CC24 patches processed using the CC24 profile
- The fourth column is the cropped CCSG patches processed using the CCSG profile
Mean Delta E is the average CIELab delta E. Since Delta E can never be negative, errors in one direction don’t cancel out errors in another.
Mean Delta L is the average difference in the CIELab and CIELuv vertical (luminance) channel. Positive Delta L means that the output is brighter than it should be. Negative Delta L means that the output is darker than it should be. Thus Delta L is good for detecting systematic luminance bias.
Mean Gray Delta L is the average difference in the CIELab and CIELuv vertical (luminance) channel for the 6 gray patches. Positive Gray Delta L means that the output is brighter than it should be. Negative Gray Delta L means that the output is darker than it should be. Thus Gray Delta L is good for detecting systematic luminance bias in the gray axis.
Mean Delta A and B are the average differences in the CIELab and CIELuv a and b channels. Positive Delta A or B means that the output is redder or yellower than it should be. Negative Delta A or B means that the output is bluer or more cyan than it should be. These measures are good for detecting systematic color balance bias.
Mean Delta Cab is the average chroma error measured in Lab. A positive number means that the output colors are more saturated than they should be. A negative number means that the output colors are less saturated than they should be.
Mean Non-Gray Delta Cab is the average chroma error measured in Lab for the 18 chromatic patches. Mean Non-Gray Delta Cuv is the average chroma error measured in CIELuv for the 18 chromatic patches. A positive number means that the output colors are more saturated than they should be. A negative number means that the output colors are less saturated than they should be. The sigma metrics track the standard deviation of the 18 samples.
Mean Delta Hab is the average hue angle error measured in Lab, expressed in degrees. The gray patches are excluded from this measure, since their target hue angle is undefined. A positive number means that the output colors have a hue angle higher than they should have. A negative number means that the output colors have a hue angle lower than they should have. Mean Delta Huv is the same measure in CIELuv. The sigma metrics track the standard deviation of the 18 samples.
Look at the first two columns, which both use the Adobe Color profile, concentrating on the darker yellow rows. The crop of the CCSG patch set is more chromatic than the CC24 set. This is exactly the opposite of the predicted behavior in this sentence at the top of this post: “Several people said that the CCSG target might be more sensitive to glare than the CC24 — the SG does stand for semigloss — leading to dulling of the patches when the capture used to make the profile is exposed…”
Now look at the next two columns, in which the CC24 patches are developed using the X-Rite-generated CC24 profile, and the CCSG patches are developed using the X-Rite-generated CCSG profile. They are both more chromatic than they were with the Adobe Color profile. In addition, the increased chroma in the CCSG target is not calibrated out by the profiling process.
This is going to take some more work. It’s not making it any easier that the X-Rite profile creator is a black box with no knobs. I’m in the process of learning how to use Lumariver Profile Developer, and I’ll be reporting on my experiences with it and both the CC24 and CCSG targets.
My version of X-Rite ColorChecker profiler makes it excessively difficult to use a custom-measured reference. In my experience using custom measurements for CC SG is very important. CC24 targets have much less manufacturing variation.
Thanks, Iliah. That sounds like a lot more work than may be worth it. Do you consider the SG target useful for practical photography?
Dear Jim,
CC SG never gave me results better than CC24 when “standard” references were used for CC SG.
My thinking is that repro-style profiling based on shooting targets is more trouble than using SPDs, while the grip, 4 flashes, and support for shooting targets is much more expensive than a decent spectrometer and monochromator – not to mention the space this support takes, it’s basically a column of a steady MF enlarger.
When I do art duplication I’ve never been able to get a good match using any process in Lightroom including custom profiles from an X-Rite color checker. I use Capture One with a custom LumaRiver flat art profile and a linear curve in C1. I can send you a couple visual examples if you want.
I don’t think any standard raw converter is good for art reproduction, those converters introduce too many unknown factors to the processing.
Hi Iliah,
No contradiction, but it seems that Capture One has a Cultural Heritage edition:
https://dtculturalheritage.com/capture-one-ch/
I would be interested in your take on that.
Personally, I would think that knowledge may also play a role. Just as an example, reproducing a painting may need take preparing test targets using the same kind of color pigments as used in the original, or just go the spectral response way.
Do you think the problem is the raw converters or the profiles they use?
A small question, we have like RGBG2 sensors with G and G2 probably being the same. Could we have better accuracy having four different CFA filters?
Best regards
Erik
Erik, we could certainly achieve better color accuracy with a fourth filter, but luminance resolution would suffer.
Dear Erik,
My take is that it is not only colour transforms and tone curves. The whole reproduction process IMO (and it is shared by my customers) should be documented and transparent. Nothing but demosaicking and conversion to colorimetric space with Ymax set from a separate measurement, not even a separate white balance stage, is allowed. Raw original shots of the object and colour target, with all characterization data including SPDs in the form of sidecar files must be supplied.
To obtain better accuracy:
6-filter reproduction (6 shots with a monochrome sensor, scene lit through 6 different filters) or +2 filters (based on Bayer sensor, 3 shots, with 2 shots for which the light is filtered), Dual-RGB Processor (RIT, for this and more, including X-rite ColorChecker Digital SG (CCSG) Evaluation, please look at https://www.rit.edu/cos/colorscience/mellon/software.php) are good ways to improve colour reproduction accuracy.
Some of it is in “Modifications of a sinarback 54 digital camera for
spectral and high-accuracy colorimetric imaging:
simulations and experiments”.
You may also find this recent work by Roy S. Berns interesting:
Digital color reconstructions of cultural heritage using color-managed imaging and small-aperture spectrophotometry
Dear Iliah,
Thank you for your long and detailed answer and also the links.
Lots to learn!
Best regards
Erik