This is one in a series of posts on the Fujifilm GFX 100. You should be able to find all the posts about that camera in the Category List on the right sidebar, below the Articles widget. There’s a drop-down menu there that you can use to get to all the posts in this series; just look for “GFX 100”.
I’ve discussed automatic focus shifting features in cameras many times. In the D850 and the Z7, Nikon calls the feature “focus shift shooting”. Fuji calls the implementation in the GFX 50S, GFX 50R, and GFX 100 “focus bracketing.” I think Nikon’s name is more descriptive of what the feature is there for than Fuji’s, but I’ll call it focus bracketing in this post. At the very bottom I’ll tell you why I don’t think it is apt.
In this post, I gave you a visual look at the focus bracketing step size, and I’ll be mor quantitative here. But I’m going to derive my results publicly and in detail, because I think the Fuji focus bracketing feature is fundamentally misunderstood by many. As an example, just the other day I got this question from a well-known web photographer:
What’s the right step size in the GFX 100 for f/8?
If that looks like a perfectly reasonable question to you, read on, and find out why it’s not.
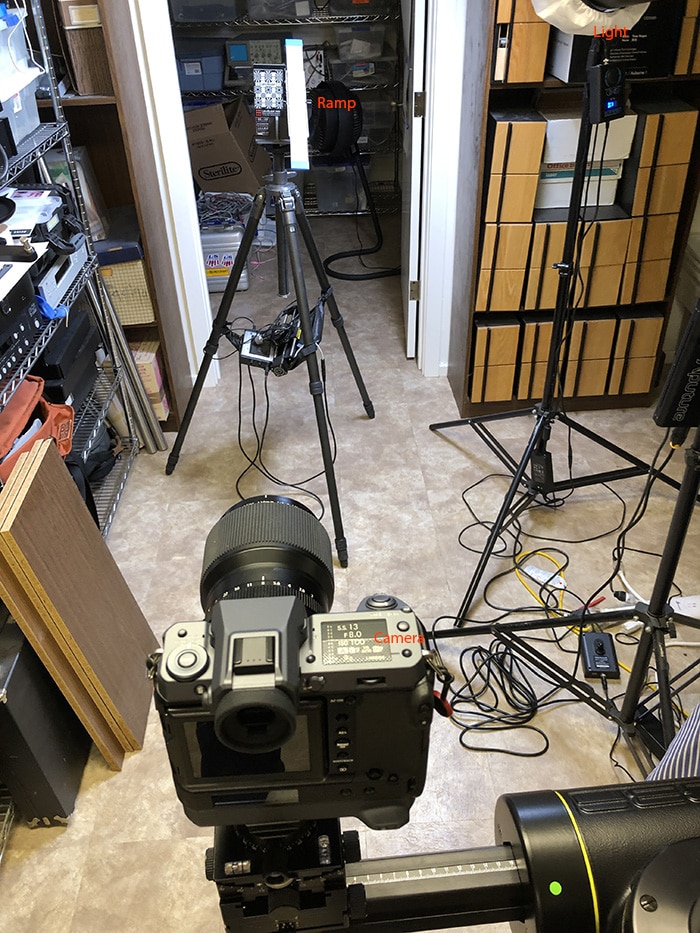
In order to quantify the focus bracketing step size, I used the following setup:
The camera has a 110 mm f/2 lens on it and is 1.65 meters from the center of the ramp, which has a checkerboard on it that I use for computer analysis of the plane of focus. The ramp is lit from above and slightly to the front by a Westcott LED panel behind a diffuser.
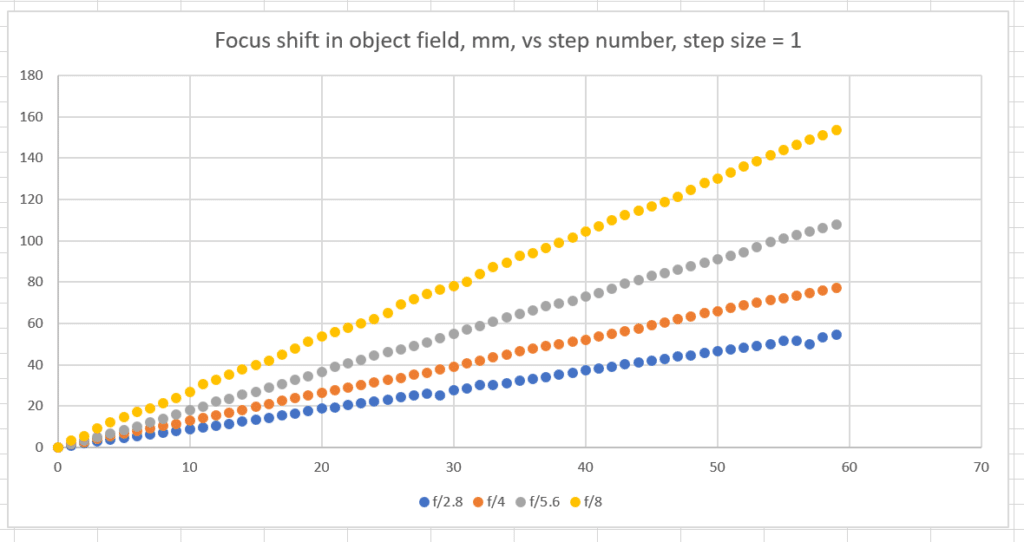
I set the step size to one, and made focus shifted series at f/2, f/2.8, f/4, f/5.6, and f/8. I used a Matlab program that I had previously written to analyze the plane of focus shift in the object field (along the ramp):
The curves are approximately linear; which means that each step is the same distance. The distance changes faster for the narrow f-stops than the wide ones.
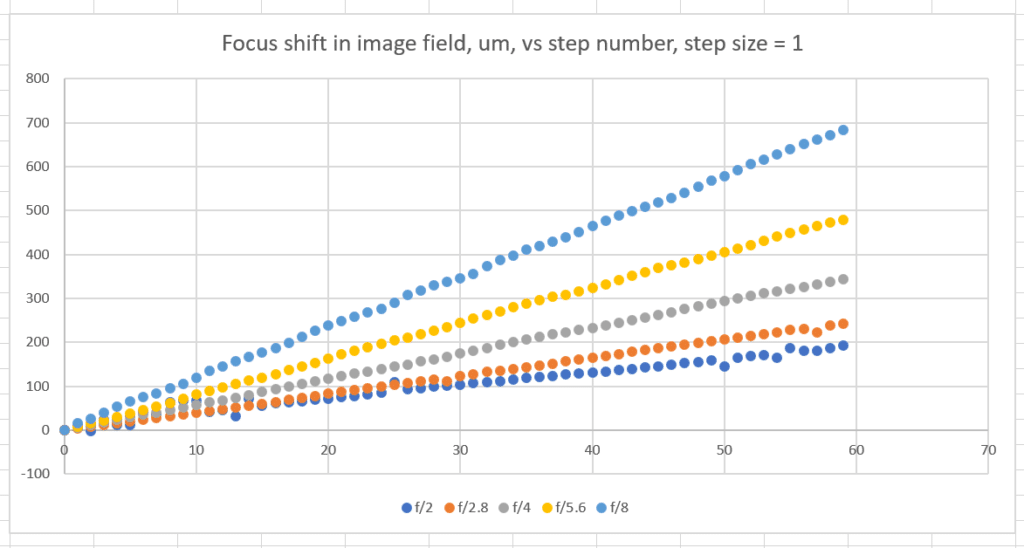
I then converted the focus shift from the object plane to the image plane (at the sensor), and changed the units from millimeters (mm) to micrometers (um);
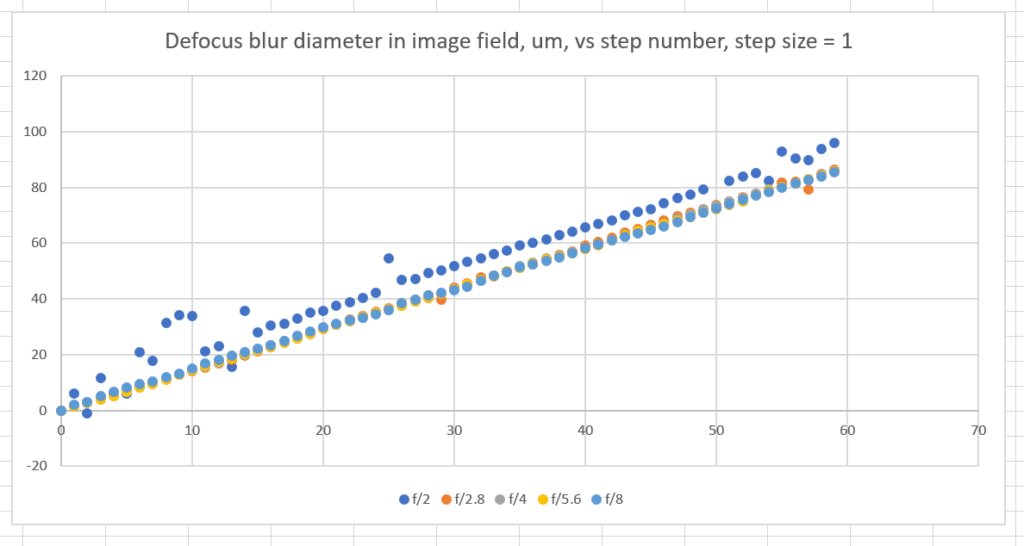
Then I computed the diameter of the circle of confusion (CoC) implied by each shift in the focal plane:
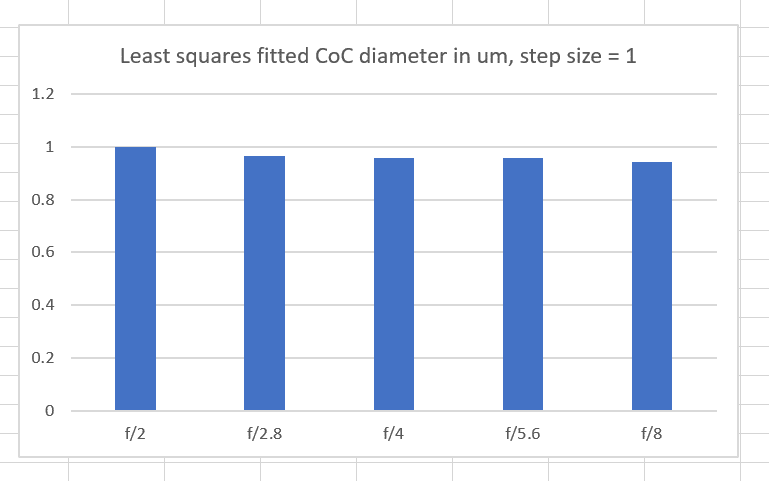
The f/2 curve is noisier, because the focal shift in um is divided by the smallest number to get to CoC diameter. There’s a shift in the f/2 curve, too. I think the focus shift of the 110/2 near wide open is the main culprit. In order to calibrate that out and get a better estimate of the slope of the five curves, I fitted a line to each minimizing the least-squares error:
Regardless of the f-stop, the step size is that which produces about a 1 um diameter CoC. The camera is compensating for the f-stop to make your life easier.
Now you see why the question “What’s the right step size in the GFX 100 for f/8?” is poorly framed. The right step size doesn’t depend on the f-stop.
The step size that you chose in the GFX 100 gives you the implied CoC diameter in um.
A 1 um CoC diameter per step is extremely conservative, and you may never want to use steps that fine. A useful way to think about the CoC diameter for precision work is to compare it to the pixel aperture, which in the GFX 100 is about 4 pixels on a side. When the CoC is 4 um, about half the resultant blur comes from the pixel aperture, and half from defocus.
The way that I define focus bracketing, it’s taking several images on both sides of the estimated proper plane of focus, with the intention of picking one such image for use. Focus stacking is taking several — or hundreds — of images with the intention of blending them all in postproduction. Why is “focus bracketing” a misnomer as the name for Fuji’s feature? It’s because the Fuji user interface is lousy for that. To do focus bracketing right, you’d focus, and tell the camera how many steps of what size, and it would start the focal plane on the near side of the place you focused, have the center shot of the series on the plane where you focused, and put the last half of the shots further way. The way the feature actually works is you pick the near plane, and it moves the focal plane further and further away with each shot. This is great for stacking, but not for bracketing, since you have no way to precisely find the near plane in that case.
I’ve been playing with Focus Brk on my GFX100 and not seeing any change in focus. ?? ALl works fine when I use my D850, but want the increased file size. Any suggestions? Am finding very little out there about the details of setting things up.
I set the knob at the top to multi and scrolled down and chose FOCUS in the bracketing options. Went to the Focus Bracket setting and set it to 10 frames, Step of 10 (thinking that would be the largest step) and 1s interval (hoping I could hear or see my lens changing focus.
Have ripped off a bunch of images and it does shoot 10 frames, but they all look the same. Doesn’t seem like its changing focus. Only focusing on the edge of my cubical wall 8 feet away, then can see other walls and objects further out but they aren’t getting any sharper.
Try 100 shots and see if you can tell the difference.
Will give that a try. Thanks. I mainly shoot inside of business jets so want to have 4-6 photos from front to back to get all 20 feet in focus. Thinking this might take many more if a step of 10 is so tiny I can barely see it. I did set up 4 dry erase markers on my desk and put the 120 macro on and did a run of 10 and saw the first and last were shifted almost to the second pen. Any way to force it to do a larger leap?
Have another shoot coming up in a couple of weeks that I just wanted to get 3-4 images and gain DOF but will be shooting across a street to capture buildings to print a 37ftX140ft print, so will be doing a Gigapixel stitch as well as wanting to focus stack. Having things move quickly is key so I don’t go nuts with cars and people and such y having to stack 100 images on each location. Appreciate any input or ideas.
Not that I know of.
Got it. Appreciate all of your help! Will go play and see how it goes. Have a good one!
Yep…100 images at a step of 10 showed a noticeable stack, so it is working after all. Still now wondering if the step could be made larger somehow.
Just re-reading through your post. Maybe I’m expecting something it isn’t built to do. Is Focus Brk the same as Focus Stacking like I do with my Nikon??
Thanks again for your help and your time posting all of these things. Love your page. Very informative!
It’s the same idea, but IMHO the Fuji implementation is much better. Among other things, the Nikon step sizes are too big, the lens doesn’t return to the initial focus plane at the end of the series, you can’t see what’s going on in the image during the sequence, and you need to menu dive to initiate the sequence.