This is one in a series of posts on the Fujifilm GFX 100S. You should be able to find all the posts about that camera in the Category List on the right sidebar, below the Articles widget. There’s a drop-down menu there that you can use to get to all the posts in this series; just look for “GFX 100S”.
For some reason, I thought that the Dynamic Range settings in the IQ tab of the GFX menus didn’t affect raw files. Someone on Facebook claimed they did. I went to check. I found out that I was wrong.
I picked a high contrast scene, used a 105/1.4 lens set to wide open, set the shutter speed to 1/320 second, aimed the camera at a high dynamic range scene, and made exposures at the four Dynamic Range settings.
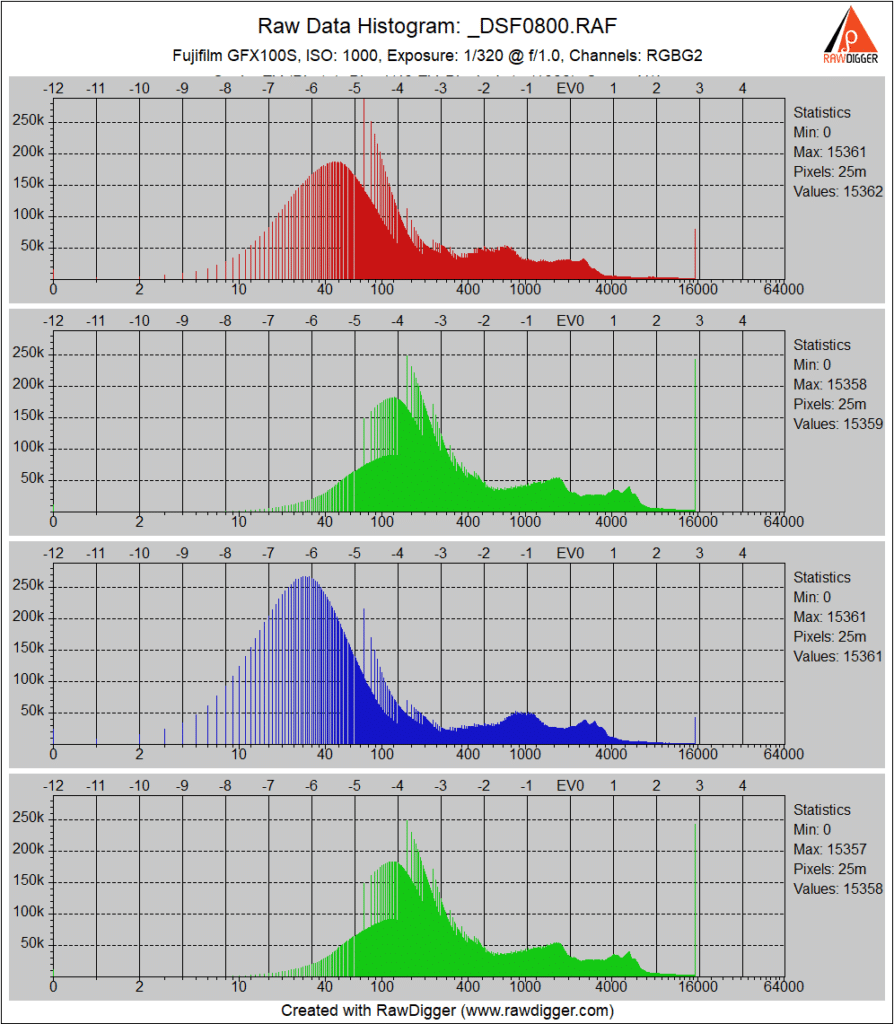

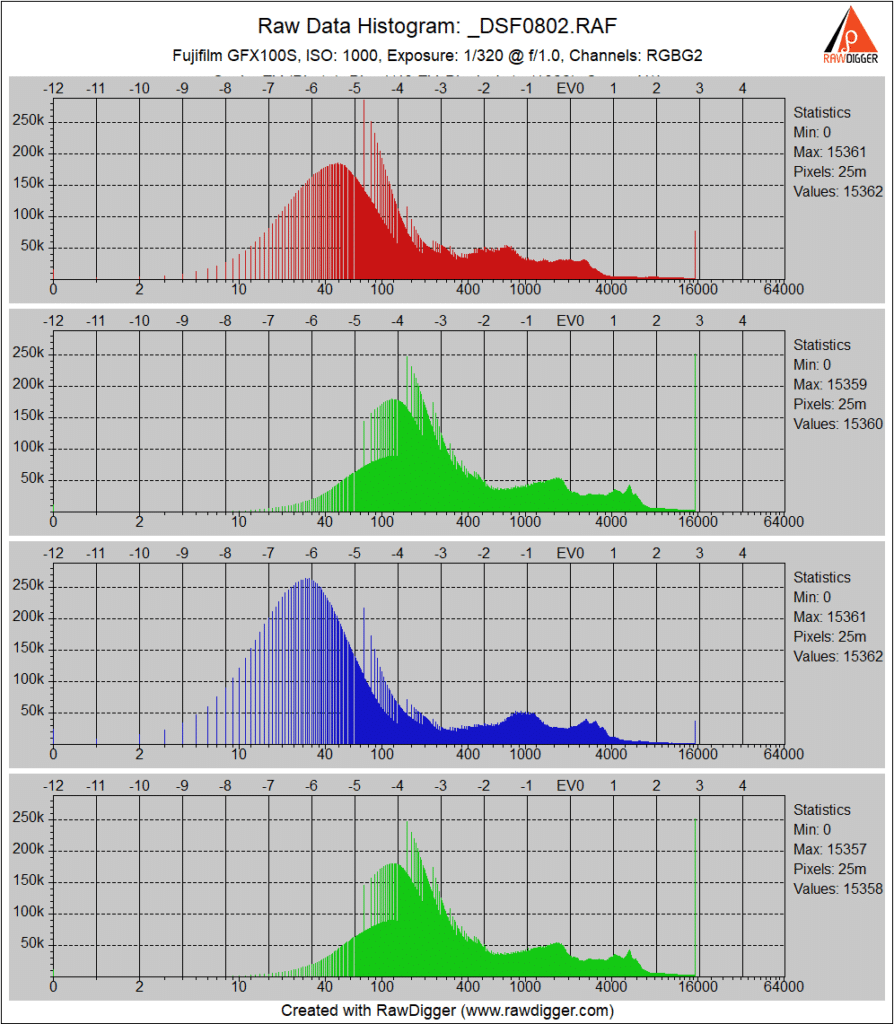
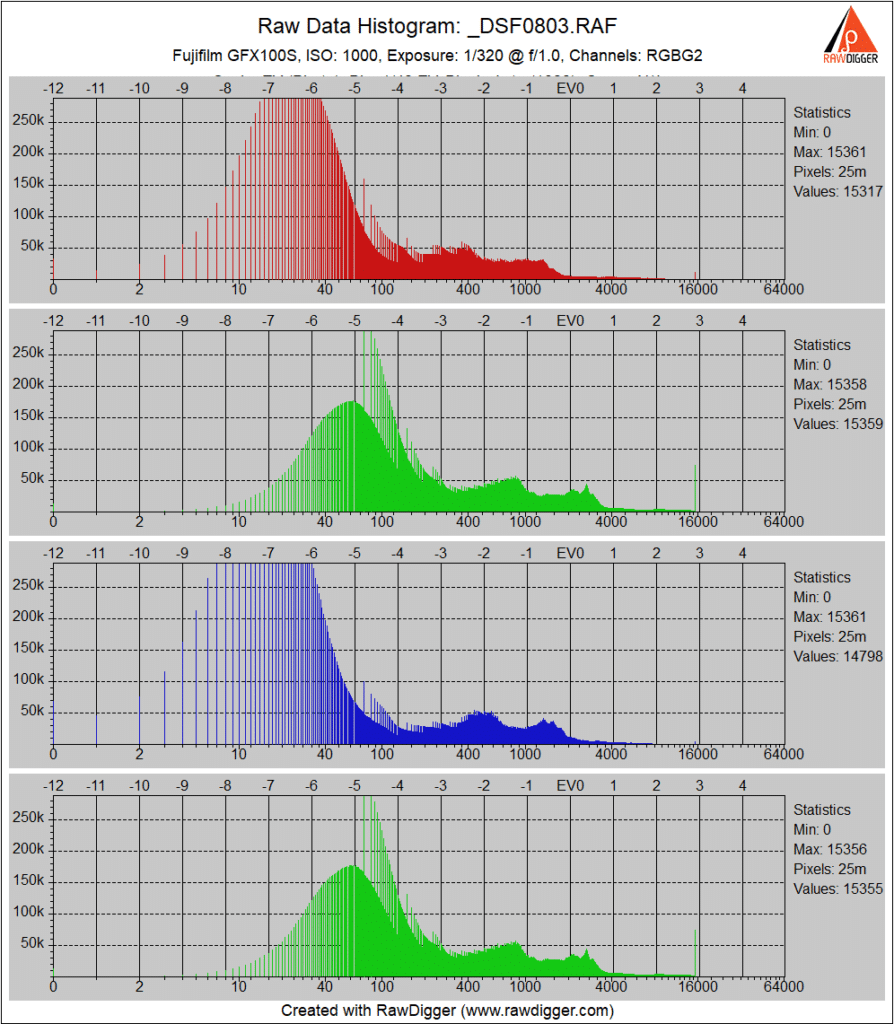
It is clear that the camera is darkening the image when DR = 200 and DR = 400. And here’s the really pernicious thing: DR = Auto, which is the default, in this scene, darkened the image by the same amount as DR = 200.
Check your camera, and set the DR to 100.
In a comment below, Rico Pfirstinger provides an excellent explanation of what’s going on:
The DR function has been around for way more than a decade. With regular Bayer and X-Trans sensors (not necessarily with EXR sensors), it has always worked in the same way: DR200% reduces ISO in the RAW file by 1 stop, and DR400% reduces ISO in the RAW file by 2 stops. Since EXIF data always refers to the JPEGs and Fujifilm is using the SOS method for ISO, the EXIF data doesn’t reflect this RAW ISO reduction.
To compensate the ISO underexposure of the RAW files, the JPEGs and the live view receive a gain of 1 or 2 stops in the shadows and midtones, but not in the highlights, thus adding 1 or 2 stops of additional highlight dynamic range in the JPEGs. As long as the camera firmware works correctly (it sometimes doesn’t), this DR increase in the highlights is also reflected in the live view and hence the live histogram and any activated blinkies.
Very similar gain curves are also automatically applied in Capture One if you select one of Fujfilm’s native film simulations (like Provia) in C1 and took the shot with either DR200% or DR400%. In fact, C1 stores three versions of every film simulation (one each for DR100%, DR200% and DR400%). Sadly, some of these C1 DR curves are faulty and can lead to ugly halos, especially with Velvia.
As mentioned, current X cameras limit DR AUTO to DR200%. Older models like the X-Pro1 can also automatically select DR400% when set to DR AUTO. In any case, don’t use DR AUTO. There are several reasons why you shouldn’t, including a weak (you could also say faulty) firmware algorithm that is used in most X camera models (but not in all of them) to determine what DR setting to automatically pick for a specific scene and exposure. So set your DR manually.
To find the optimal exposure for a scene (as described in Jim’s blog post from August, 2nd), always use DR100%. After manually setting the optimal exposure, you can use what I call “ISO-equivalent settings” to brighten the live view and the JPEGs by manually increasing ISO by 1 or 2 stops and at the same time manually increasing DR to 200% or 400%, respectively. That way, your RAW exposure doesn’t change, but your live view image and the JPEGs look 1 or 2 stops brighter, which can be nice with backlight high-contrast scenes. It often also helps the AWB to find a better setting.
Note from a DPR member:
The manual says that the AUTO setting chooses between 100% or 200% depending on the subject and shooting conditions to reduce loss of detail in highlights in contrasty situations.
It will only select 200% from ISO 200 to ISO 12800.
So at base ISO, the AUTO setting is equivalent to setting the value to 100%.
The last sentence does not match the plots. Did not you mix the labels for DR=100 and DR=400?
Looks good to me. On what are you basing your conclusions?
@400, the R_channel shadow peak is at DN=25. @100, it is at DN=90. How can this be compatible with
> “a tone curve that boosts the shadows at DR = 200 and DR = 400”
?
Ah, now I see. Here’s what the manual says: “Use lower values to increase contrast when shooting indoors and under overcast skies, and higher values to reduce loss of detail in highlights when photographing high-contrast scenes.” So 200 and 400 reduce the counts, not boost them. That’s what the histo is showing, as you pointed out. I’ll make the correction.
Thanks for this!
However, I see that nobody questions a very strange artefact:
Eyeballing, I can see that about every 8th pixel is read in 11-bit mode, every 16th (32rd?) In 10-bit mode etc.
Have you commented on this before?!
Are you considering that the x-axis is logarithmic and the binning is not as fine as it could be?
Do you say that it is just a bug in your plotting software? (As in: it FIRST converts to log, THEN bins?)
I wouldn’t call it a bug. Binning was set to 1/48 EV.
Well, it bit me, didn’t it? 😉
On the other hand, indeed I do not see a simple algorithm which would work much better…
The DR function has been around for way more than a decade. With regular Bayer and X-Trans sensors (not necessarily with EXR sensors), it has always worked in the same way: DR200% reduces ISO in the RAW file by 1 stop, and DR400% reduces ISO in the RAW file by 2 stops. Since EXIF data always refers to the JPEGs and Fujifilm is using the SOS method for ISO, the EXIF data doesn’t reflect this RAW ISO reduction.
To compensate the ISO underexposure of the RAW files, the JPEGs and the live view receive a gain of 1 or 2 stops in the shadows and midtones, but not in the highlights, thus adding 1 or 2 stops of additional highlight dynamic range in the JPEGs. As long as the camera firmware works correctly (it sometimes doesn’t), this DR increase in the highlights is also reflected in the live view and hence the live histogram and any activated blinkies.
Very similar gain curves are also automatically applied in Capture One if you select one of Fujfilm’s native film simulations (like Provia) in C1 and took the shot with either DR200% or DR400%. In fact, C1 stores three versions of every film simulation (one each for DR100%, DR200% and DR400%). Sadly, some of these C1 DR curves are faulty and can lead to ugly halos, especially with Velvia.
As mentioned, current X cameras limit DR AUTO to DR200%. Older models like the X-Pro1 can also automatically select DR400% when set to DR AUTO. In any case, don’t use DR AUTO. There are several reasons why you shouldn’t, including a weak (you could also say faulty) firmware algorithm that is used in most X camera models (but not in all of them) to determine what DR setting to automatically pick for a specific scene and exposure. So set your DR manually.
To find the optimal exposure for a scene (as described in Jim’s blog post from August, 2nd), always use DR100%. After manually setting the optimal exposure, you can use what I call “ISO-equivalent settings” to brighten the live view and the JPEGs by manually increasing ISO by 1 or 2 stops and at the same time manually increasing DR to 200% or 400%, respectively. That way, your RAW exposure doesn’t change, but your live view image and the JPEGs look 1 or 2 stops brighter, which can be nice with backlight high-contrast scenes. It often also helps the AWB to find a better setting.
Thanks for that. I’ll put what you said in the body of the post so that nobody misses it.
I have been taking benefit out of this. Especially in low light but high contrast situations. It is quite the same thing as how GFX50S/R high ISOs are set up: a built in 1 or 2 stop digital gain setting.
For example, I find that ISO3200 is the sweetspot for GFX100S dynamic range in low light. But I want to see a good exposure while shooting in even lower light conditions. Flip DR400 on, and set ISO to 12800 – and voila, the camera will use “native” ISO3200 gain, push the result by 2 stops to ISO12800 for the JPEG preview (while keeping highlights). I can see (almost) the end result I am getting, when pushing it at the editing table (well, as it is in the EXIF, I do not even need to push it), with all the real DR of the “native” ISO3200 gain.
In such cases, it’s important to remember that raising DR also shifts the dual conversion gain ISO level. So, if our native DCG level is ISO 500 (which is the actual DCG level in GFX100 cameras and Fuji’s current APS-C cameras with 26 MP), setting DR200% moves that level to ISO 1000, and setting DR400% moves it to ISO 2000.
I’d say DR doesn’t really affect the jpeg because it raises the exposure to compensate and the jpeg ends up pretty similar. DR-P is another animal. It adjusts the DR settings which affect the raw, but then for the jpeg it does the equivalent of raising the shadows to bring back only the shadows. the resulting jpeg looks kind of HDR ish. I don’t know if you tested DR-P.
So in addition to everything else technical I would need to keep aware of – and most of what I need to keep aware of and thinking of what taking a photograph should NOT be technical – I should now waste even more valuable time in the field bothering with this geeky Anorak stuff? No thanks.
Anorak stuff? I don’t know what that means.
Also, if you turn DR off, you don’t have to think about anything related to that in the field. That’s what I do.
How is ISO reduced? My understanding is that exposure is constant in the experiment. So photon counts are the same. But the data numbers are lower with DR200.
Does it mean that less digital gain is applied at high ISO? Essentially similar to reducing exposure at low ISO and compensating in post instead of increasing ISO. That may be something similar to your suggested exposures strategy?
Please ignore reply if you think it is stupid.