In this test and this one, I showed that you could get the colors of developed files from the Sony a7RIV, the Nikon Z7, and the Fujifilm GFX 100 reasonably close if you used Lumariver Profile Designer, and the reproduction style. The a7RIV and the Z7 were remarkably statistically accurate and even closer to each other than they were to a perfect result.
Lumariver — quite wisely, I think — separates the calibration of the camera (which gets you to the reproduction styles) and the specification of the “look” of any output-referred image coming from the application of the profile. A logical question is, how well does this work in practice?
To find out, I took the same set of test images made using the CC24 target, and the same set of training images using the CCSG target, and the same flat field images from the above-linked tests. I made new profiles using the Lumariver Default style, which is among other differences from the reproduction style, is more chromatic and has a nonlinear tone curve.
The results were surprising to me.
Here are is the overall mean Delta-E 2000 errors, compared to the previous tests:
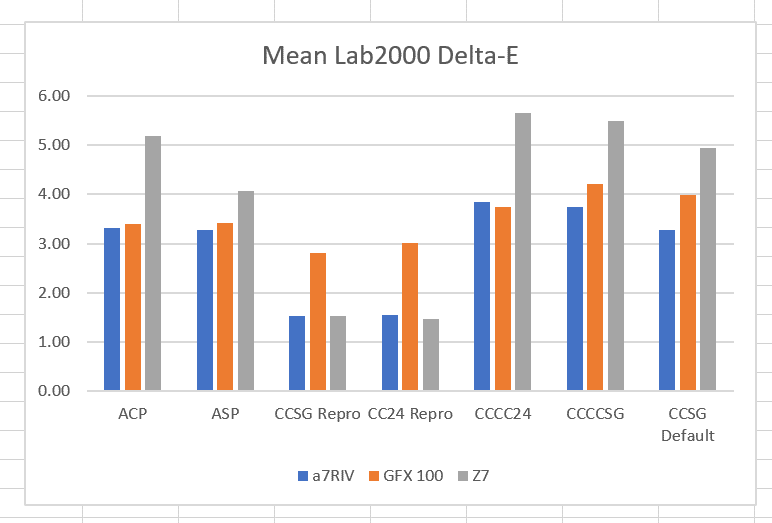
The Lumariver Default bars are on the right. Notice that, although the Z7 was basically tied for most accurate in the two reproduction profiles, it’s the worst in the Default profile set.
If you look at the rms Delta-E 2000 errors, which penalize outliers more, it’s the same thing:

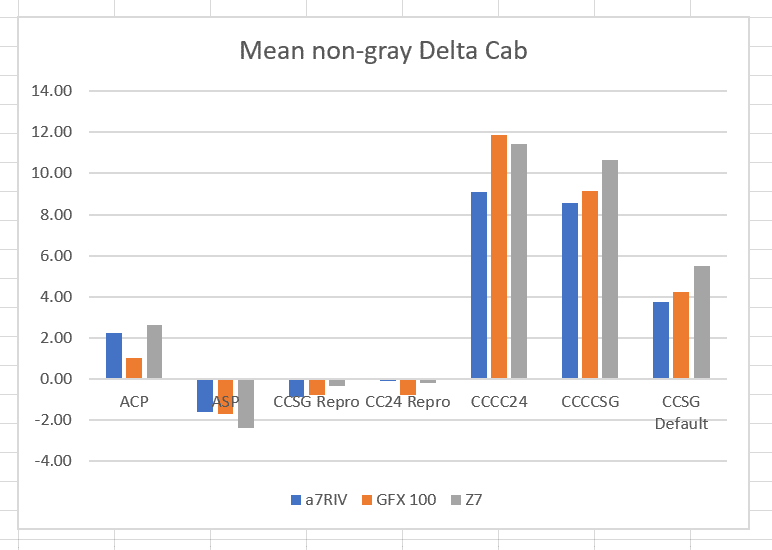
And if we look at mean chroma errors, we can see that there are more chroma differences with the Lumarive default profile than with the two reproduction profiles:
Now let’s look at the chromaticity differences in pairwise comparisons between the three cameras.
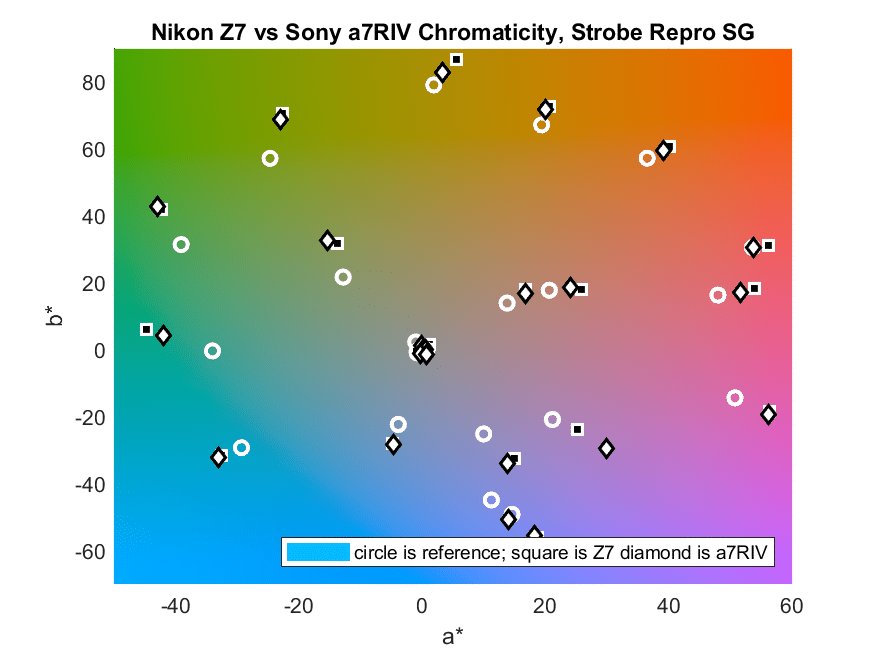


I can’t find any rhyme or reason to these plots. For some of the patches the images from two cameras show nearly the same chromaticity, albeit different chromaticity from the correct one (indicated by the circles). In some cases the pairs of cameras show quite different renderings of the same patch.
Here are the statistics for the errors with respect to the reference:
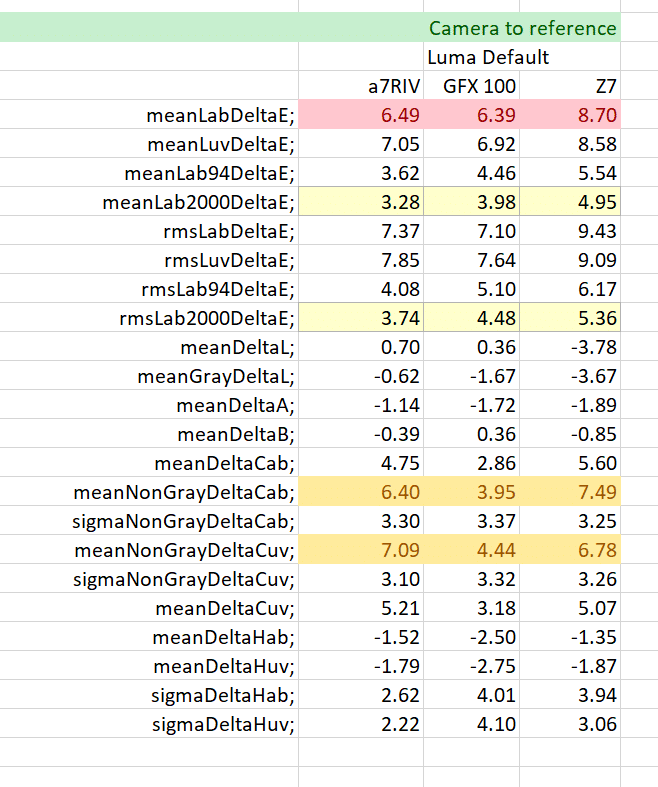
For those of you who don’t remember them, I’ll include row descriptions the the end of this post.
Here’s how the cameras do when compared only to each other, not to the reference.

This is passing strange. Look at the mean Delta-E 2000 line. The closest camera pair with the reproduction profile was the a7RIV/Z7. With the Lumariver Default profile, they are virtually tied for worst, and the GFX100/a7RIV pair, which was tied for worst with the reproduction profile, is a clear first here.
I think it’s safe to say that, at least in this case, the promise of separating the desired look from the color filter array characteristics of the camera has not been realized.
Here’s an explanation for the rows.
Mean Delta E is the average CIELab delta E. Since Delta E can never be negative, errors in one direction don’t cancel out errors in another.
Mean Delta L is the average difference in the CIELab and CIELuv vertical (luminance) channel. Positive Delta L means that the output is brighter than it should be. Negative Delta L means that the output is darker than it should be. Thus Delta L is good for detecting systematic luminance bias.
Mean Gray Delta L is the average difference in the CIELab and CIELuv vertical (luminance) channel for the 6 gray patches. Positive Gray Delta L means that the output is brighter than it should be. Negative Gray Delta L means that the output is darker than it should be. Thus Gray Delta L is good for detecting systematic luminance bias in the gray axis.
Mean Delta A and B are the average differences in the CIELab and CIELuv a and b channels. Positive Delta A or B means that the output is redder or yellower than it should be. Negative Delta A or B means that the output is bluer or more cyan than it should be. These measures are good for detecting systematic color balance bias.
Mean Delta Cab is the average chroma error measured in Lab. A positive number means that the output colors are more saturated than they should be. A negative number means that the output colors are less saturated than they should be.
Mean Non-Gray Delta Cab is the average chroma error measured in Lab for the 18 chromatic patches. Mean Non-Gray Delta Cuv is the average chroma error measured in CIELuv for the 18 chromatic patches. A positive number means that the output colors are more saturated than they should be. A negative number means that the output colors are less saturated than they should be. The sigma metrics track the standard deviation of the 18 samples.
Mean Delta Hab is the average hue angle error measured in Lab, expressed in degrees. The gray patches are excluded from this measure, since their target hue angle is undefined. A positive number means that the output colors have a hue angle higher than they should have. A negative number means that the output colors have a hue angle lower than they should have. Mean Delta Huv is the same measure in CIELuv. The sigma metrics track the standard deviation of the 18 samples.
Jim,
I have seen that question coming since the first test with you made with Lumariver.
I would hoped that the ‘tone operator’ would be independent from the compromise matrix.
It also seems that Lumariver pushes saturation (correct word?) quite a bit. My impression was that Lumariver takes great care not to distort colors when applying the ACR curve.
Anyway, thanks looking into this. Ignorance can be a bliss, but I think that knowledge is preferable.
Erik
Hi Jim,
DNG 1.4+ spec builds camera profiles in this sequence (see ch 6 here
https://wwwimages2.adobe.com/content/dam/acom/en/products/photoshop/pdfs/dng_spec_1.5.0.0.pdf):
1) Raw-> XYZ matrix
2) HSV colorimetric LUT (ProfileHueSatMapData)
3) HSV ‘look’ LUT (ProfileLookTable)
4) ‘tone’ LUT (ProfileToneCurve)
5) user LUTs (ACR/LR since last year)
Step 1) is mandatory, all others are incremental and optional. Every step after 2) takes you further away from a colorimetric result. You could do away with ‘look’ step 3) but pretty well everybody wants the contrast boost of ‘tone’ step 4) so that images not look flat on typical monitors – and contrast messes up chromaticities big time.
Lumariver is quite clever in that it tries to counteract the disruptive effects of the ‘tone’ curve on chromaticities by introducing changes in one of the previous LUTs (can’t remember which one) that together result in minimium colorimetric impact after the curve has been applied. The instant one deviates from that and changes ‘look’ and/or ‘tone’ (even using Lumariver’s own) they break the toy.
‘look’, ‘tone’ and ‘user’ table changes presume that one is favoring a pleasing result at the expense of ‘accurate’ colors.
Jack
Jack, that’s all good information, but what I can’t understand is why the spread of the cameras is greater in the default general-purpose mode than in reproduction mode. You’d think that general-purpose mode would essentially move the “aim point”, but not increases the scatter. The camera-to-camera scattering is not much qualitatively different from the camera-to-reference scattering.
Or am I missing something here?
With Repro they all have the same objective: get as close as they can to colorimetric. All other modes are arbitrary, subjective and not necessarily common. Maybe we could ask Torger what parameters are involved in Default?
I’ll buy the arbitrary. I’m not using a subjective analysis, so I’m not on the same page there. Also, I think there are no people making decisions inside Lumariver Profile Designer, although people made decisions about what the algorithms are. But isn’t the whole point of separating the look from the calibration to get commonality in the look regardless of camera?
In that I would guess I share Jim’s assumptions and frustrations.
But, there may be boundary conditions that I am not aware of.
Best regards
Erik
Considering what I would recall, I would guess that Lumariver uses different strategies for calculating the compromise matrix.
My guess would be that the normal profiles are sort of generic and try to avoid off diagonals going negative, while the repro profiles may allow for negative elements.
These profiles made from the same exposure may point into that direction:
http://echophoto.dnsalias.net/ekr/Articles/TMP/DCPDIFF.PNG
Best regards
Erik
This Wold be a more interesting study using several copies of each camera and lens combinations. I would love to see the variances if any between several of the same camera bodies but especially with different copies of lenses!
I’ve not seen variations across different copies of the same model number. Lenses certainly make a difference, mostly because of veiling flare, which can reduce chroma. There are also some color differences across lenses, but they mostly get calibrated out by white balancing.
I did a small test a while ago, comparing four lenses using the same sensor and using a ColorChecker as target. Lenses were Canon, Sigma, Hasselblad Zeiss and Contax.
There was no discernible difference, even without adjusting WB:
https://www.dpreview.com/forums/post/63505345
On the other hand, I would agree that flare/glare causes a difference.
Best regards
Erik
I thought Hasselblad told me each sensor was individually calibrated maybe I misunderstood
I believe that is the case. That would make all serial numbers of a given model number the same. But that wouldn’t provide consistency across camera model numbers, particularly if some weren’t Hasselblads.
I would guess that some calibration is done on most cameras. I have looked at some video from Sony A7rII production and they certainly hooked up to some device that looked like a calibration device.
Also, I think that things may have changed a bit going from CCD to CMOS produced at large scale. My guess is that sample variation is limited in CMOS.
There may be som indication that CFA designs may vary over time. I have seen some info in D1X raw files like ‘stroke version’ which I associated with CFA, right or wrong…
In the end, production is probably pretty similar regardless if the camera is assembled by underpaid ladies in Thailand or a less underpaid group of workers in Sweden.
That said, in the early eighties my best friend worked at Hasselblad for a year and he assembled his own camera. So, that was a camera that was hand made by himself. He still has it, although he never uses it.
Just to say, Luminous Landscape had a very nice video about Phase One assembly and testing. It seems that the rejection rate on the CCDs was pretty high, like 7%, that though many errors were just mapped out.
It is said that Sony cameras self check and map out bad pixels each month. Don’t know if that is correct, although the info comes from what seems to be a credible source.
It also seems that Phase One has some process where bad pixels are mapped out by a dealer, without sending the back to Denmark.
Fact is probably that many tests are done, unknown to us.
Just look at any lens disassembly by LensRentals and you may realize how much effort goes into a lens:
https://www.lensrentals.com/blog/2019/01/the-great-400mm-teardown-comparison-part-ii-the-sony-400mm-f2-8-g/
Or a camera:
Ouch… wrong key pressed!
Here is the camera: https://www.lensrentals.com/blog/2018/02/taking-apart-the-sony-a7riii-in-search-of-better-weather-sealing/
That is probably the reason for Nikon’s white balance prescaling.
Dear Erik,
Some cameras provide raw data after the calibration is applied (1st type), some (like Canon) provide calibration data in metadata (2nd type). One of the easy pointers: if a derived DNG contains camera calibration matrices in tags 0xc623 and 0xc624, the camera is definitely of the 2nd type.
Iliah, thank you very much! Excellent info, as usual if I may say.
Erik
Hi Jim, I am also very disappointed by Lumariver failing to be the solution for creating usable baseline profiles (in Default mode) for my A7RIV and Z7.
I have been frustrated for years not having a way to standardize the colors from different camera bodies given that I shoot different brands and models depending on needs.
One question though, have you tried capturing your targets at different EV levels and if yes, how do the resulting profiles differ based on the EV levels of the images?
I am asking this because when I used Adobe DNG Profile Editor to create profiles, I noticed that the app would create more “accurate” or “neutral” profiles if the Color Checker target I shot was slightly underexposed, as if cameras and sensors have a sweet spot with the least hue shift or variance when their profiles were generated from slightly underexposed targets.
But without more objective tools or measurements, my problems are:
A) different cameras/sensors may need different amount of underexposure to generate the most accurate profile (assuming this actually even makes a difference)
B) not having a standardized way to identify the correct underexposure amount
C) not knowing how much do my monitors contribute to this chain (I use LG’s ARGB 4K monitor and iMac P3 monitor, all profiled using i1D Pro)
D) the final determination of their profile accuracy is based on my own subjective evaluation, not an objective measure
Any advice on what can be done in the meantime to get baseline profiles that produce consistently similar colors across camera brands and models?
I haven’t done controlled exposure variations at calibration time. I do in general shy away from making profiles that depend on absolute illumination. Since sensors are darned near linear except near clipping, I don’t see any a priori reason why target underexposure would produce a more accurate profile. Did you look at the raw values in the shots that you called the correct exposure?
As to consistently similar colors across brands and models, that’s a tall order if you’re picky. I’m not sure it’s even possible for a wide range of subject materials and lighting.
Jim
Hi! I’ve recently discovered your blog and am FASCINATED by your topics and research.
I do editing for other photogs, mostly wedding galleries, and I get VERY picky (and frustrated) when it comes to matching colors between cameras of their second shooters. I also do film matching, where I match their digitals to their film scans. Most of my clients use profiles from companies like TAP or Goodlight, and I aim to match their styles when completing the galleries.
My question is – in Lightroom Classic do you think adjusting the Calibration settings for a camera/lens combo to match another, would maintain accuracy throughout different lighting scenarios? After the profile is applied? Given that the main shooter and second shooter never change their body/lens combo? Do you have any suggestions besides creating a new profile? My workflow typically looks like applying a profile, working A LOT in the tone curve panels (esp. when film matching), and HSL panel when necessary.
I doubt if correcting color via calibration settings would be sufficient to get very close matches across a variety of lighting and subject spectra.
I don’t think simple “calibration” will get you very far with different sensors. Although I guess an AI algorithm could just re-colorize the images and uniformize them. Although for all I know Lightroom probably paints everything with Lightroom colors.
Edmund