• site home
  • blog home
  • galleries
  • contact
  • underwater
  • the bleeding edge

the last word

Photography meets digital computer technology. Photography wins -- most of the time.

You are here: Home / Nikon Z6/7 / Z mount and long lenses — practical examples

Z mount and long lenses — practical examples

September 10, 2018 JimK 3 Comments

The question before the house is still, “Does the Z mount offer advantages over the F mount for long lenses?” Yesterday, I showed you how the Z mount and F mount interacted with very simple long lenses. It looked like the Z mount helped give the corners of the sensor a better view of the exit pupil. What about with a real lens design? Bill Claff has a lens ray tracer on his excellent Photons to Photos website, and I found a lens labeled Nikon 300 mm f/2.9. I don’t know what production lens that corresponds to, unfortunately.

I pasted my mount diagrams over Bill’s ray tracing:

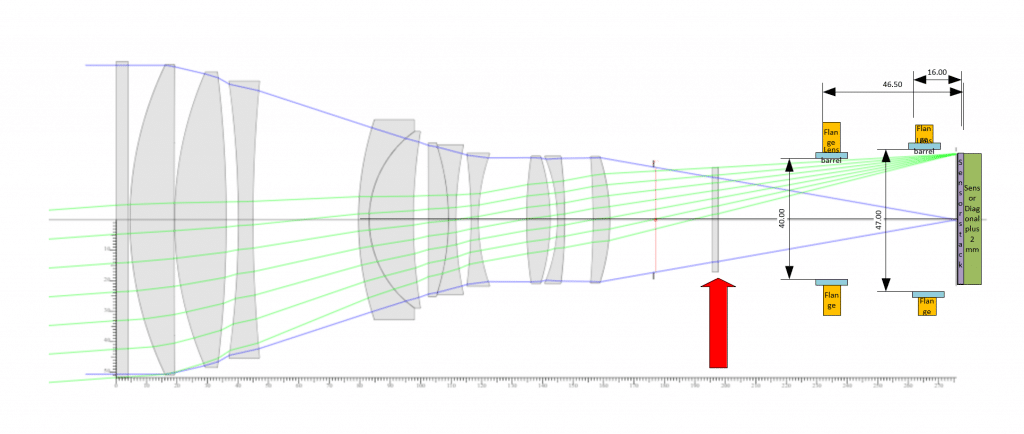
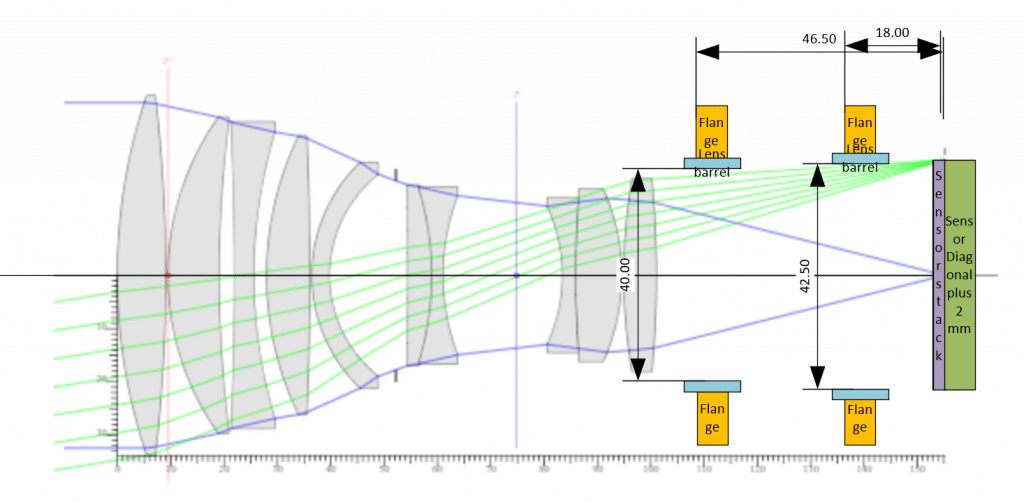
I’ve placed a red arrow at the element that is limiting the sensor corner’s view of the exit pupil, which is the thin red line. Let’s look a little closer.

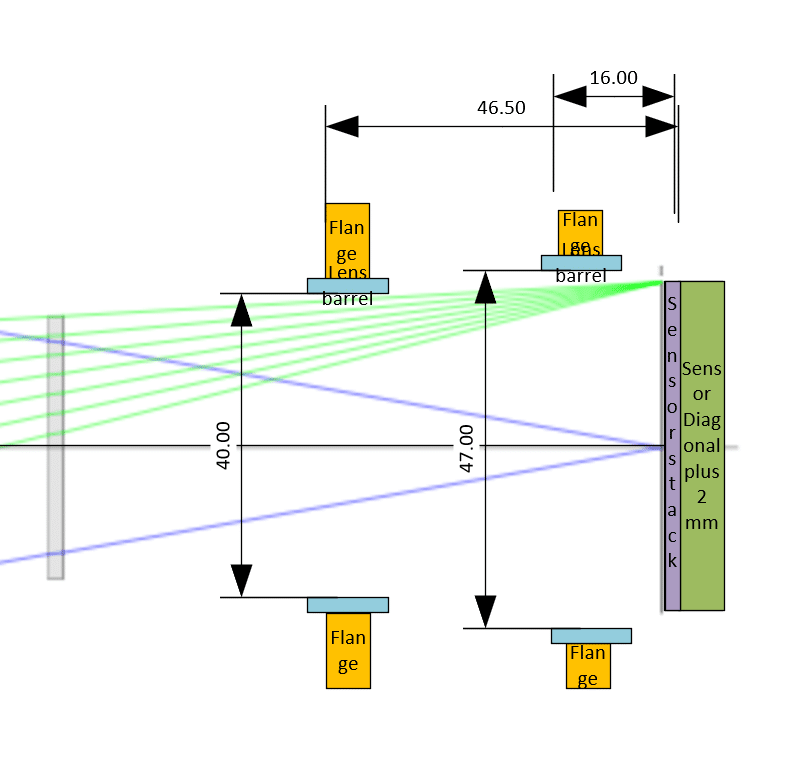
The F mount is the one with the 46.5 mm flange focal distance (FFD), and the Z mount is the one with the 16 mm FFD. The most peripheral ray just grazes to F mount, with my previous assumption of 40 mm clear diagonal for that mount. That can’t be a coincidence. The flat element on the far left of the lower drawing (and pointed to by the big red arrow in the upper drawing) has to be sized based on the mount. If it were bigger, the sensor corner could see more of the exit pupil.

If the element to the left of the flat element were bigger as well, the exit pupil would be even more visible.

So, the Z mount is an improvement for (some) long lenses, too. The catch is that they have to be designed to take advantage of the mount.

Let’s look at a Canon 400 mm f/2.8 from Bill’s site. It was designed for a mount with a larger throat:

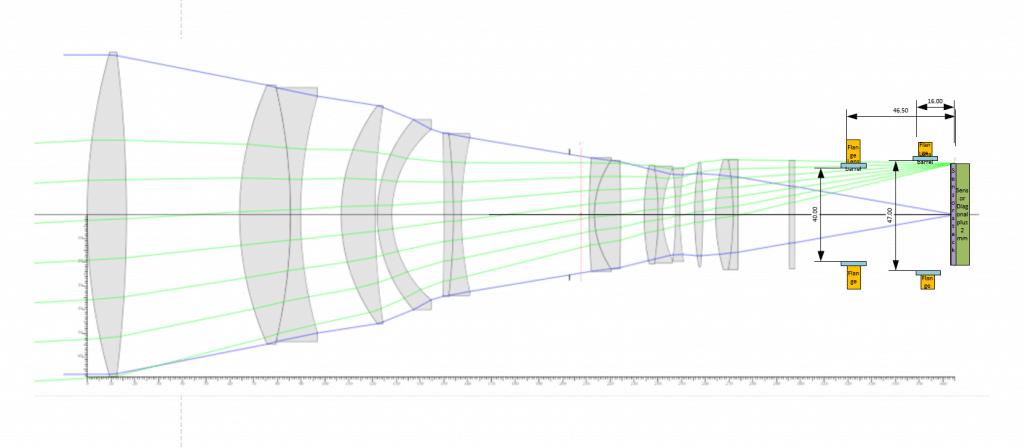
This lens allows the corner of the sensor a better view of the exit pupil than does the Nikon 300 above.

Zooming in:

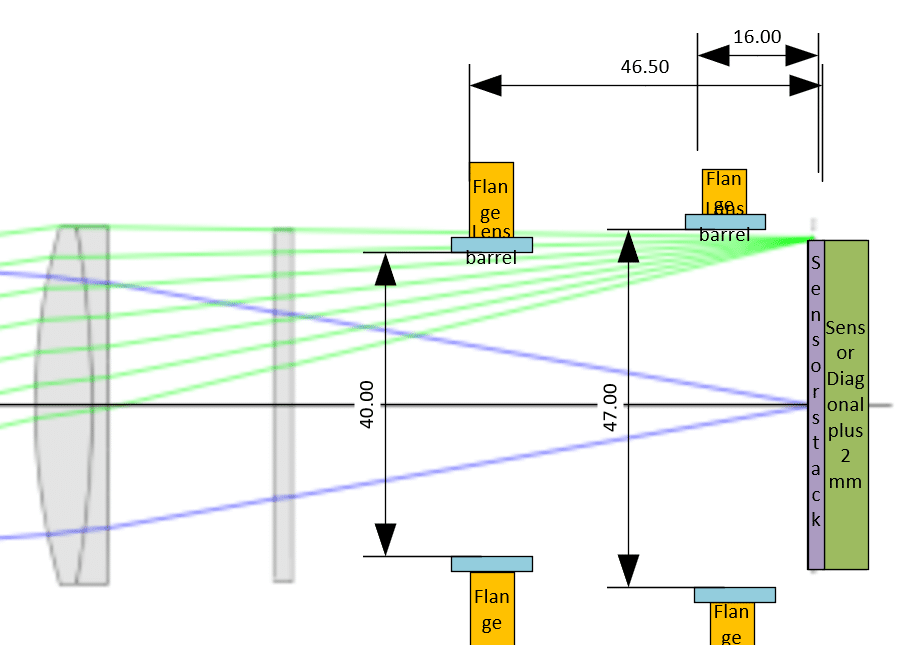
We can see that this design would not work well with the F mount, but would be just fine with the Z mount.

Not all Canon designs take full advantage of their mount diameter. Here’s one from Bill’s site that he’s calling Canon 130 mm (probably labeled 135 mm by Canon, but the design measures 130). That design would work with the Nikon F mount and even with a Sony E mount:

The E-mount case is not academic since Canon lenses can easily be adapted to those cameras.  However, 42.5 mm looks a bit optimistic. Here’s the clear aperture of several E-mount adapters that I’ve measured:

The Vello is small because it needs to make room for the electrical contacts. The other adapters are dumb ones.

Nikon Z6/7

← Does the Z mount help with long lenses? Exposure strategies for the Fuji GFX 50S — numbers →

Comments

  1. CarVac says

    September 10, 2018 at 9:46 am

    I’d always wondered why the superteles had so much vignetting.

    It seems one reason is because they all have very distant entrance pupils.

    Reply
  2. Brandon Dube says

    September 10, 2018 at 6:40 pm

    @CarVac

    Partly because making dinner plate sized elements of very expensive and difficult to process optical materials is hard, so the F/#s are stretched by marketing somewhat, as is the focal length. Partly because achieving a reasonable telephoto ratio for compact size (and light weight) is difficult. Partly because crushing down an e.g. 125mm diameter beam into a < 40 mm diameter beam is no small order. Also partly because the demand for resolution outweighs the demand for even illumination.

    Reply
  3. Chris says

    September 11, 2018 at 2:04 am

    From the number of elements and the date of the teleconverter patent application, the 2.9/300 would be the AF-I Nikkor 300mm 1:2.8 D ED lens produced from 1992-1996.

    Reply

Leave a Reply Cancel reply

Your email address will not be published. Required fields are marked *

May 2025
S M T W T F S
 123
45678910
11121314151617
18192021222324
25262728293031
« Apr    

Articles

  • About
    • Patents and papers about color
    • Who am I?
  • How to…
    • Backing up photographic images
    • How to change email providers
    • How to shoot slanted edge images for me
  • Lens screening testing
    • Equipment and Software
    • Examples
      • Bad and OK 200-600 at 600
      • Excellent 180-400 zoom
      • Fair 14-30mm zoom
      • Good 100-200 mm MF zoom
      • Good 100-400 zoom
      • Good 100mm lens on P1 P45+
      • Good 120mm MF lens
      • Good 18mm FF lens
      • Good 24-105 mm FF lens
      • Good 24-70 FF zoom
      • Good 35 mm FF lens
      • Good 35-70 MF lens
      • Good 60 mm lens on IQ3-100
      • Good 63 mm MF lens
      • Good 65 mm FF lens
      • Good 85 mm FF lens
      • Good and bad 25mm FF lenses
      • Good zoom at 24 mm
      • Marginal 18mm lens
      • Marginal 35mm FF lens
      • Mildly problematic 55 mm FF lens
      • OK 16-35mm zoom
      • OK 60mm lens on P1 P45+
      • OK Sony 600mm f/4
      • Pretty good 16-35 FF zoom
      • Pretty good 90mm FF lens
      • Problematic 400 mm FF lens
      • Tilted 20 mm f/1.8 FF lens
      • Tilted 30 mm MF lens
      • Tilted 50 mm FF lens
      • Two 15mm FF lenses
    • Found a problem – now what?
    • Goals for this test
    • Minimum target distances
      • MFT
      • APS-C
      • Full frame
      • Small medium format
    • Printable Siemens Star targets
    • Target size on sensor
      • MFT
      • APS-C
      • Full frame
      • Small medium format
    • Test instructions — postproduction
    • Test instructions — reading the images
    • Test instructions – capture
    • Theory of the test
    • What’s wrong with conventional lens screening?
  • Previsualization heresy
  • Privacy Policy
  • Recommended photographic web sites
  • Using in-camera histograms for ETTR
    • Acknowledgments
    • Why ETTR?
    • Normal in-camera histograms
    • Image processing for in-camera histograms
    • Making the in-camera histogram closely represent the raw histogram
    • Shortcuts to UniWB
    • Preparing for monitor-based UniWB
    • A one-step UniWB procedure
    • The math behind the one-step method
    • Iteration using Newton’s Method

Category List

Recent Comments

  • bob lozano on The 16-Bit Fallacy: Why More Isn’t Always Better in Medium Format Cameras
  • JimK on Goldilocks and the three flashes
  • DC Wedding Photographer on Goldilocks and the three flashes
  • Wedding Photographer in DC on The 16-Bit Fallacy: Why More Isn’t Always Better in Medium Format Cameras
  • JimK on Fujifilm GFX 100S II precision
  • Renjie Zhu on Fujifilm GFX 100S II precision
  • JimK on Fuji 20-35/4 landscape field curvature at 23mm vs 23/4 GF
  • Ivo de Man on Fuji 20-35/4 landscape field curvature at 23mm vs 23/4 GF
  • JimK on Fuji 20-35/4 landscape field curvature at 23mm vs 23/4 GF
  • JimK on Fuji 20-35/4 landscape field curvature at 23mm vs 23/4 GF

Archives

Copyright © 2025 · Daily Dish Pro On Genesis Framework · WordPress · Log in

Unless otherwise noted, all images copyright Jim Kasson.