I was asked how well the Zeiss 135mm f/2 Apo-Sonnar performed handheld on the Sony alpha 7 Mark II (a7II) with and without in-body image stabilization (IBIS) turned on.
I did a run and the results were wonky. I did another run with the Leica 135/3.4 Apo-Telyt and the results were better, but still didn[‘t seem right. I went back to the Zeiss 135 and did a third run. Better, but still not right.
Then I took a look at the individual MTF files that Imatest generates for each image. The auto-target recognition software was making mistakes. Fortunately, Imatest give you a shot of the region of interest that it picked so you can see if it screwed up. I have recently upgraded to Imatest version 4, and that may be the difference. I am asking it to do the ROI identification from handheld images, and it’s not written for that purpose, so I wouldn’t consider ROI errors to be a flaw in the program.
I went back and looked at more than 400 Imatest MTFs, found all the bad ROIs, and replaced the data with data from places where Imatest had found the right ROI. Fortunately, I take lots of extra shots, so I had more data.
For review, here’s the protocol:
- The camera: the Sony a7II.
- The lens: the Zeiss 135mm f/2 Apo-Sonnar.
- The lighting: a single Fotodiox LED-200WA-56 daylight balanced flood.
- ISO set to 640, f-stop set to 8,
- Focusing manually using maximum magnification wide open,
- Drive set to single
- EFCS on
- Manual exposure mode.
- “Pete Souza” grip: left palm under base, left fingers bracing the underside of the front part of the lens, elbows against chest, and following this rifle-range release protocol: Inhale, exhale, brace gently, think calm thoughts, squeeze the shutter release, remembering to “pull through”
- Exposure protocol: Light to maximum,, shutter to 1/500 second, make at least 16 exposures, Turn the light down a stop, make at least 16 exposure, until you get to 1/30 of a second.
- Make one series with IBIS on, and one with it off.
- Develop in Lightroom CC 2015 (with ACR 9.0) with standard settings.
- Crop, export as TIFFs, analyze for horizontal edge and vertical edge MTF50 in Imatest.
- Export the results to Excel, crunch the stats, and graph.
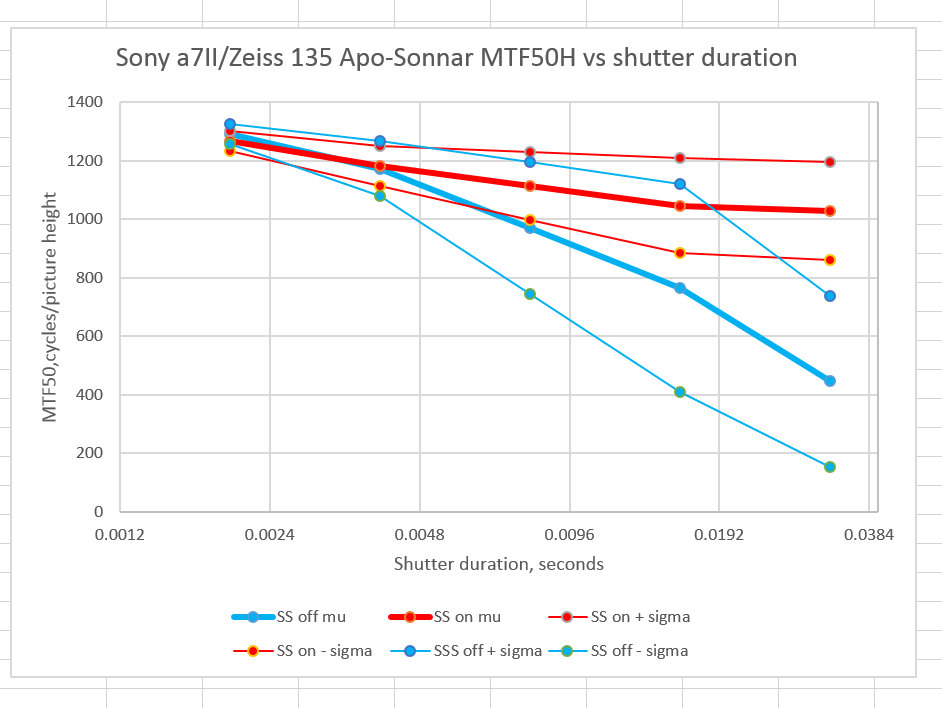
For horizontal edges:
For vertical edges:
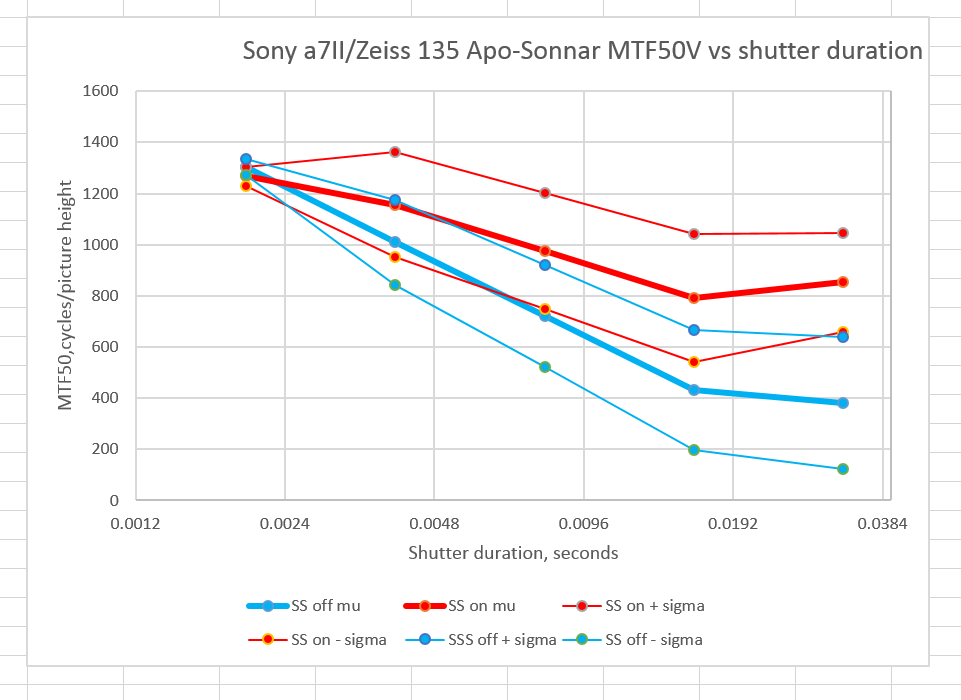
The vertical axis is the MTF50 for the image: the point where, as the spatial frequency of the subject matter increases, the response on the sensor is reduced to half its very-low-frequency value. The units of spatial frequency are cycles per picture height. Since the a7II has a picture height of 4000 pixels, the highest that the MTF50 should ever get is 2000 cycles per picture height. 1500 is exemplary performance, and not something we are likely to ever see with edges perpendicular to the strong axis of the a7II’s anti-aliasing filter .
The horizontal axis is the shutter duration. The points on the graph correspond to 1/500, 1/250, 1/125, 1/60, and 1/30 second.
The heavy lines are the average for all 16 exposures. The red is with IBIS on, and the blue is with is off (In the legend, I call IBIS “SS”, for SteadyShot). The light lines are the average plus one standard deviation and the average minus one standard deviation. If the statistics for handheld MTF50 turn out to be Gaussian, about two thirds of the images will fall between the two narrow lines. Mu stands for mean. and sigma for standard deviation.
You can see that for the Apo-Sonnar, the IBIS is effective at making the average sharpness better, and lowers the spread of sharpness among groups of photographs somewhat, but not as much as I’ve seen in previous tests. This is my first test on a non-Sony, non-zoom lens since I updated the camera’s firmware to 1.20. I’ll be doing further testing.
By the way, having used the Apo-Sonnar and the 135 Apo-Telyt back to back under the same circumstances, i am struck by how much easier it is to deal with the Leica lens. It feels like it was made for the a7II; the Zeiss is huge and heavy. The Leica’s focusing ring is near the body end of he lens, and very easy to use. The Zeiss ring is towards the front of the lens, and is so wide that you have to make an effort not to move it using the Souza grip. Because of the focusing rings, it’s easy to focus the Leica lens, and a little harder to focus the Zeiss, although the IBIS makes a big difference in both cases.
Since I have the data for the Leica 135/3.4 Apo-Telyt, I might as well show it to you. The shutter speeds are slightly different.
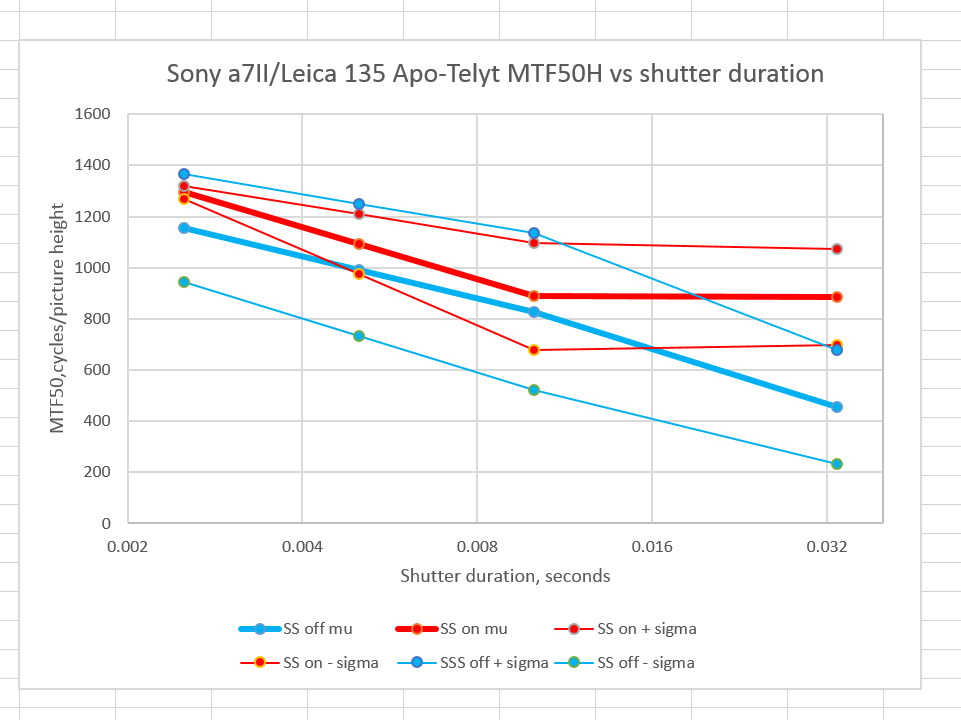
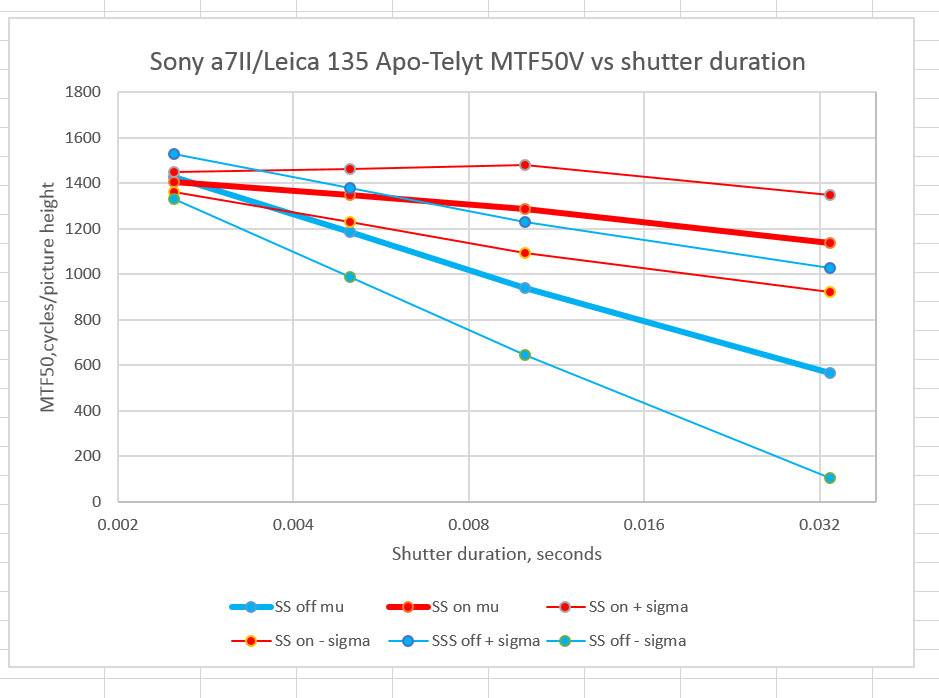
You’ll note that the Leica lens’ more balanced configuration on the a7II makes for sharper handheld images, even though the lens itself is not sharper than the Apo-Sonnar )At f/8, there’s not much difference between them).
Why is that? It’s got to have something to do with how easy the two camera/lens combinations are to handhold, unless I misfocused the Apo-Sonnar images — hard to do with an f/2 lens with essentially zero focus shift. It could also be that the much heavier Zeiss lens means that the small movements from handholding are lower frequency but higher in amplitude, and therefore more likely to exceed the shifting capability of the IBIS mechanism than with the light, dainty Leica lens.
NightPhotographer says
Hello
Was it Nikon mount or Canon mount? One has to change the aperture manually in Nikon mount which might throw the subject off focus.
Jim says
Nikon
Jerry Fusselman says
Just a thought: IBIS needs to know the focal length of the lens to work best. Is there any chance that the IBIS does not know the focal length with these 135’s? It is not easy to imagine what might cause these relatively poor results.
Jim says
FL was entered into IBIS setup manually.