• site home
  • blog home
  • galleries
  • contact
  • underwater
  • the bleeding edge

the last word

Photography meets digital computer technology. Photography wins -- most of the time.

You are here: Home / The Last Word / 85 Otus, Tele-Tessar, handheld w/ IBIS on the a7II

85 Otus, Tele-Tessar, handheld w/ IBIS on the a7II

April 27, 2015 JimK Leave a Comment

Yesterday, although it was hard to tell for sure because of the noise associated with handheld testing, that a lighter lens did slightly better when handheld with IBIS on the Sony alpha 7 Mark II (a7II) at 135mm. For today’s test, I’m pairing the monstrous, heavy Zeiss 85mm f/1.4 Otus with the svelte, dimunitive Zeiss 85mm f/4 Tele-Tessar ZM, both used on the a7II..

The protocol:

  • A single Fotodiox LED-200WA-56 daylight balanced flood.
  • ISO set to 640, f-stop set to 8,
  • Focusing manually using maximum magnification wide open,
  • Drive set to single
  • EFCS on
  • Manual exposure mode.
  • “Pete Souza” grip: left palm under base, left fingers bracing the underside of the front part of the lens, elbows against chest, and following this rifle-range release protocol: Inhale, exhale, brace gently, think calm thoughts, squeeze the shutter release, remembering to “pull through”
  • Exposure protocol: Light to maximum,, shutter to 1/500 second, make at many more than 16 exposures so you can be sure to have 16 ones where Imatest can find the region of interest (ROI), Turn the light down a stop, make at many more than 16 exposure, until you get to 1/30 of a second.
  • Make one series with IBIS on, and one with it off.
  • Develop in Lightroom CC 2015 (with ACR 9.0) with standard settings.
  • Crop, export as TIFFs, analyze for horizontal edge and vertical edge MTF50 in Imatest version 4.
  • Find the files for which Imatest improperly identified the ROI,  and replace them with the extra files. This is a manual, fiddly, boring, unpleasant operation.
  • Export the results to Excel, crunch the stats, and graph.

These graphs are for the horizontal edges. I ran out of patience before I could analyze the vertical ones.

TeleTessarMTFHH

otus85mtfhh

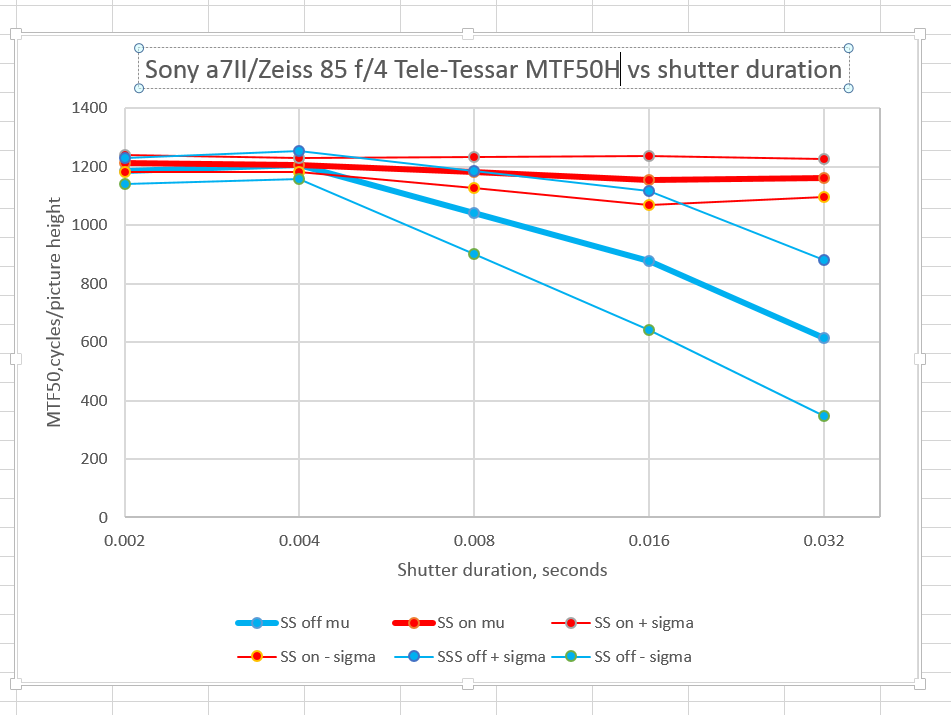
The vertical axis is the MTF50 for the image: the point where, as the spatial frequency of the subject matter increases, the response on the sensor is reduced to half its very-low-frequency value. The units of spatial frequency are cycles per picture height. Since the a7II has a picture height of 4000 pixels, the highest that the MTF50 should ever get is 2000 cycles per picture height. 1500 is exemplary performance, and not something we are likely to ever see with edges perpendicular to the strong axis of the a7II’s anti-aliasing filter .

The horizontal axis is the shutter duration. The points on the graph correspond to 1/500, 1/250, 1/125, 1/60, and 1/30 second.

The heavy lines are the average for all 16 exposures. The red is with IBIS on, and the blue is with is off (In the legend, I call IBIS “SS”, for SteadyShot). The light lines are the average plus one standard deviation and the average minus one standard deviation. If the statistics for handheld MTF50 turn out to be Gaussian, about two thirds of the images will fall between the two narrow lines. Mu stands for mean. and sigma for standard deviation.

The Otus is slightly worse than the Tele-Tessar at 1/250 second, but it’s probably not statistically significant. I’m discarding the light lens is better theory.

Note that the IBIS is producing nice tight spreads like it did at 180mm, 55mm and the wide angel focal lengths. That’s different from what we saw yesterday with the 135mm lenses.

I wonder if the a7II IBIS (firmware version 1.20 ) has a problem at 135mm


The Last Word

← 135 Apo-Sonnar, Apo-Telyt, handheld with IBIS on the a7II Spatial filtering of raw images by Sony a7S, a7II →

Leave a Reply Cancel reply

Your email address will not be published. Required fields are marked *

May 2025
S M T W T F S
 123
45678910
11121314151617
18192021222324
25262728293031
« Apr    

Articles

  • About
    • Patents and papers about color
    • Who am I?
  • How to…
    • Backing up photographic images
    • How to change email providers
    • How to shoot slanted edge images for me
  • Lens screening testing
    • Equipment and Software
    • Examples
      • Bad and OK 200-600 at 600
      • Excellent 180-400 zoom
      • Fair 14-30mm zoom
      • Good 100-200 mm MF zoom
      • Good 100-400 zoom
      • Good 100mm lens on P1 P45+
      • Good 120mm MF lens
      • Good 18mm FF lens
      • Good 24-105 mm FF lens
      • Good 24-70 FF zoom
      • Good 35 mm FF lens
      • Good 35-70 MF lens
      • Good 60 mm lens on IQ3-100
      • Good 63 mm MF lens
      • Good 65 mm FF lens
      • Good 85 mm FF lens
      • Good and bad 25mm FF lenses
      • Good zoom at 24 mm
      • Marginal 18mm lens
      • Marginal 35mm FF lens
      • Mildly problematic 55 mm FF lens
      • OK 16-35mm zoom
      • OK 60mm lens on P1 P45+
      • OK Sony 600mm f/4
      • Pretty good 16-35 FF zoom
      • Pretty good 90mm FF lens
      • Problematic 400 mm FF lens
      • Tilted 20 mm f/1.8 FF lens
      • Tilted 30 mm MF lens
      • Tilted 50 mm FF lens
      • Two 15mm FF lenses
    • Found a problem – now what?
    • Goals for this test
    • Minimum target distances
      • MFT
      • APS-C
      • Full frame
      • Small medium format
    • Printable Siemens Star targets
    • Target size on sensor
      • MFT
      • APS-C
      • Full frame
      • Small medium format
    • Test instructions — postproduction
    • Test instructions — reading the images
    • Test instructions – capture
    • Theory of the test
    • What’s wrong with conventional lens screening?
  • Previsualization heresy
  • Privacy Policy
  • Recommended photographic web sites
  • Using in-camera histograms for ETTR
    • Acknowledgments
    • Why ETTR?
    • Normal in-camera histograms
    • Image processing for in-camera histograms
    • Making the in-camera histogram closely represent the raw histogram
    • Shortcuts to UniWB
    • Preparing for monitor-based UniWB
    • A one-step UniWB procedure
    • The math behind the one-step method
    • Iteration using Newton’s Method

Category List

Recent Comments

  • Mike MacDonald on Your photograph looks like a painting?
  • Mike MacDonald on Your photograph looks like a painting?
  • bob lozano on The 16-Bit Fallacy: Why More Isn’t Always Better in Medium Format Cameras
  • JimK on Goldilocks and the three flashes
  • DC Wedding Photographer on Goldilocks and the three flashes
  • Wedding Photographer in DC on The 16-Bit Fallacy: Why More Isn’t Always Better in Medium Format Cameras
  • JimK on Fujifilm GFX 100S II precision
  • Renjie Zhu on Fujifilm GFX 100S II precision
  • JimK on Fuji 20-35/4 landscape field curvature at 23mm vs 23/4 GF
  • Ivo de Man on Fuji 20-35/4 landscape field curvature at 23mm vs 23/4 GF

Archives

Copyright © 2025 · Daily Dish Pro On Genesis Framework · WordPress · Log in

Unless otherwise noted, all images copyright Jim Kasson.