• site home
  • blog home
  • galleries
  • contact
  • underwater
  • the bleeding edge

the last word

Photography meets digital computer technology. Photography wins -- most of the time.

You are here: Home / The Last Word / Aliasing visibility and PS downsampling

Aliasing visibility and PS downsampling

July 2, 2016 JimK Leave a Comment

I interrupt the series of posts on DOF for this one that proves a point that most of my blog readers already know: in general downsampling can cause aliasing, and in particular the downsampling algorithms in Photoshop do cause aliasing, at least some of the time.

I’ve addressed this issue before, with spectral plots showing the details of what’s going on, but there is a discussion going on on DPR to which this point is germane, some of the participants have limited image-processing skills, and DPR damages posted images to the point that the visual comparisons I want to make are confused.

To make sure that you’re seeing the images properly here, click on each in turn and make sure your browser zooming is set to 100%. Otherwise, your browser will introduce aliasing. If you see aliasing in the first image, then something is wrong.

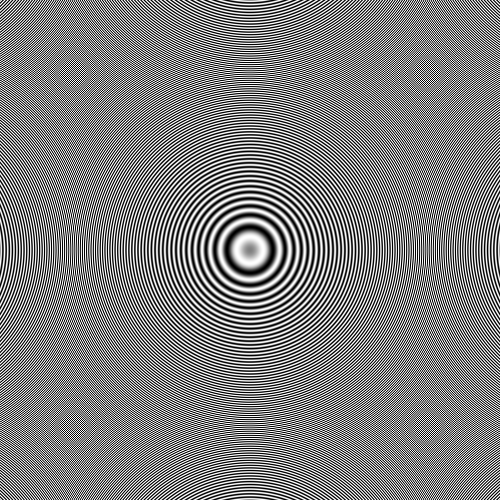
I started with this 1000×1000 pixel image:

Rings

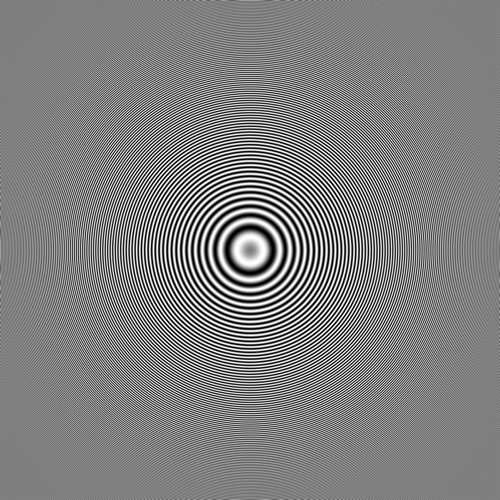
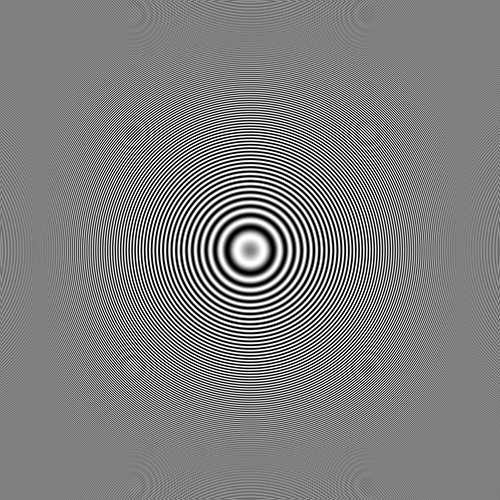
I downsampled it to 500×500 using several of the Photoshop (Ps) algorithms.

Nearest Neighbor
Nearest Neighbor
Bilinear
Bilinear
Bicubic
Bicubic
Bicubic Sharper
Bicubic Sharper

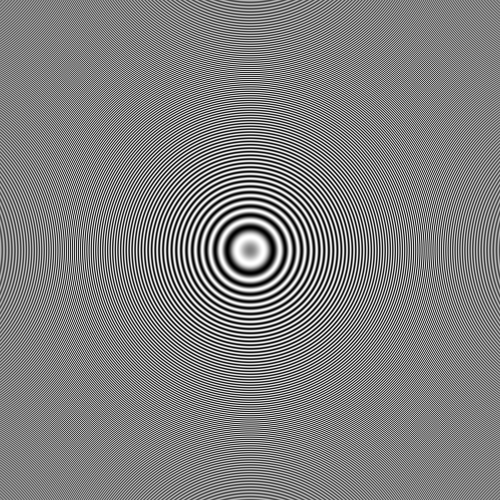
In all cases aliasing is visible as false patterns. There are false circles, and the rings at the edges go in the wrong direction. It is worst with nearest neighbor. That is expected; nearest neighbor has no lowpass filtering qualities, and there are many spatial frequencies in the original image that are beyond the Nyquist frequency of the downsampled image. By looking at the corners, you can see that nearest neighbor has not blurred the image at all.

That’s not the case with the other three algorithms. Bilinear offers the most detail of those at the edges and corners, but you pay for that with more aliasing. Bicubic is next, and then (surprisingly, considering the name) bicubic sharper.

The Last Word

← Depth of field and the web How to decrease photon noise →

Leave a Reply Cancel reply

Your email address will not be published. Required fields are marked *

May 2025
S M T W T F S
 123
45678910
11121314151617
18192021222324
25262728293031
« Apr    

Articles

  • About
    • Patents and papers about color
    • Who am I?
  • How to…
    • Backing up photographic images
    • How to change email providers
    • How to shoot slanted edge images for me
  • Lens screening testing
    • Equipment and Software
    • Examples
      • Bad and OK 200-600 at 600
      • Excellent 180-400 zoom
      • Fair 14-30mm zoom
      • Good 100-200 mm MF zoom
      • Good 100-400 zoom
      • Good 100mm lens on P1 P45+
      • Good 120mm MF lens
      • Good 18mm FF lens
      • Good 24-105 mm FF lens
      • Good 24-70 FF zoom
      • Good 35 mm FF lens
      • Good 35-70 MF lens
      • Good 60 mm lens on IQ3-100
      • Good 63 mm MF lens
      • Good 65 mm FF lens
      • Good 85 mm FF lens
      • Good and bad 25mm FF lenses
      • Good zoom at 24 mm
      • Marginal 18mm lens
      • Marginal 35mm FF lens
      • Mildly problematic 55 mm FF lens
      • OK 16-35mm zoom
      • OK 60mm lens on P1 P45+
      • OK Sony 600mm f/4
      • Pretty good 16-35 FF zoom
      • Pretty good 90mm FF lens
      • Problematic 400 mm FF lens
      • Tilted 20 mm f/1.8 FF lens
      • Tilted 30 mm MF lens
      • Tilted 50 mm FF lens
      • Two 15mm FF lenses
    • Found a problem – now what?
    • Goals for this test
    • Minimum target distances
      • MFT
      • APS-C
      • Full frame
      • Small medium format
    • Printable Siemens Star targets
    • Target size on sensor
      • MFT
      • APS-C
      • Full frame
      • Small medium format
    • Test instructions — postproduction
    • Test instructions — reading the images
    • Test instructions – capture
    • Theory of the test
    • What’s wrong with conventional lens screening?
  • Previsualization heresy
  • Privacy Policy
  • Recommended photographic web sites
  • Using in-camera histograms for ETTR
    • Acknowledgments
    • Why ETTR?
    • Normal in-camera histograms
    • Image processing for in-camera histograms
    • Making the in-camera histogram closely represent the raw histogram
    • Shortcuts to UniWB
    • Preparing for monitor-based UniWB
    • A one-step UniWB procedure
    • The math behind the one-step method
    • Iteration using Newton’s Method

Category List

Recent Comments

  • JimK on Goldilocks and the three flashes
  • DC Wedding Photographer on Goldilocks and the three flashes
  • Wedding Photographer in DC on The 16-Bit Fallacy: Why More Isn’t Always Better in Medium Format Cameras
  • JimK on Fujifilm GFX 100S II precision
  • Renjie Zhu on Fujifilm GFX 100S II precision
  • JimK on Fuji 20-35/4 landscape field curvature at 23mm vs 23/4 GF
  • Ivo de Man on Fuji 20-35/4 landscape field curvature at 23mm vs 23/4 GF
  • JimK on Fuji 20-35/4 landscape field curvature at 23mm vs 23/4 GF
  • JimK on Fuji 20-35/4 landscape field curvature at 23mm vs 23/4 GF
  • Ivo de Man on Fuji 20-35/4 landscape field curvature at 23mm vs 23/4 GF

Archives

Copyright © 2025 · Daily Dish Pro On Genesis Framework · WordPress · Log in

Unless otherwise noted, all images copyright Jim Kasson.