• site home
  • blog home
  • galleries
  • contact
  • underwater
  • the bleeding edge

the last word

Photography meets digital computer technology. Photography wins -- most of the time.

You are here: Home / The Last Word / Back to the firehouse

Back to the firehouse

March 22, 2014 JimK Leave a Comment

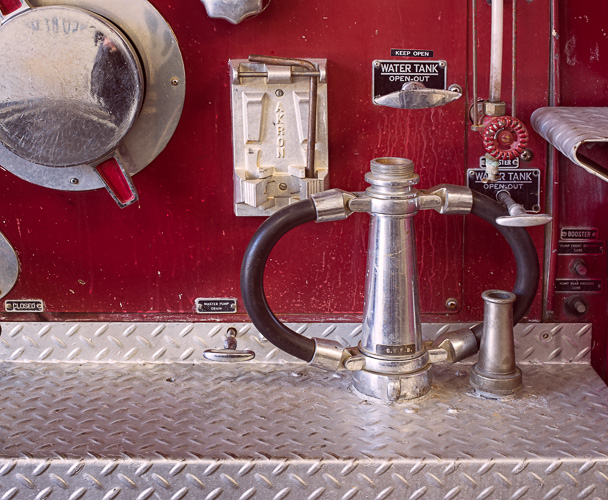
After an extensive technical detour that will be familiar to regular readers, yesterday I started back on the Firehouse pictures. I took three cameras, the a7 (for handholding) the a7R, the D800E, and four lenses, the Zony 55 (on the a7), the Zeiss 135mm Apo Sonnar, the Zeiss 55mm Apo Distagon, and the Coastal Optics 60mm macro lens. I ended up not using the a7 at all; the light was too dim. Surprisingly, at least to me, I only made a couple of images with the D800E, both with the 135. Instead, I spent nearly all my time with the a7R and the 55mm Apo Distagon.

I love that lens. First off, it’s got a nice long focusing throw and a silky-smooth action, so it’s a tactile joy to focus. I was shooting entirely with the idea of doing focus-stacking later, and the long throw makes the depth of field markings useful in getting the right focus difference between the pictures in a stack. Second, it’s so contrasty and so fast that there’s hardly ever any doubt when something’s in focus. It goes without saying that it makes really nice images.

Why did I use the a7R in preference to the D800E? I’m not afraid of the a7R’s shutter shock with lenses shorter than 135mm under conditions where I can make sure my exposures are long enough. If the subject’s not moving, I can use a neutral density filter to get the long exposures without having to stop the lens down too far. The Otus only stops down to f/16, so only one stop really suffers from diffraction with that lens.

The live view on the a7R is so much better than that on the D800E that it’s really hard to go back to the Nikon. In addition, I am spending more and more time using the LCD panel for focusing and framing. I don’t think I used the EVF once yesterday. The articulation of the LCD panel makes it easy to use at lowish camera heights that would have my back screaming with the Nikon.

14-03-22_132218_M=B_R=8_S=4a

For some reason, looking at the LCD finder, like looking at a ground glass with both eyes, makes it easier for me to compose the picture than using an EVF, or a prism finder, for that matter. I like the grid that you can have the camera superimpose on the image, too. You can always straighten things out in post, but it costs you resolution, and it’s more satisfying to line up the shot right in the camera. However, I think the rule-of-thirds grid is the work of the Devil and an invitation to boring, formulaic pictures.

14-03-22_143926_M=B_R=8_S=4-Edit

What’s not to like about the a7R experience for this kind of subject matter? Battery life? Not a problem for me yesterday; I had two spares, and used neither. I had the Monitor/EVF switching set to Auto, and it switched off the LCD panel whenever I got close to the panel to get a really good look at the image. It would be nice if you could switch it to manual, and use one of the custom buttons to toggle it back and forth from the EVF to the LCD panel, but that’s not possible. I’m going to leave it in Auto, and next time I’ll change it to the LCD panel for the shoot, and change it back at the end. Otherwise, I’ll forget that it’s not on Auto, raise the camera to my eye, and be surprised when I can’t see anything. I also had the power saving timeout set to 1 minute, and discovered that that’s not long enough for the kind of work I was doing. I set it to five minutes, which is fine.

14-03-22_133923_M=B_R=8_S=4-Edit

I used to think the camera I really wanted was the D4x, but I’m beginning to think that a 54 megapixel a7x with the ability to take leaf-shutter lenses would be awfully nice.

The Last Word

← a7 & a7R firmware upgrade Shift vs skew →

Leave a Reply Cancel reply

Your email address will not be published. Required fields are marked *

May 2025
S M T W T F S
 123
45678910
11121314151617
18192021222324
25262728293031
« Apr    

Articles

  • About
    • Patents and papers about color
    • Who am I?
  • How to…
    • Backing up photographic images
    • How to change email providers
    • How to shoot slanted edge images for me
  • Lens screening testing
    • Equipment and Software
    • Examples
      • Bad and OK 200-600 at 600
      • Excellent 180-400 zoom
      • Fair 14-30mm zoom
      • Good 100-200 mm MF zoom
      • Good 100-400 zoom
      • Good 100mm lens on P1 P45+
      • Good 120mm MF lens
      • Good 18mm FF lens
      • Good 24-105 mm FF lens
      • Good 24-70 FF zoom
      • Good 35 mm FF lens
      • Good 35-70 MF lens
      • Good 60 mm lens on IQ3-100
      • Good 63 mm MF lens
      • Good 65 mm FF lens
      • Good 85 mm FF lens
      • Good and bad 25mm FF lenses
      • Good zoom at 24 mm
      • Marginal 18mm lens
      • Marginal 35mm FF lens
      • Mildly problematic 55 mm FF lens
      • OK 16-35mm zoom
      • OK 60mm lens on P1 P45+
      • OK Sony 600mm f/4
      • Pretty good 16-35 FF zoom
      • Pretty good 90mm FF lens
      • Problematic 400 mm FF lens
      • Tilted 20 mm f/1.8 FF lens
      • Tilted 30 mm MF lens
      • Tilted 50 mm FF lens
      • Two 15mm FF lenses
    • Found a problem – now what?
    • Goals for this test
    • Minimum target distances
      • MFT
      • APS-C
      • Full frame
      • Small medium format
    • Printable Siemens Star targets
    • Target size on sensor
      • MFT
      • APS-C
      • Full frame
      • Small medium format
    • Test instructions — postproduction
    • Test instructions — reading the images
    • Test instructions – capture
    • Theory of the test
    • What’s wrong with conventional lens screening?
  • Previsualization heresy
  • Privacy Policy
  • Recommended photographic web sites
  • Using in-camera histograms for ETTR
    • Acknowledgments
    • Why ETTR?
    • Normal in-camera histograms
    • Image processing for in-camera histograms
    • Making the in-camera histogram closely represent the raw histogram
    • Shortcuts to UniWB
    • Preparing for monitor-based UniWB
    • A one-step UniWB procedure
    • The math behind the one-step method
    • Iteration using Newton’s Method

Category List

Recent Comments

  • JimK on Goldilocks and the three flashes
  • DC Wedding Photographer on Goldilocks and the three flashes
  • Wedding Photographer in DC on The 16-Bit Fallacy: Why More Isn’t Always Better in Medium Format Cameras
  • JimK on Fujifilm GFX 100S II precision
  • Renjie Zhu on Fujifilm GFX 100S II precision
  • JimK on Fuji 20-35/4 landscape field curvature at 23mm vs 23/4 GF
  • Ivo de Man on Fuji 20-35/4 landscape field curvature at 23mm vs 23/4 GF
  • JimK on Fuji 20-35/4 landscape field curvature at 23mm vs 23/4 GF
  • JimK on Fuji 20-35/4 landscape field curvature at 23mm vs 23/4 GF
  • Ivo de Man on Fuji 20-35/4 landscape field curvature at 23mm vs 23/4 GF

Archives

Copyright © 2025 · Daily Dish Pro On Genesis Framework · WordPress · Log in

Unless otherwise noted, all images copyright Jim Kasson.