• site home
  • blog home
  • galleries
  • contact
  • underwater
  • the bleeding edge

the last word

Photography meets digital computer technology. Photography wins -- most of the time.

You are here: Home / The Last Word / Browser and OS scaling in Windows

Browser and OS scaling in Windows

August 16, 2021 JimK 1 Comment

When I post images from lens tests, I often encourage you to look at them at 1:1. I explain how to view them assuming that you’re looking at them at 1:1. But I haven’t explained the ins and outs of that. That was partially because I thought everybody understood them, and partly because I thought they were simple. I was wrong on both counts.

In order to figure out what is going on, I did some testing.

I uploaded a large JPEG file to a DPR post, click on the JPEG button to get it in a window all by itself, and, using Save As…” download it to my computer. So I had the file I uploaded and the file I downloaded in the same directory.

I noticed that they were the same length.

I brought both files into Photoshop as layers, and set the blend mode to Difference. I was rewarded with an image that looked completely black, even with aggressive curves applied. I wrote that image into a file, brought the file into Matlab, and looked for the largest pixel in the image:

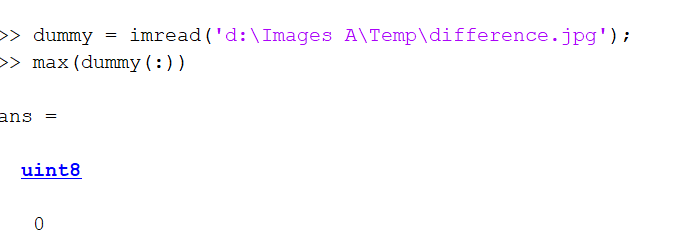
So every entry in the file was zero. That means that DPR is not compressing the files at all. That was a surprise; conventional wisdom seemed to be that they heavily compressed the files.

I turned my attention to the browser scaling. I opened up the Windows 10 scaling window:

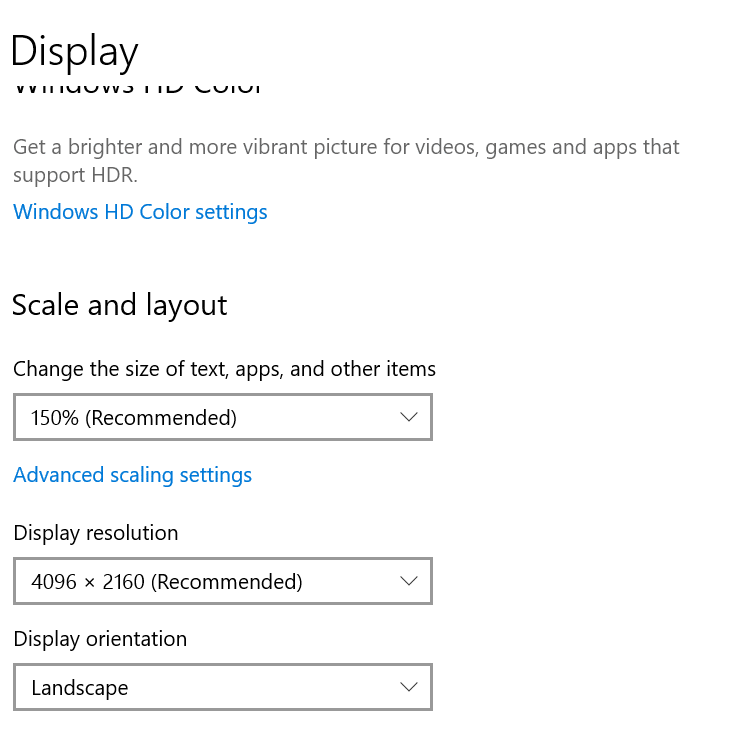
The default scaling is 150%, which is normal for a 32 inch 4K monitor. I set it to 100%. I set my browser (Chrome) to 100% scaling, and told DPR to render the image at 1:1. Then I brought the JPEG image that I’d uploaded into Photoshop, which ignores the OS scaling setting, and set the magnification to 100%. When I compared the version in the browser to the version in Photoshop, they were very similar. I noted no sharpness differences, but there were some subtle color and tonality differences that I put down to the two images going through two different color management chains.

With a 32 inch 4K monitor, setting the OS scaling to 100% is not practical. Everything is just too darned small. So I tried setting the OS scaling to 150% (the default) and the browser scaling to 67%. Would the two settings cancel out and let me see the image at 100% in the browser window?

Yes, indeed. the browser and Photoshop images looked the same as when I had the browser scaling and the OS scaling set to 100%.

So here’s the rule foe looking at images in your browser at 1:1: if your OS scaling is set to x, set your browser scaling to 1/x.

There was one last thing to check. When you ask the browser to scale up an image, how well does it do? I had always thought that it didn’t do that well, but have never tested it. I set the Photoshop magnification to 300%. I left the OS magnification at 150%, and set the browser magnification to 200%, for a total of 300%. I eyeballed the two images. I could see some scaling-related differences, with the nod going to Photoshop, but the browser scaling wasn’t bad at all. It may be different with other browsers.

Things are not so simple on the Mac, but I only have one Mac, and I infrequently use it, so I’m not up on its tricks and foibles well enough to figure out what it does.

The Last Word

← Buying a camera by feel Fuji 120/4 GF microcontrast at close distances →

Comments

  1. Henrik Helmers says

    October 5, 2021 at 12:28 am

    If at all possible, never use fractional scaling. Meaning 100%, 200% or 300%. In my testing macOS does a better job with resolutions like 150% and other platforms. It will render at a higher resolution (200%) and scale down. The resulting blur is bad, but the behavior is predictable, as applications do not have to deal with fractional sizes.

    In the browser world, some properties can be fractional, others cannot. The layout is only done with integers, meaning that height, width, and borders are not fractional. In an environment scaled to 150%, a border will be 1 or 2 pixels wide, depending on its position and other factors.

    Source: I work as a designer on a cross-platform web browser.

    Reply

Leave a Reply Cancel reply

Your email address will not be published. Required fields are marked *

May 2025
S M T W T F S
 123
45678910
11121314151617
18192021222324
25262728293031
« Apr    

Articles

  • About
    • Patents and papers about color
    • Who am I?
  • How to…
    • Backing up photographic images
    • How to change email providers
    • How to shoot slanted edge images for me
  • Lens screening testing
    • Equipment and Software
    • Examples
      • Bad and OK 200-600 at 600
      • Excellent 180-400 zoom
      • Fair 14-30mm zoom
      • Good 100-200 mm MF zoom
      • Good 100-400 zoom
      • Good 100mm lens on P1 P45+
      • Good 120mm MF lens
      • Good 18mm FF lens
      • Good 24-105 mm FF lens
      • Good 24-70 FF zoom
      • Good 35 mm FF lens
      • Good 35-70 MF lens
      • Good 60 mm lens on IQ3-100
      • Good 63 mm MF lens
      • Good 65 mm FF lens
      • Good 85 mm FF lens
      • Good and bad 25mm FF lenses
      • Good zoom at 24 mm
      • Marginal 18mm lens
      • Marginal 35mm FF lens
      • Mildly problematic 55 mm FF lens
      • OK 16-35mm zoom
      • OK 60mm lens on P1 P45+
      • OK Sony 600mm f/4
      • Pretty good 16-35 FF zoom
      • Pretty good 90mm FF lens
      • Problematic 400 mm FF lens
      • Tilted 20 mm f/1.8 FF lens
      • Tilted 30 mm MF lens
      • Tilted 50 mm FF lens
      • Two 15mm FF lenses
    • Found a problem – now what?
    • Goals for this test
    • Minimum target distances
      • MFT
      • APS-C
      • Full frame
      • Small medium format
    • Printable Siemens Star targets
    • Target size on sensor
      • MFT
      • APS-C
      • Full frame
      • Small medium format
    • Test instructions — postproduction
    • Test instructions — reading the images
    • Test instructions – capture
    • Theory of the test
    • What’s wrong with conventional lens screening?
  • Previsualization heresy
  • Privacy Policy
  • Recommended photographic web sites
  • Using in-camera histograms for ETTR
    • Acknowledgments
    • Why ETTR?
    • Normal in-camera histograms
    • Image processing for in-camera histograms
    • Making the in-camera histogram closely represent the raw histogram
    • Shortcuts to UniWB
    • Preparing for monitor-based UniWB
    • A one-step UniWB procedure
    • The math behind the one-step method
    • Iteration using Newton’s Method

Category List

Recent Comments

  • bob lozano on The 16-Bit Fallacy: Why More Isn’t Always Better in Medium Format Cameras
  • JimK on Goldilocks and the three flashes
  • DC Wedding Photographer on Goldilocks and the three flashes
  • Wedding Photographer in DC on The 16-Bit Fallacy: Why More Isn’t Always Better in Medium Format Cameras
  • JimK on Fujifilm GFX 100S II precision
  • Renjie Zhu on Fujifilm GFX 100S II precision
  • JimK on Fuji 20-35/4 landscape field curvature at 23mm vs 23/4 GF
  • Ivo de Man on Fuji 20-35/4 landscape field curvature at 23mm vs 23/4 GF
  • JimK on Fuji 20-35/4 landscape field curvature at 23mm vs 23/4 GF
  • JimK on Fuji 20-35/4 landscape field curvature at 23mm vs 23/4 GF

Archives

Copyright © 2025 · Daily Dish Pro On Genesis Framework · WordPress · Log in

Unless otherwise noted, all images copyright Jim Kasson.