Yesterday’s post trotted out an idea for producing moderate resolution files from high-resolution cameras without demosaicing, and speculated that such files might show higher quality and fewer artifacts than similar-sized filed down-res’d from demosaiced raw files.
I looked around for a tool to perform an experiment. I didn’t have to look far. DCRAW has an option, -h, that produces a half-sized image using the idea that I proposed in yesterday’s post, right down to averaging the two green channels. I took a raw file of an ISO 12233 chart made with the Sony a7R and the Zeiss 135mm f/2 Apo Sonnar ZF.2, and “developed” in in DCRAW three ways, with the four-pixels-into-one half-sized option, and demosaiced using bilinear interpolation and adaptive homogeneity-directed demosaicing. I brought all the images into Photoshop, down-res’d the demosaiced images by 50% using bilinear and bicubic sharper, and stacked them up in five layers. On the bottom, the four-pixels-into-one image, above it the bilinear-interpolation-demosaiced images down-res’d both ways, and above that the adaptive homogeneity-directed demosaiced images down-res’d both ways. I put a curves layer on top of everything to set the black and the white point.
The two images that were down-res’d with bilinear interpolation were both softer than their bicubic sharper counterparts, and didn’t have significantly fewer artifacts, so I ignored them. The differences between the images demosaiced with the two quality settings were minimal, so I ignored the bilinear interpolation demosaiced one.
Overall, the image processed without demosaicing had greater microcontrast, but more false-color artifacts and more evidence of luminance aliasing artifacts. This was a surprise to me.
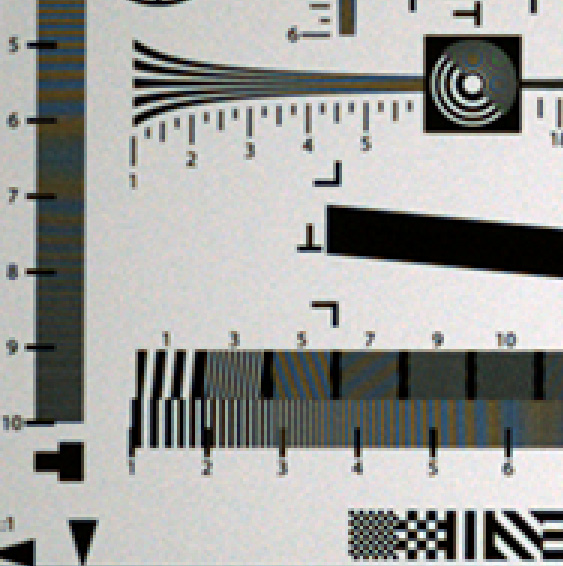
Take a look at this section of the target, enlarged 300% using nearest neighbor.
First with conventional demosaicing:
And with the four-pixels-into-one technique:
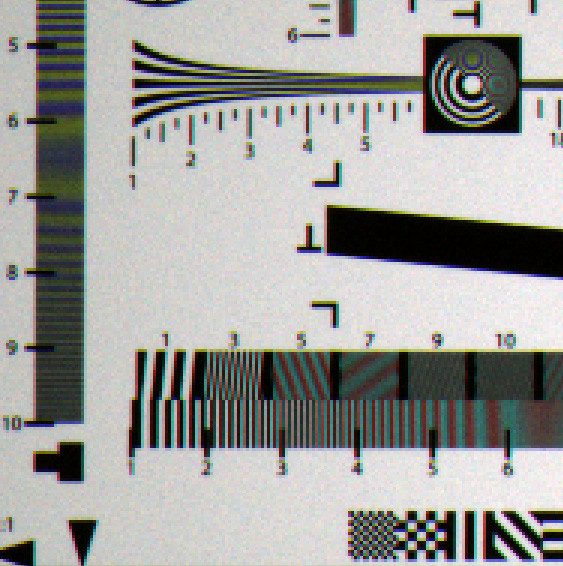
Take a look at the vertical bar on the left which has a slanted, but mostly horizontal, grating of increasing spatial frequencies running from top to bottom. Notice that in both images, the apparent frequency actually drops from above the “5” to above the “6”, further drops above the “7”, then starts to increase again. This is classic aliasing, where spatial frequencies above half the sampling frequency appear at lower than half the sampling frequency. It occurs in this section of the image at much higher contrast in the four-pixels-into-one case than in the demosaiced case.
To see what happens with spatial frequencies below the Nyquist frequency (half the sampling frequency), look at the variable-pitch horizontal grating to the left of the zone plate at the top of the image. The lines at about 3.5 are at the Nyquist frequency. You can see that the contrast at that point in the demosaiced image is close to zero, which is appropriate. So there’s antialiasing filtering in the combination of the demosaicing and the down-sampling. It’s not a brick-wall filter, though; the contrast of the area above the “2” is adversely affected compared to the four-pixels-into-one image.
If you look below the “3” at the slanted, but mostly vertical grating at the bottom center, you’ll see what happens to spatial frequencies just below the Nyquist frequency. They are reproduced with greater contrast in the four-pixels-into-one case, but there’s more false color.
The four-pixels-into-one technique doesn’t produce the anticipated freedom from false color with test charts. It appears that the sophistication of the current demosaicing techniques is enough to overcome any advantage that might accrue to the four-pixels-into-one approach.
As we’ve seen with cameras that omit the anti-aliasing filter, sometimes approaches that don’t work well for test charts are good for some real-world subjects. I’ll look at that next.
Leave a Reply