Ready for an unscientific experiment? Set up a sturdy tripod and head as if you were going to make a photograph, but don’t mount your camera on the head. Make sure there’s plenty of room around you. Make a fist. Holding your hand about a foot above the clamp, bring your hand down smartly, but not so hard that you hurt yourself. Give it a good whack. What happened? The tripod moved around, but it sure stopped your hand dead, didn’t it? Now take the same fist, and swing it through the same one-foot arc, but don’t come down on the top of the head; hit it from the side. Now pick your tripod up off the floor. You’ve just demonstrated that the tripod can resist motion in the vertical direction more easily than in the horizontal one (To all you engineers and physicists out there; yes, I know I’m oversimplifying).
The Copal shutter on the a7 and a7R moves mostly up and down. Thus, when the camera’s in landscape orientation, it tries to shake the camera in the direction that the tripod is stiff. However, when you rotate the camera 90 degrees into portrait mode, the shutter’s shaking the tripod in its wimpy direction. So, you can expect more vibration blur in your portrait-orientation images. How much more? That’s partially what this post is about. I haven’t done much a7R portrait-mode testing up to now, because I haven’t been real happy with the landscape-orientation results. However, yesterday’s good news – the a7R with a 135mm lens properly mounted never does worse than the a7 regardless of the shutter speed – gave me reason to see if the same is true in portrait mode.
If you want to just cut to the chase, no, it isn’t.
Still with me? I set up an a7R with the 135mm f/2 Zeiss APO Sonnar ZF.2 on a Novoflex adapter, mounted it like this:
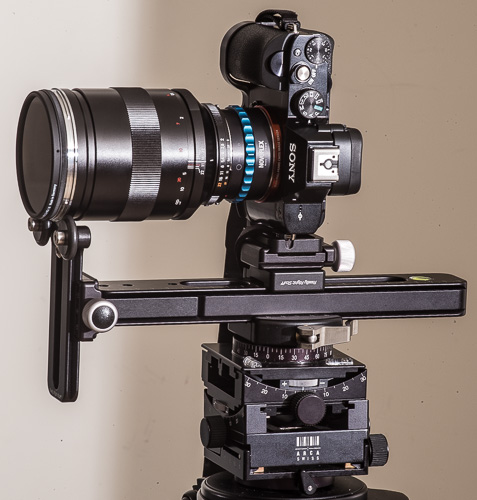
Note that the strap clip is squeezed between the RRS L-bracket and the camera body, reducing the cantilever effect. Note also that the shutter is right over the tripod head, to minimize rotational effects due to shutter inertia.
There’s much less sophistication in the way I mounted the a7, using the Novoflex ASTAT-NEX foot, but thanks to the a7’s electronic first curtain, this mounting arrangement works just fine:

I supported the above setups with an Arca Swiss C1 Cube (which you can see in the pictures) and RRS TVC-44 legs (which you can’t). Heliopan 77mm variable neutral density filter on the lens. Release with the 2 second self-timer. ISO 400, lens focused wide open and then stopped down to f/5.6. ISO 12233 target with the camera at a distance to yield an active area about 750 pixels high for the a7R images, and 615 for a7 ones. Thus, the lines labeled “8” represent slightly more than 1 line pair per pixel pair in the a7R images, and the lines labeled “6” represent about 1 line pair per pixel pair in the a7R ones.
Target illumination for the continuous lighting images was provided by a single Fotodiox LED-200WA-56 lamp set to full output, using the supplied reflector. I set the camera to aperture priority, and, with the ND filter set to minimum attenuation, adjusted the exposure compensation to give a shutter speed of 1/640 second. I made an exposure. Then I added sufficient light attenuation to get the shutter to 1/3 stop slower speed, and made another exposure. I continued all the way to a shutter speed of ¼ second. Then I did the whole thing again with the other camera.
I brought the images into Lightroom, tweaked exposure and set white balance by eyedropper on the paper white of the target. I left all the other settings at default. I found the sharpest a7R image (1/640 second), and opened it in Photoshop. Then I found the fuzziest (1/80 second) and did the same. I enlarged both images to 300% using bilinear interpolation. This isn’t the sharpest way to scale up an image, but it’s the about the least likely to introduce artifacts. I checked the a7 images, and saw that they were all about the same sharpness. I opened the 1/640 second one in Photoshop, and scaled it up to 368% using bilinear interpolation, so that the target features were the same size in pixels as in the a7R images.
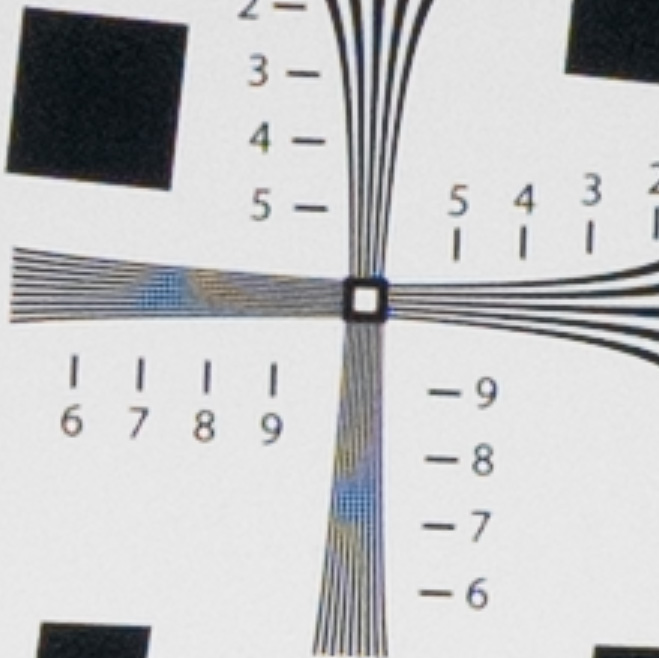
Here’s the sharpest a7R image (1/640 second) cropped to the upper right cross:
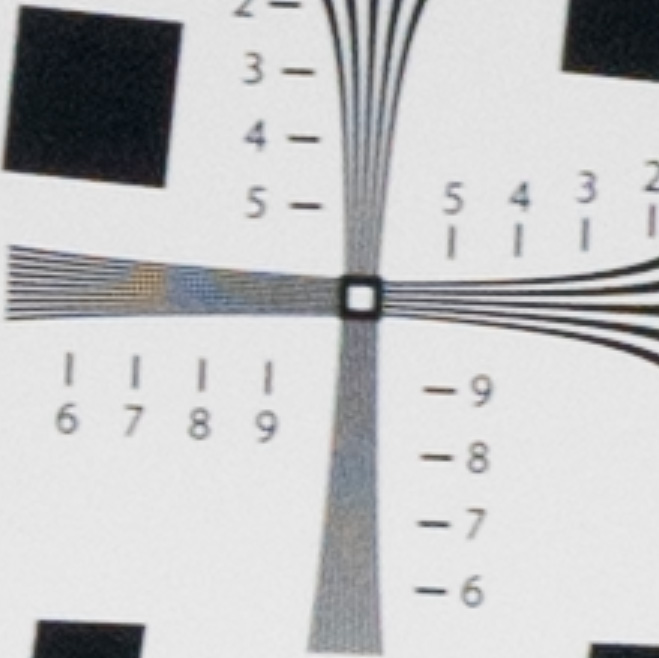
Here’s the worst a7R image (1/80 second) cropped to the upper right cross:
Here’s the a7 image cropped to the upper right cross:
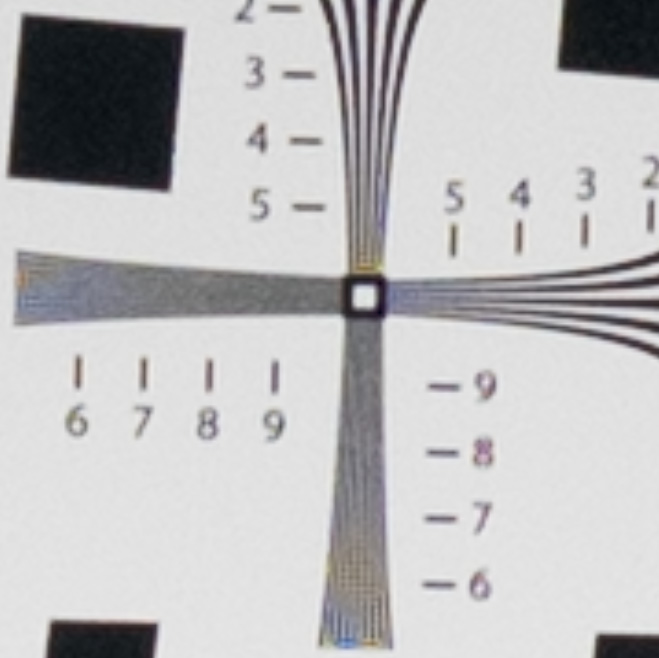
The good news (if you’ve got an a7R): the a7 image is not as sharp as the worst a7R image vertically (for horizontal lines). In fact, the horizontal lines in the worst a7R image aren’t much worse than they are in the best. The bad news: the a7 image is somewhat sharper than the worst a7R image horizontally (for vertical lines). We’ve managed to turn a 36 megapixel camera with no AA filter into a quasi-24 megapixel camera with one.
I’ve got a few ideas that may help things. More later.
Leave a Reply