I haven’t posted in the last few days. That’s not because I was taking time off from photo tech. It’s because I’ve been beavering away on how to measure and design color profiles. I’ve built more than 50 of them, learned a lot, found a few dead ends, and am finally reading to report my discoveries to you all. I did some of work with lighting with odd spectra, since that is where I think custom profiles have the most utility, but I’ll leave that for another post, partly because I would like to do some better instrumentation, and also because throwing that into the mix would make this post even more complicated than it already is.
A lot has been made of how to expose the target so that reflections and glare is not a problem. It is possible to take this to extremes. You can build a box around the sensor, line it with black velvet, cut holes for the lens and the lights, and fire away. Or, if you’re using artificial lights, you could perform the target captures on a moonless night in the middle of a field, with the black velvet draped around the camera — and around you, if you don’t have a radio trigger. I figure that most photographers aren’t going to do their target captures that way, so I opted for a basic setup. I used two FlashPoint/Godox AD600Pro strobes, set to 1/64 power, which gave this spectrum:
The strobes get bluer as you turn them down. There is some peakyness, and the CRI is only about 98. I could do better with incandescent bulbs, but I’m never going to use them for real photography. I put a 12-inch parabolic reflector on one of the strobes, and a 6-inch snoot on the other, and lined them up at a 45-degree angle on opposite sides of the target. After I exposed the target, I shot a white card. Here’s what it looks like cropped to the field of view of the target:
It’s only fairly even, but I was planning on using flat field techniques for making and measuring the profiles, so I wasn’t worried about that.
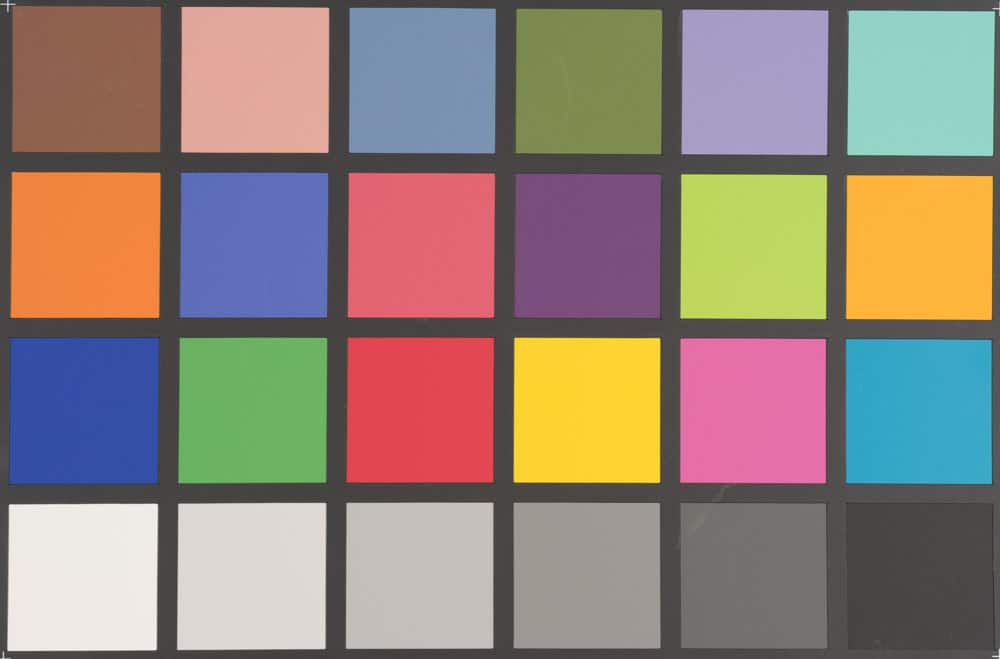
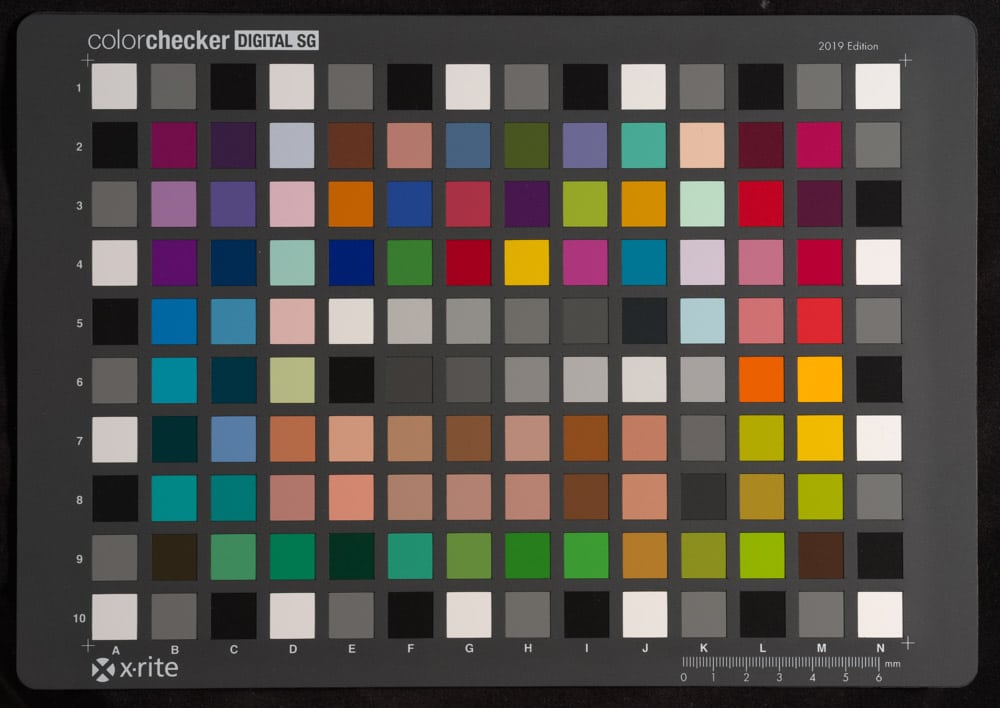
I exposed both the CC24 and CCSG targets on a black velvet background with the GFX 100 at f/11, 1/60 second, and ISO 100:
Both those shots are brightened up about two stops from the raw captures using Lightroom’s Process Version 1 to keep things linear; I was mainly concerned that there was no clipping at all in any raw channel. That doesn’t affect the profiling, since I built the profiles from DNG files that came directly from the raws.
I’m going to be presenting a lot of data, and I think it will help you deal with it if I list the questions that it’s supposed to help answer:
- How much good does shooting a flat field image and using that when you make your profile do?
- How much good does shooting a flat field image and using that when you evaluate your profile do?
- What kind of accuracy is possible with the GFX 100 and “reproduction” profiles? How inaccurate are some of the common general-purpose profiles?
- How well do various profiles trade off accuracy with increased chroma?
- Does shooting a ColorChecker SG when you make your profile give you better or worse results with a ColorChecker 24 target than using that target when you make your profile?
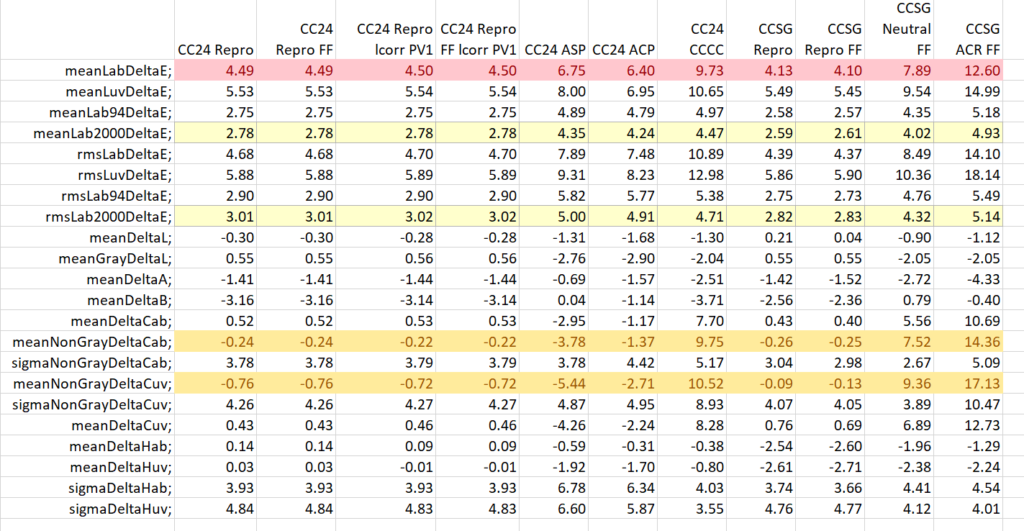
At the risk of scaring people off, I’m going to present all the data that we’ll be using for the rest of this post, together with a description of the rows and columns. If you are a seasoned color pro, this will be all that you need. If you’re not, don’t worry. You don’t have to understand it all. I’ll be going through the most significant data and giving you explanations if you scroll down further.
Here is a description of each of the columns:
- CC24 Repro: using the CC24 target, and picking Reproduction as the profile type in LumaRiver Profile Designer. I used 2 1/2 D lookup tables. 3D tables are more accurate, but require absolute control of exposure, and are thus not useful in general photography.
- C24 Repro FF: like 1, but using the flat fielding feature of LumaRiver Profile Designer.
- CC24 Repro lcorr PV1: like 1, but normalized to near full scale using the Exposure control in Lightroom and Process Version 1. PV1 does not apply a “shoulder” nonlinearity when you increase exposure; all the other process versions do.
- CC24 Repro lcorr PV1: like 2, but normalized to near full scale using the Exposure control in Lightroom and Process Version 1.
- CC24 ASP: using the Adobe Standard Profile.
- CC24 ASP: using the Adobe Color Profile.
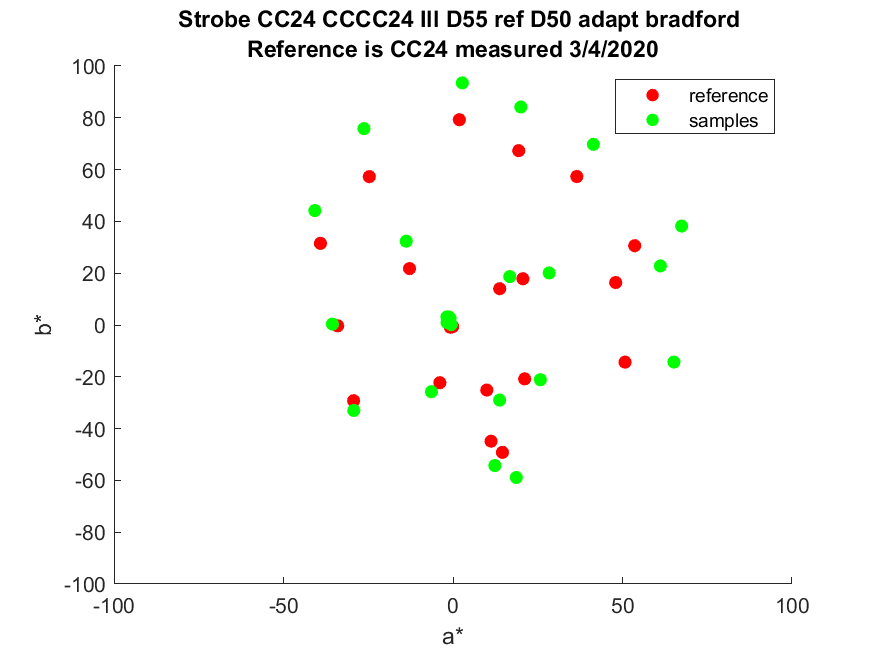
- CC 24 CCCC: using the CC24 target and the X-Rite Color Checker Camera Calibration profile maker.
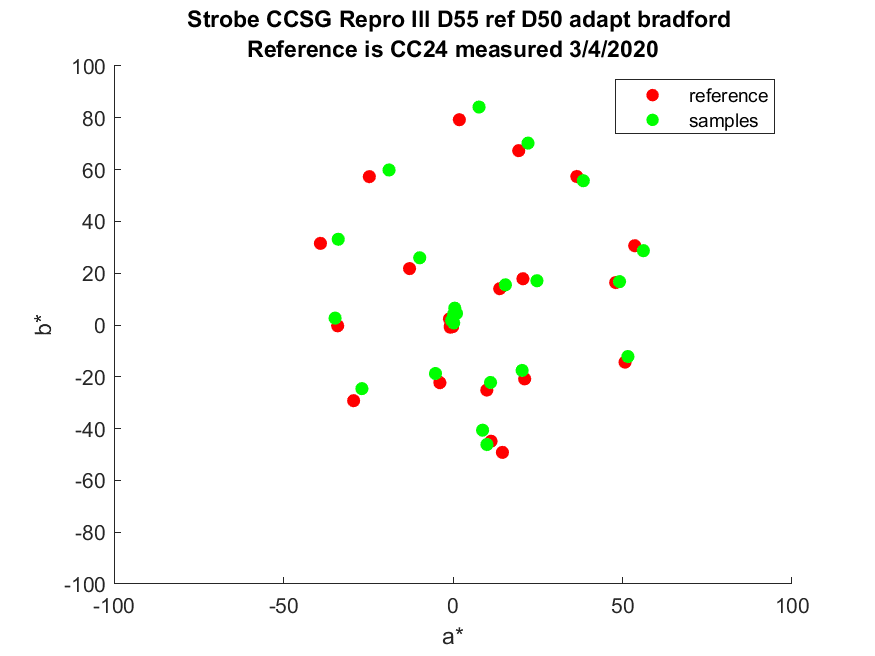
- CCSG Repro: using the CCSG target, and picking Reproduction as the profile type in LumaRiver Profile Designer and using 2 1/2 D lookup tables.
- CCSG Repro FF: like 8, but using the flat fielding feature of LumaRiver Profile Designer.
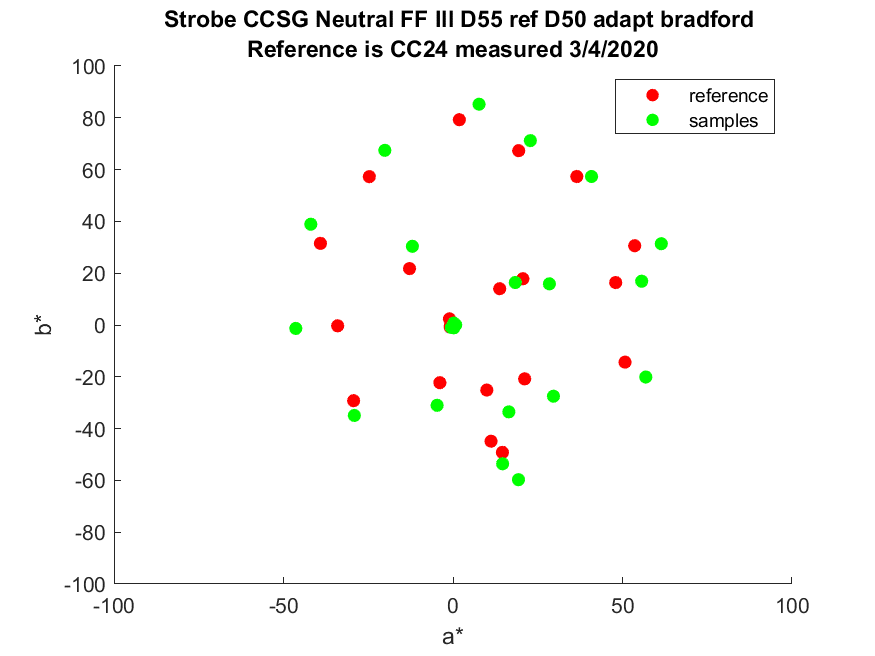
- CCSG Neutral FF: using the CCSG target and LumaRiver Profile Designer, but picking profile type as General-Purpose, and using the Linear tone curve and Neutral Optimization.
- CCSG ACR FF: like 10, but using the ACR default tone curve.
In all cases, the profile measurements were determined using a shot of the CC24 target. Since the putative CC24 patches in the CCSG target aren’t the same as the ones in the real CC224 target, that means the CCSG-based profiles are evaluated with patches outside of the training set. The profiles that were based on CC24 shots were evaluated by a test set that is identical to the training set. That should give the CC24-based profiles an advantage. How much of one? We’ll see.
The target values used by the profile makers for the training set were the stored values that the profile makers shipped with. The target values for the profile evaluation were created by me, using an X-Rite i1Pro Model 1D and BabelColor’s PatchTool.
Now the rows:
Mean Delta E is the average CIELab delta E. Since Delta E can never be negative, errors in one direction don’t cancel out errors in another.
Mean Delta L is the average difference in the CIELab and CIELuv vertical (luminance) channel. Positive Delta L means that the output is brighter than it should be. Negative Delta L means that the output is darker than it should be. Thus Delta L is good for detecting systematic luminance bias.
Mean Gray Delta L is the average difference in the CIELab and CIELuv vertical (luminance) channel for the 6 gray patches. Positive Gray Delta L means that the output is brighter than it should be. Negative Gray Delta L means that the output is darker than it should be. Thus Gray Delta L is good for detecting systematic luminance bias in the gray axis.
Mean Delta A and B are the average differences in the CIELab and CIELuv a and b channels. Positive Delta A or B means that the output is redder or yellower than it should be. Negative Delta A or B means that the output is bluer or more cyan than it should be. These measures are good for detecting systematic color balance bias.
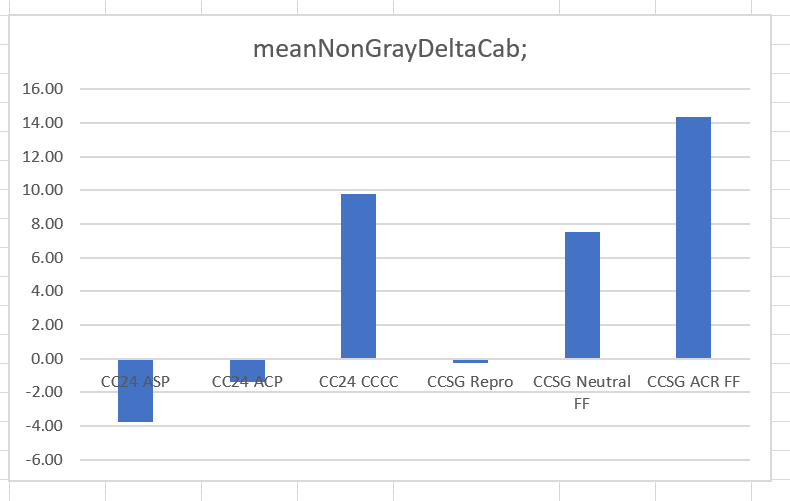
Mean Delta Cab is the average chroma error measured in Lab. A positive number means that the output colors are more saturated than they should be. A negative number means that the output colors are less saturated than they should be.
Mean Non-Gray Delta Cab is the average chroma error measured in Lab for the 18 chromatic patches. Mean Non-Gray Delta Cuv is the average chroma error measured in CIELuv for the 18 chromatic patches. A positive number means that the output colors are more saturated than they should be. A negative number means that the output colors are less saturated than they should be. The sigma metrics track the standard deviation of the 18 samples.
Mean Delta Hab is the average hue angle error measured in Lab, expressed in degrees. The gray patches are excluded from this measure, since their target hue angle is undefined. A positive number means that the output colors have a hue angle higher than they should have. A negative number means that the output colors have a hue angle lower than they should have. Mean Delta Huv is the same measure in CIELuv. The sigma metrics track the standard deviation of the 18 samples.
OK, now let’s tackle two questions:
- How much good does shooting a flat field image and using that when you make your profile do?
- Does shooting a ColorChecker SG when you make your profile give you better or worse results with a ColorChecker 24 target than using that target when you make your profile?
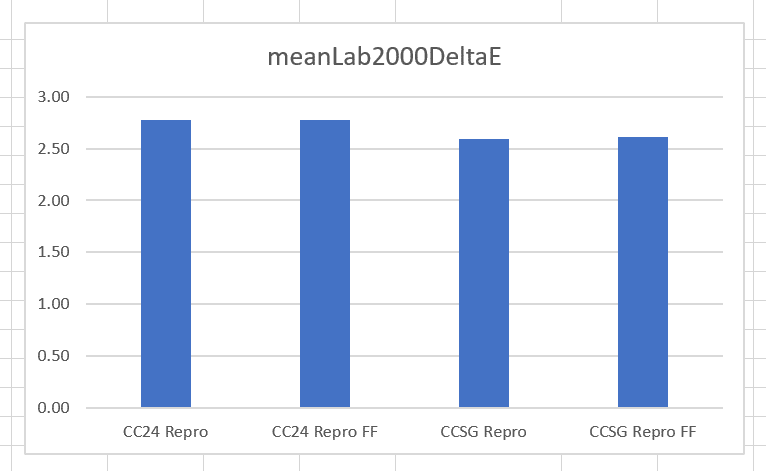
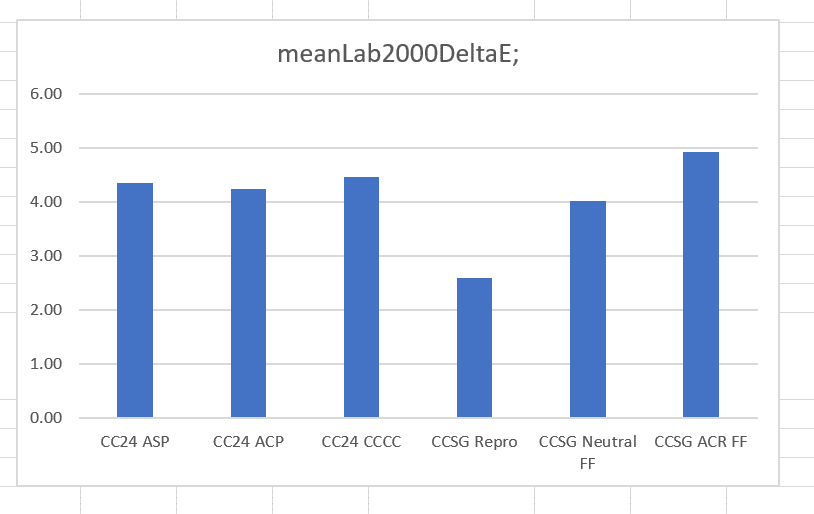
Arguably, the best measure we have for color accuracy is the mean CIELab 200 Delta-E:
You can see that comparing the first two and the last two bars, that using the flat field corrections in LumaRiver Profile Designer doesn’t help much. In the case of the CCSG target, it actually makes things fractionally worse. The reason it doesn’t help with the CCSG target is that that target has white patches sprinkled throughout, so that clever profile builders — and LumaRiver is one of those — can take advantage of the built-in clues for filed flattening, and a second exposure is unnecessary.
By comparing the first and third and second and fourth columns above, we can see that using a CCSG target produces slightly better profiles when using a CC24 for profile testing than does using a CC24 target. This is surprising to me, since none of the evaluation patches are in the training set if we train with a CCSG target. An interesting question that comes to mind is: how much improvement in the entire CCSG patch set conversions is produced by using the CCSG target. I would expect that to be more, but there’s only one way to find out, and I hope to be able to do that experiment later.
Next up:
- What kind of accuracy is possible with the GFX 100 and “reproduction” profiles? How inaccurate are some of the common general-purpose profiles?
The reproduction profile is the most accurate. The next four are very close, and the ACR curve LumaRiver profile on the far right is marginally the worst. Adobe Standard Profile and the new adobe Color Profile are very close, with ASP being ever-so-slightly more accurate, which is the opposite of what I’ve seen previously. The Color Checker Camera Calibration (CCCC) profile is not much less accurate than the two Adobe profiles.
Now for this one:
- How well do various profiles trade off accuracy with increased chroma?
The reproduction profile is, on average, chromatically accurate. The two Adobe profiles under play chroma, and the other three over-amp it. It is surprising to me how much deviation of mean chroma error is possible among profiles that are not greatly dissimilar in Delta-E 2000.
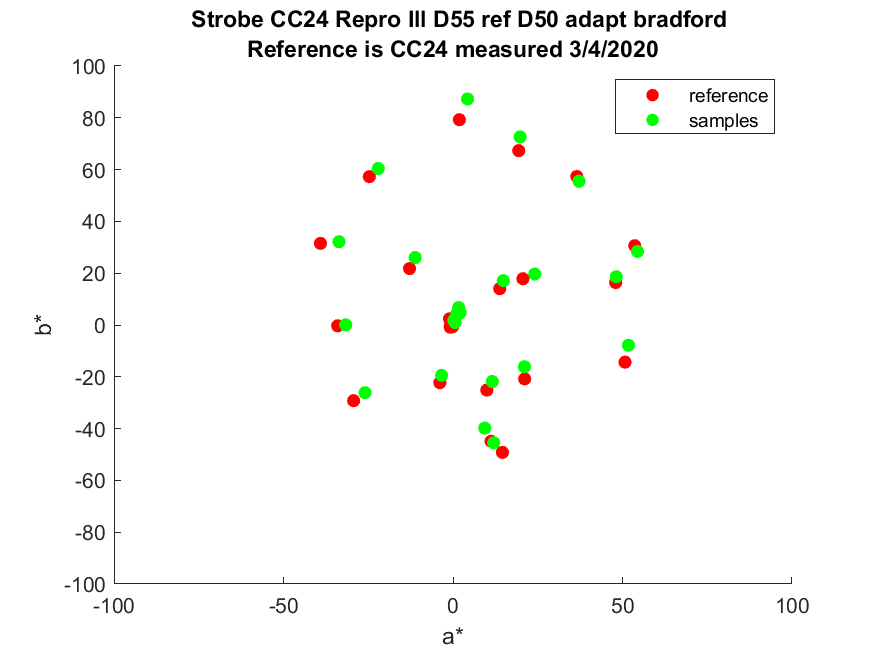
Now let’s look at the direction of the chromaticity errors, in CIE a* and b*. First, with the LumaRiver-generated reproduction profile, using the CC24 target:
The yellowish patches are slightly oversaturated. The bluish ones are similarly undersaturated. The magenta patch appears to have the largest huw angle shift, towards red. Flesh tones are slightly oversaturated.
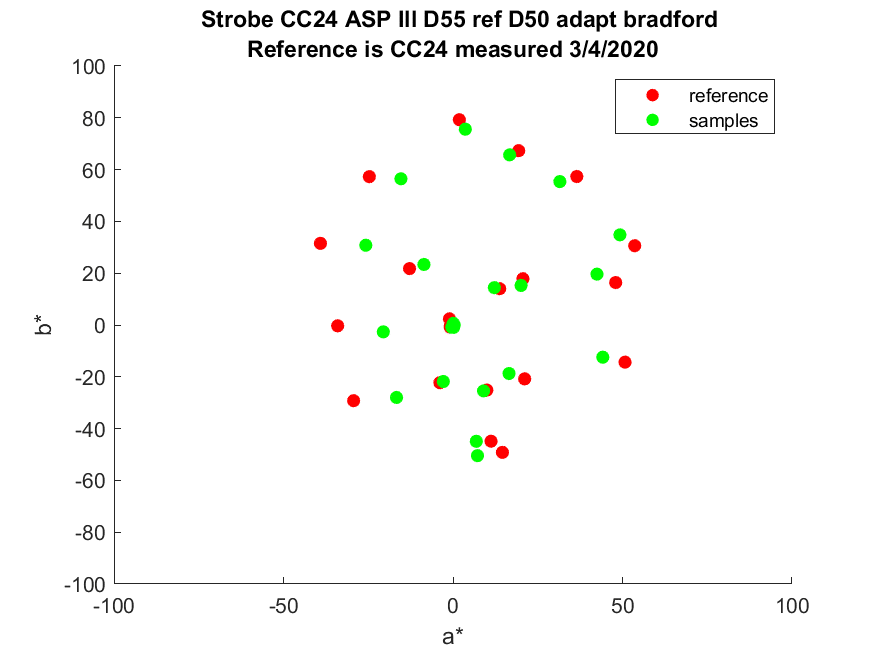
Adobe Standard Profile:
There is a tendency towards undersaturation that is most pronounced in the reds and cyans. Flesh tones are slightly undersaturated. There is a yellowish patch with a pronounced shift away from cyan. There’s a shift in the blues away from magenta, which is almost certainly by design.
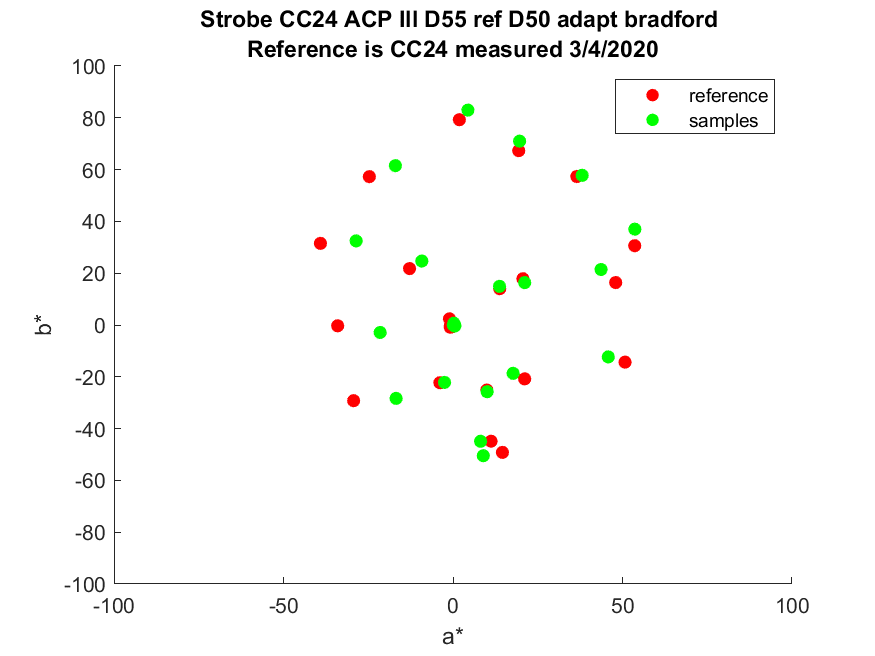
Adobe Color Profile:
Skin tones are almost bang on. There’s a shift in the blues away from magenta, which is almost certainly by design. It’s really quite similar to ASP.
The X-Rite Color Checker Camera Calibration profile generated from the CC24 patch set:
Not much oversaturation in the cyans, but a lot everywhere else. Caucasian skin tones are markedly shifted in the red direction.
The following profiles were made from the CCSG patch set. First, the LumaRiver reproduction profile, which is the most accurate of all the ones I’m showing you today:
I’ll show you the CC24 one again so you can compare more easily:
They are quite similar.
Here’s the LumaRiver Neutral profile:
Note the overall tendency towards oversaturation. There is a slight shift in the blues towards violet, which could be a problem in some sky images.
And finally, the ACR tone curve profile generated by LumaRiver Profile Designer:
It’s even more saturated, and the blue to violet shift is even greater.
We can see the differences with respect to saturation by plotting the CIELab chromaticity metric for each patch set:
Not surprisingly, the LumaRiver reproduction profile is the best, with the two Adobe profiles somewhat undersaturated, and the X-Rite CCCC and the two general-purpose profiles being quite oversaturated.
Warning — nerds only past this point.
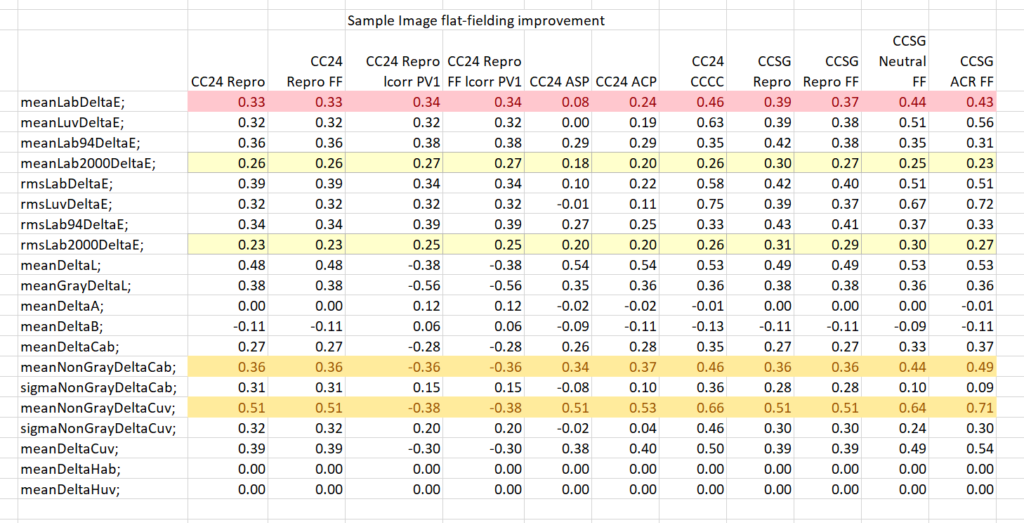
This is mainly for Iliah Borg, but may be useful for anyone who realy wants to dig around under the covers of the test-image flat-fielding that I’m doing. Assuming that lower numbers are better than higher ones, which is not true for all of the rows, here is the improvement that I get for all of the profiles when I flat-field the sample images rather than just taking then at face value:




Iliah Borg says
Flat-fielding is not as simple as it may look. It includes per-cannel flat-fielding, and because there is variability in border patches of CC SG (within one target), it doesn’t work quite well if the target is not custom-measured (and perfectly flat). Next, some profilers substitute Y / L* values with those that are pre-calculated, which makes flat field mostly ineffective. Such technique is a trade-off, having its plusses and minuses.
JimK says
Thanks, Iliah. The flat-fielding in the profile maker appeared to do virtually nothing. My own flat-fielding of the sample images worked better, but the improvements were small — I’m hoping because there were few improvements to be had. The technique I’m using is multiplication of the linear XYZ values in the sample by the correction image.
JimK says
Iliah, I’ve added a section at the bottom of the post to show the differences I get when flat-fielding the sample images.
Iliah Borg says
Dear Jim,
We have flat-fielding in RawDigger, it is based on raw data – “How to Compensate for Non-Uniform Target Illumination” on https://www.rawdigger.com/howtouse/prepare-data-for-profiling
JimK says
Thanks for that, Iliah.
JimK says
lliah, I followed the instructions and created the CGATS file, but I can’t figure out how to get LumaRiver to load it instead of a DNG image file.
Iliah Borg says
Dear Jim,
You can use “Custom Target (Raw Values)” – that’s the last item in the drop-down below “Load Illuminant” button. Easy to overlook. It’s a bit of a pain to use with RawDigger, as it requires a combined reference+device file. To make such a file one can use Argyll txt2ti3 utility like this:
$ Argyll_V2.1.2/bin/txt2ti3 -i -v a7RIV_CCDC_ARW.dev CCDC_02_CGATS.ref a7RIV_CCDC_ARW
where:
a7RIV_CCDC_ARW.dev is exported from RawDigger, CGATS, no WB, no scaling, no gamma, averaged G channels.
CCDC_02__CGATS.ref is my target reference
a7RIV_CCDC_ARW is output base name, the extension ti3 is added automatically.
Thus, one needs to load the resulting a7RIV_CCDC_ARW.ti3 file into LumaRiver profiler.
They can also read illuminant CGATS-like files, not just reference CGATS. For the DPR new studio scene my own profiler works better if I set blackbody 5500 (also possible in LumaRiver profiler).
“Sample image flat-fielding improvement” table: FF columns are from Lumariver Profile Designer algorithm, are they? Is it automatic flat-fielding, or you’ve loaded a flat field shot with “Load Flatfield” button?
barry says
Ironical your using the famed X-Rite color checker camera profile and their target to color check your strobe lighting and it doesn’t come out as the industry best.
Questions did you kinda follow Martins procedure https://vimeo.com/268585170
Also which version of Lumariver did you use? Basic, Pro or Repro?
JimK says
It’s certainly not the most accurate, but that’s not usually the objective for general-purpose profiles.
I don’t watch web videos unless highly motivated. I get bored too easily, and they seen to drag on and on.
Repro.
Erik Kaffehr says
Jim,
Thanks for your efforts. Reading up your stuff, I guess I need to do a bit of homework. But homework can be fun!
Lumariver allows the use of measured data as reference. So it may make sense to do so. The ColorChecker Passports I have are not easy to measure with the ColorMunki Photo, but I did some tests with an older ColorChecker mini and I got a small improvement in ’roundaround’ testing.
JimK says
Yes, that’s on my list of things to experiment with. Iliah’s idea to use RawDigger to flatfield and extract the CGATS files is also on that list.
Jack Hogan says
Hi Jim,
Different profile makers minimize different cost functions. For instance, if a profile is evaluated via dE2000 but it was developed by minimizing dE it will not look as good as a profile that was evaluated and developed using dE2000.
I have found that one way to further reduce mean dE2000 is to white balance the raw data off a proper gray card, instead of using one of the patches. This may be a reason why the CCSG target (with a more varied selection of gray squares) fares slightly better than the CC24 with its notoriously non-neutral neutral patches.
Jack
Iliah Borg says
Dear Jack,
A good way to white-balnce for profiling is to use actual measured data, and not to presume anything is neutral. In many cases white balance in the regular sense of that word is not needed at all and only imposes an unwanted constraint to optimization. I don’t know of any profiler that performs white-balancing.
Jack Hogan says
Understood Iliah. Although I have found that the surface that I try to find a global minimum of with my routines tends to have many local minima near the global one, and the starting point affects where I end up.
The way I have been able to consistently get better mean DE2000 from a CC24 is to white balance the raw data first and seed the initial matrix with the solution of the normal equation . White balancing off a quality gray card helps in my process.
Perhaps the fault is in my choice of algorithms, I wonder how others do it. If they do it like me, then they will have the same issues.
Jack
Iliah Borg says
Dear Jack,
Are you using something like gradient descent method, or some (stochastic) variation of it?
Jack Hogan says
Iliah, I am using the ‘trust-region-reflective’ algorithm within Matlab’s least-square non-linear function. Do you recommend a gradient descent variation instead? What do you use?
Iliah Borg says
Dear Jack,
First, to produce a matrix, I delete all the patches with the spectra that are close to linear combination of other patches. After that I use a variation of https://en.wikipedia.org/wiki/Stochastic_gradient_descent#Momentum
Jack Hogan says
Thanks Iliah, I’ll give it a go in due time.