• site home
  • blog home
  • galleries
  • contact
  • underwater
  • the bleeding edge

the last word

Photography meets digital computer technology. Photography wins -- most of the time.

You are here: Home / The Last Word / Does the D810 EFCS work with the intervalometer?

Does the D810 EFCS work with the intervalometer?

May 25, 2015 JimK 1 Comment

The Nikon D810 EFCS is a little finicky in use. To get it to work, you have to turn it on in the menu, and set the shutter control dial in Mup position. When that’s done, the first press of the shutter button will raise the mirror and open the mechanical shutter, and the second press will instigate the rolling reset that acts as the first curtain, followed by the mechanical second curtain. If the camera is in live view mode, the first press of the shutter release does nothing, and the second works as above.

The D810 also has a built-in intervalometer. When you’re using the intervalometer and you put the shutter dial to Mup and turn EFCS on, will it work, or will you just get the mechanical shutter? The manual is silent on that subject.

I attempted to find out by doing some testing. I set up a D810 in portrait orientation using a RRS L-bracket on an Arca Swiss C1 cube head attached to a set of RRS TVC-43 legs. I mounted a Zeiss 85mm f/1.4 Otus.

  • The lighting: a single Fotodiox LED-200WA-56 daylight balanced variable-output flood.
  • ISO set to 125, f-stop set to f5.6.
  • Focusing manually at f/1/4, using the magnifier. The focus point is a Siemens star on the target.
  • Shutter delay set to 3 seconds
  • EFCS on, dial to Mup
  • Lamp to full, shutter to 1/250 second, make 16 exposures, turn the light down a stop, make 16 exposures… until you get to 1/30 of a second.
  • Dial to Single Exposure (this turns off EFCS).
  • Repeat exposure sequence.
  • Dial back to Mup
  • Repeat exposure sequence with the intervalometer set for 16 exposures 10 seconds apart.
  • Develop in Lightroom 5.7.1 with standard settings.
  • Crop, export as TIFFs, analyze for horizontal edge and vertical edge MTF50 in Imatest.
  • Export the results to Excel, crunch the stats, and graph.

Here are the results comparing the intervalometer shots with the EFCS ones, looking at the vertical edges on the target, which are perpendicular to the shutter movement when the camera is in portrait orientation, and thus will suffer the most degradation.

85efcsv-inter

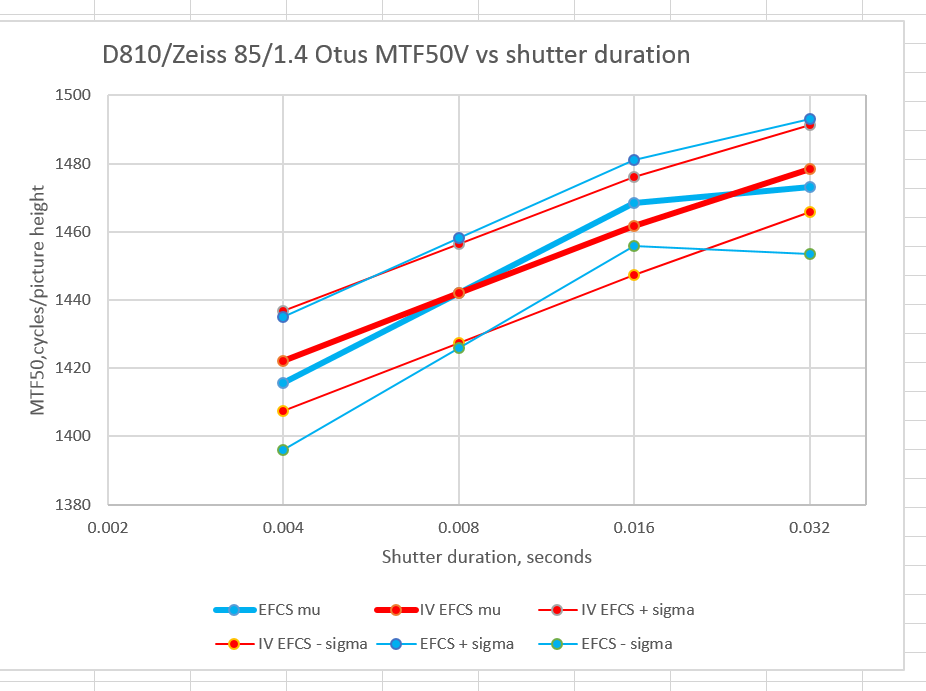
The solid lines are the average of the MTF50 values for he 16 exposures, measures in cycles per picture height. The light lines are the averages plus and minus one standard deviation. You can see that there is no statistical difference between the curves with the intervalometer firing the shutter and the ones with yours truly tripping it.

If we compare the EFCS versus the non-EFCS shots, it’s a different story:

85efcsv-efcaonoff

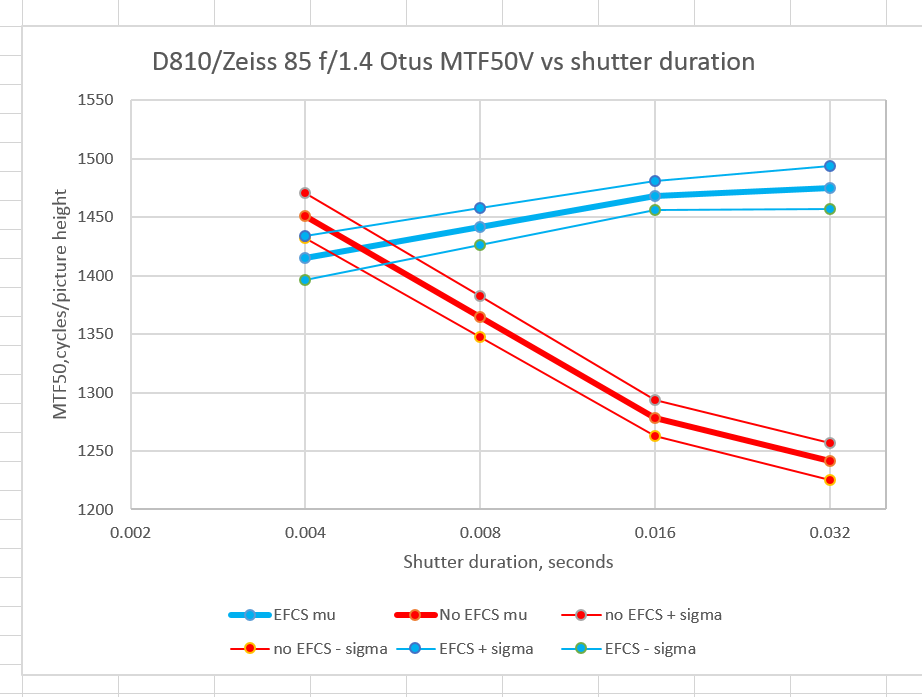
Not only is the EFCS doing its job, we are definitely getting EFCS with the intervalometer. That’s good news.

Note that with EFCS off, longer shutter speeds are worse. With EFCS on, longer shutter speeds are slightly better. Why is that? With longer shutter speeds and EFCS off, the first curtain’s acceleration and deceleration have a change to shake the camera for a longer period of time. With EFCS on, the second curtain’s acceleration has some effect, but the longer the shutter speed, the smaller percentage of the shutter’s open time is taken up by the second curtain’s acceleration. Of course, the second curtain’s deceleration causes no problems because the shutter is closed by then.

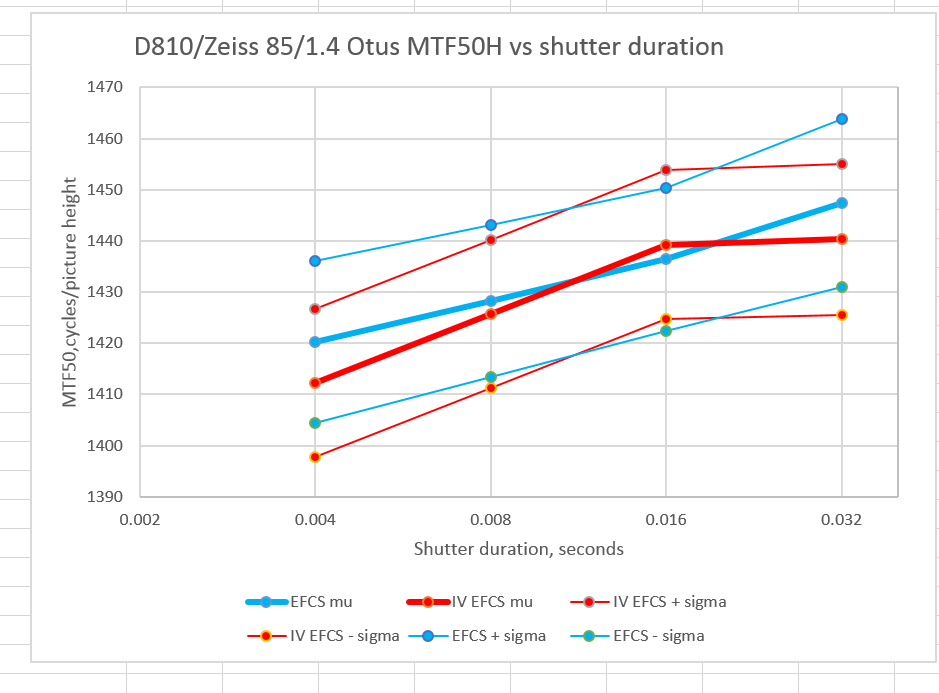
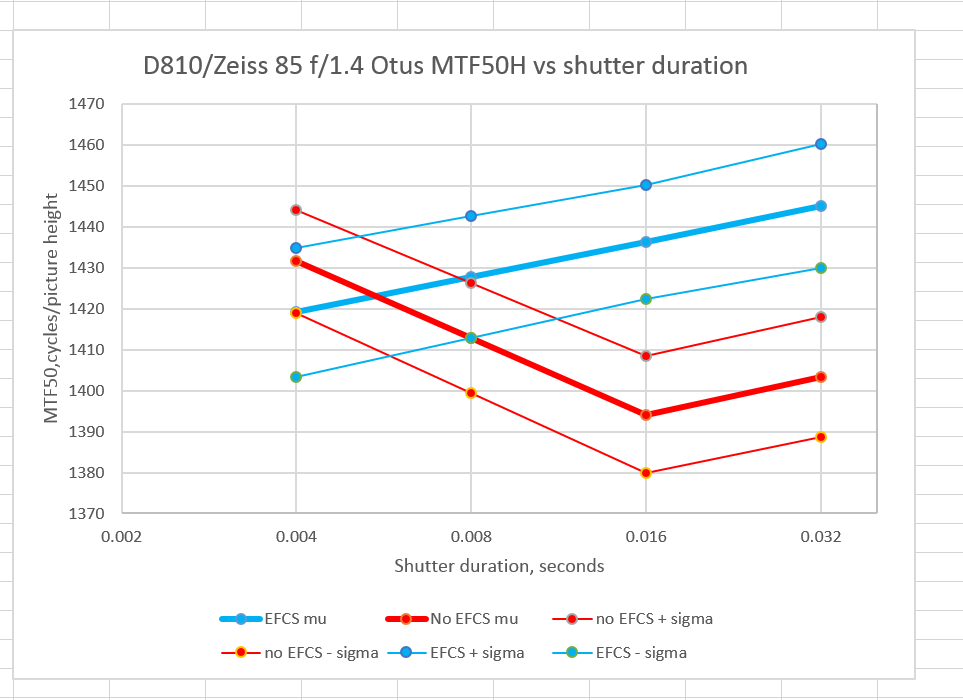
For horizontal edges, which are parallel to the direction of the shutter travel, the effects are much smaller.

Comparing EFCS on with and without the intervalometer:

85efcsh-inter

Comparing EFCS on and off:

85efcsh-efcaonoff


The Last Word

← Doing it for money Process vs result →

Comments

  1. Tony Arnerich says

    May 27, 2015 at 12:39 pm

    I investigated the same question last week and arrived at the same conclusion. I used a low tech approach: you can hear and feel the mechanical first curtain if that is the selected mode of operation. It’s easy to separate the events using times of 1 or 2 seconds for the delay, 5 seconds for the exposure time, and 10 seconds for the interval.

    Reply

Leave a Reply Cancel reply

Your email address will not be published. Required fields are marked *

May 2025
S M T W T F S
 123
45678910
11121314151617
18192021222324
25262728293031
« Apr    

Articles

  • About
    • Patents and papers about color
    • Who am I?
  • How to…
    • Backing up photographic images
    • How to change email providers
    • How to shoot slanted edge images for me
  • Lens screening testing
    • Equipment and Software
    • Examples
      • Bad and OK 200-600 at 600
      • Excellent 180-400 zoom
      • Fair 14-30mm zoom
      • Good 100-200 mm MF zoom
      • Good 100-400 zoom
      • Good 100mm lens on P1 P45+
      • Good 120mm MF lens
      • Good 18mm FF lens
      • Good 24-105 mm FF lens
      • Good 24-70 FF zoom
      • Good 35 mm FF lens
      • Good 35-70 MF lens
      • Good 60 mm lens on IQ3-100
      • Good 63 mm MF lens
      • Good 65 mm FF lens
      • Good 85 mm FF lens
      • Good and bad 25mm FF lenses
      • Good zoom at 24 mm
      • Marginal 18mm lens
      • Marginal 35mm FF lens
      • Mildly problematic 55 mm FF lens
      • OK 16-35mm zoom
      • OK 60mm lens on P1 P45+
      • OK Sony 600mm f/4
      • Pretty good 16-35 FF zoom
      • Pretty good 90mm FF lens
      • Problematic 400 mm FF lens
      • Tilted 20 mm f/1.8 FF lens
      • Tilted 30 mm MF lens
      • Tilted 50 mm FF lens
      • Two 15mm FF lenses
    • Found a problem – now what?
    • Goals for this test
    • Minimum target distances
      • MFT
      • APS-C
      • Full frame
      • Small medium format
    • Printable Siemens Star targets
    • Target size on sensor
      • MFT
      • APS-C
      • Full frame
      • Small medium format
    • Test instructions — postproduction
    • Test instructions — reading the images
    • Test instructions – capture
    • Theory of the test
    • What’s wrong with conventional lens screening?
  • Previsualization heresy
  • Privacy Policy
  • Recommended photographic web sites
  • Using in-camera histograms for ETTR
    • Acknowledgments
    • Why ETTR?
    • Normal in-camera histograms
    • Image processing for in-camera histograms
    • Making the in-camera histogram closely represent the raw histogram
    • Shortcuts to UniWB
    • Preparing for monitor-based UniWB
    • A one-step UniWB procedure
    • The math behind the one-step method
    • Iteration using Newton’s Method

Category List

Recent Comments

  • bob lozano on The 16-Bit Fallacy: Why More Isn’t Always Better in Medium Format Cameras
  • JimK on Goldilocks and the three flashes
  • DC Wedding Photographer on Goldilocks and the three flashes
  • Wedding Photographer in DC on The 16-Bit Fallacy: Why More Isn’t Always Better in Medium Format Cameras
  • JimK on Fujifilm GFX 100S II precision
  • Renjie Zhu on Fujifilm GFX 100S II precision
  • JimK on Fuji 20-35/4 landscape field curvature at 23mm vs 23/4 GF
  • Ivo de Man on Fuji 20-35/4 landscape field curvature at 23mm vs 23/4 GF
  • JimK on Fuji 20-35/4 landscape field curvature at 23mm vs 23/4 GF
  • JimK on Fuji 20-35/4 landscape field curvature at 23mm vs 23/4 GF

Archives

Copyright © 2025 · Daily Dish Pro On Genesis Framework · WordPress · Log in

Unless otherwise noted, all images copyright Jim Kasson.