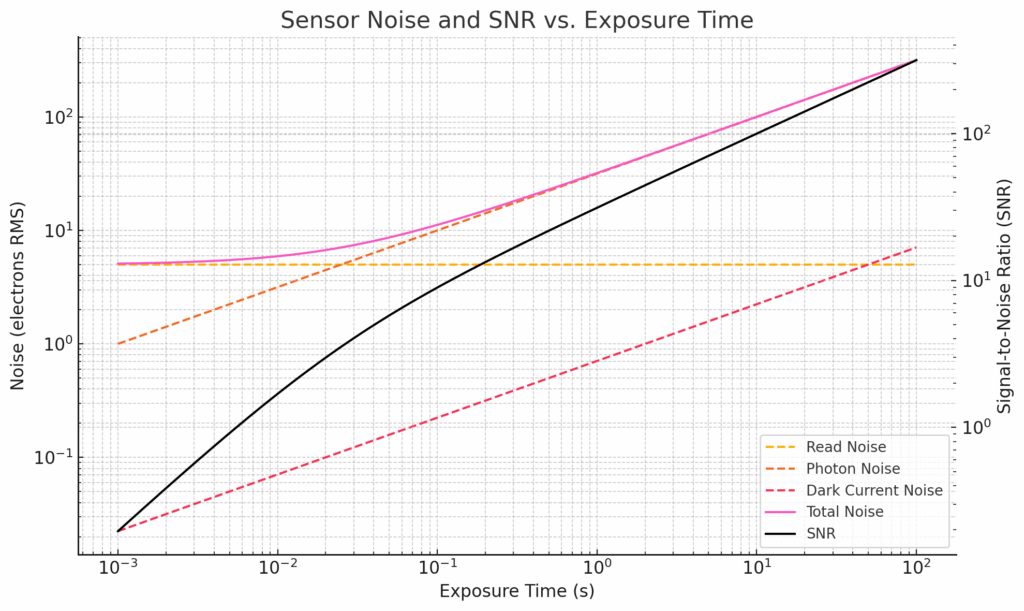
When you increase the exposure time in a digital camera, you expect to collect more signal. But what happens to the noise? The answer depends on the source of the noise. Understanding how each one scales with exposure time helps you optimize your imaging strategy, especially in low-light or long-exposure situations.
Let’s look at the major noise sources in a CMOS image sensor and how they behave as exposure time increases.
| Noise Source | Scales with Time? | Behavior |
| Read Noise | No | Constant per frame |
| Photon (Shot) Noise | Yes | Increases as √(signal) |
| Dark Current Shot Noise | Yes | Increases as √(dark current × time) |
| PRNU (Photo Response Non-Uniformity) | Mostly no | Fixed per signal level |
| Thermal Drift / Bias Instability | Maybe | Depends on system design |
In more detail:
Read Noise: Constant Per Frame
Read noise is generated during the readout process, not during integration. It’s a fixed cost for every exposure, whether it’s 1 ms or 10 seconds.
Longer exposures make read noise less significant because it’s swamped by other time-dependent noise.
Photon (Shot) Noise: √Signal
Photon noise comes from the random arrival of photons. It increases as the square root of the number of photons detected, which itself increases linearly with exposure time (assuming constant illumination):
σ_photon ∝ √(exposure time)
This means that SNR improves with √time — doubling exposure improves SNR by about 1.41×, not 2×.
Dark Current and Its Noise: Linear + √Time
Dark current is a signal-like contaminant — it builds linearly with time and adds shot noise just like a real signal. The noise it introduces behaves like:
σ_dark ∝ √(dark current × exposure time)
Longer exposures result in:
- More dark current signal,
- More dark current shot noise,
- Greater risk of hot pixels and fixed pattern artifacts.
Cooling the sensor reduces this component dramatically, as shown in the previous post.
PRNU: Independent of Time
PRNU scales with signal, not time directly. So, while a longer exposure increases the signal and therefore the PRNU noise (σ_PRNU ∝ signal), the relationship is indirect. PRNU doesn’t depend on integration time per se, but only on how much signal is accumulated.
In some sensors, very long exposures can introduce bias drift or low-frequency noise (e.g., 1/f effects or leakage from imperfect bias circuits). These effects are:
- Often sensor- or system-dependent,
- Exacerbated by thermal instability,
- Difficult to model precisely.
In most modern sensors, these are negligible under typical conditions but may become visible in minutes-long exposures.
Let’s say you start increasing exposure time from 1 ms to 1 second to 10 seconds. Here’s what you can expect:
- Signal: Increases linearly with time.
- Photon noise: Increases as √time.
- Dark noise: Also increases as √time.
- Read noise: Stays fixed — becomes less important over time.
- SNR: Improves with √time — but slowly.
Practical Implications
- At short exposures, read noise dominates. That’s where high-conversion-gain (HCG) modes shine.
- At medium exposures, photon noise dominates, and you’re approaching the ideal shot-noise limit.
- At long exposures, dark current and its noise start to intrude — unless you cool the sensor.
- PRNU and fixed pattern become visible at high signal levels, regardless of time.
Increasing exposure time is a powerful tool for improving signal-to-noise ratio, but it interacts differently with each type of sensor noise. To get the most from your camera, you need to understand not just what noise is present — but how it evolves over time.

Štěpán Kaňa says
Presumably the curves are just calculated not ouput of actual sensors. How we are to apply this in real world? Ie., am I better off with ISO 100 f/4.5 and 1/20 sec or ISO 200 f/4.5 and 1/40 sec (IS equalises the difference)
JimK says
Between 1/40 second and 1/20 second there is virtually no increase in read noise.