• site home
  • blog home
  • galleries
  • contact
  • underwater
  • the bleeding edge

the last word

Photography meets digital computer technology. Photography wins -- most of the time.

You are here: Home / The Last Word / Mastering Leica M240 green shadows

Mastering Leica M240 green shadows

August 6, 2014 JimK 1 Comment

About a year ago, I identified a problem with the Leica M240. There is a clipping of very low raw values and a non-linearity near zero for those values that leads to problems in the shadows of  images pushed in post. Since, for most lighting conditions and subjects, the green channel is the brightest one, the suppression of information near zero leaves the green channel the least affected, and results in the shadows assuming a slight green cast with gentle post-processing, and a bilious look if you push hard.

I thought at first that such manipulation of the raw image could not have been designed into the camera, and that I must have gotten a bad copy. A friend sent me some images made to my specifications from his camera, and they showed similar problems. Now there is some indication that the nonlinearity of the M240 tone curve is a deliberate move on the part of the Leica engineers, the purpose being to reduce shadow noise.

Less noise, but ugly color casts? That’s a lousy tradeoff, as far as I’m concerned. Fortunately, there’s help for M240 shooters. Jonathan Perkins has written a program to correct the problem, and it is now available as a Lightroom plugin.

I’ve tested Jonathan’s plug-in, and it works. It can’t know exactly what information got clipped, but it corrects the nonlinearities, and it really helps.

Here’s an image that I made with the M240 and the 18mm f/3.4 Super-Elmar lens. The subject was  a “cottage” right next to FDR’s 34-room one  on Campobello Island in New Brunswick, Canada, The image was made with an exposure of f/5.6 @ 1/180 at ISO 200, exposed for the outside.

L1003197-6


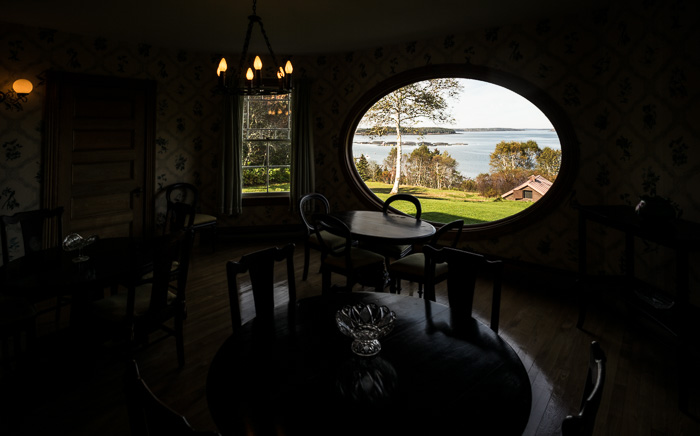
The interior is quite dim.

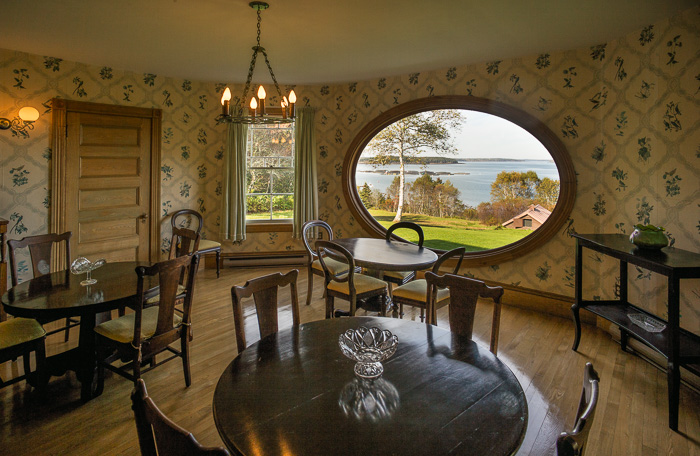
Fixing this with Lightroom’s shadow tool and applying some exposure increase with a brush yields this:

L1003197-7

Note the green in the darkest areas.

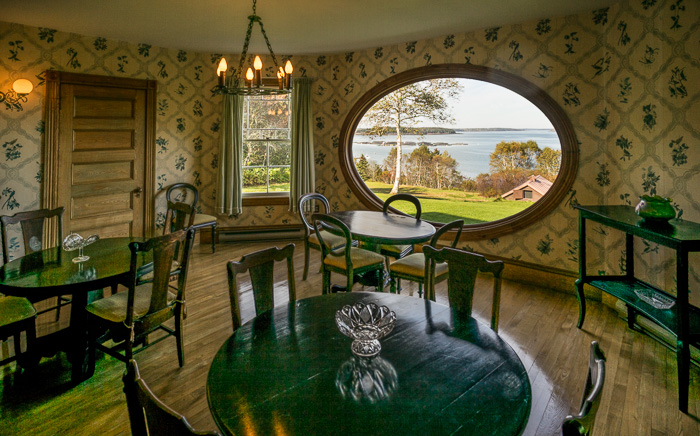
Using Jonathan’s Lightroom plugin and similar Lr corrections produces this:

L1003197-2-4

Much better.

The Last Word

← Sony a7S noise reduction in-camera processing of raw files D810 vs D800E dark-field histograms →

Trackbacks

  1. Nikon Z7 12-bit green shadows says:
    October 8, 2018 at 11:55 am

    […] The 12-bit values are too low. Since the green planes are more sensitive to light that is balanced to the illuminants most often used in photography, subtracting something from all four raw planes leaves more green in the darkest tones. The Z7 at 12-bits is mildly affected compared to the Leica M240 at any precision. […]

    Reply

Leave a Reply Cancel reply

Your email address will not be published. Required fields are marked *

May 2025
S M T W T F S
 123
45678910
11121314151617
18192021222324
25262728293031
« Apr    

Articles

  • About
    • Patents and papers about color
    • Who am I?
  • How to…
    • Backing up photographic images
    • How to change email providers
    • How to shoot slanted edge images for me
  • Lens screening testing
    • Equipment and Software
    • Examples
      • Bad and OK 200-600 at 600
      • Excellent 180-400 zoom
      • Fair 14-30mm zoom
      • Good 100-200 mm MF zoom
      • Good 100-400 zoom
      • Good 100mm lens on P1 P45+
      • Good 120mm MF lens
      • Good 18mm FF lens
      • Good 24-105 mm FF lens
      • Good 24-70 FF zoom
      • Good 35 mm FF lens
      • Good 35-70 MF lens
      • Good 60 mm lens on IQ3-100
      • Good 63 mm MF lens
      • Good 65 mm FF lens
      • Good 85 mm FF lens
      • Good and bad 25mm FF lenses
      • Good zoom at 24 mm
      • Marginal 18mm lens
      • Marginal 35mm FF lens
      • Mildly problematic 55 mm FF lens
      • OK 16-35mm zoom
      • OK 60mm lens on P1 P45+
      • OK Sony 600mm f/4
      • Pretty good 16-35 FF zoom
      • Pretty good 90mm FF lens
      • Problematic 400 mm FF lens
      • Tilted 20 mm f/1.8 FF lens
      • Tilted 30 mm MF lens
      • Tilted 50 mm FF lens
      • Two 15mm FF lenses
    • Found a problem – now what?
    • Goals for this test
    • Minimum target distances
      • MFT
      • APS-C
      • Full frame
      • Small medium format
    • Printable Siemens Star targets
    • Target size on sensor
      • MFT
      • APS-C
      • Full frame
      • Small medium format
    • Test instructions — postproduction
    • Test instructions — reading the images
    • Test instructions – capture
    • Theory of the test
    • What’s wrong with conventional lens screening?
  • Previsualization heresy
  • Privacy Policy
  • Recommended photographic web sites
  • Using in-camera histograms for ETTR
    • Acknowledgments
    • Why ETTR?
    • Normal in-camera histograms
    • Image processing for in-camera histograms
    • Making the in-camera histogram closely represent the raw histogram
    • Shortcuts to UniWB
    • Preparing for monitor-based UniWB
    • A one-step UniWB procedure
    • The math behind the one-step method
    • Iteration using Newton’s Method

Category List

Recent Comments

  • JimK on Goldilocks and the three flashes
  • DC Wedding Photographer on Goldilocks and the three flashes
  • Wedding Photographer in DC on The 16-Bit Fallacy: Why More Isn’t Always Better in Medium Format Cameras
  • JimK on Fujifilm GFX 100S II precision
  • Renjie Zhu on Fujifilm GFX 100S II precision
  • JimK on Fuji 20-35/4 landscape field curvature at 23mm vs 23/4 GF
  • Ivo de Man on Fuji 20-35/4 landscape field curvature at 23mm vs 23/4 GF
  • JimK on Fuji 20-35/4 landscape field curvature at 23mm vs 23/4 GF
  • JimK on Fuji 20-35/4 landscape field curvature at 23mm vs 23/4 GF
  • Ivo de Man on Fuji 20-35/4 landscape field curvature at 23mm vs 23/4 GF

Archives

Copyright © 2025 · Daily Dish Pro On Genesis Framework · WordPress · Log in

Unless otherwise noted, all images copyright Jim Kasson.