This is a continuation of applying the new shutter shock testing regimen first proposed and used in the last post this time to the Sony a7R and another 135mm lens. The reason there was no post yesterday was that I made some error – I’m still not sure what – that made some of the images fuzzier than they had any reason to be. I had to do everything all over today.
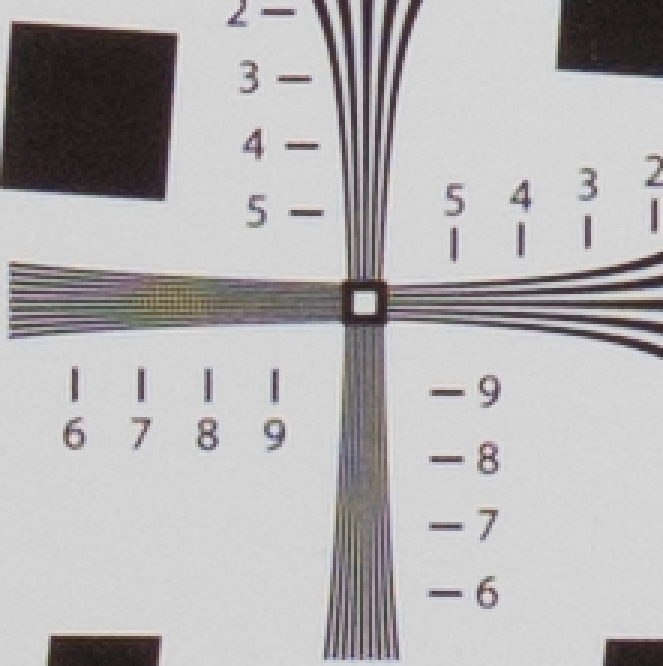
I set up this gear: Leica 135mm f/3.4 APO Telyt on a Sony alpha 7 R with a Metabones adapter, RRS a7 L-bracket, Arca Swiss C1 Cube, RRS TVC-44 legs. I put a Heliopan 77mm variable neutral density filter on the lens. Release was with the 2 second self-timer. ISO 200, lens set at f/5.6 and a half. ISO 12233 target with the camera at a distance to yield an active area 760 pixels high. Thus, the lines labeled “8” represent 1 line pair per pixel pair.
Target illumination for the continuous lighting images was provided by a single Fotodiox LED-200WA-56 lamp set to full output, using the supplied reflector. Lighting for the strobe images came from a Paul Buff Einstein 640 watt-second flash set to 2.5 watt-seconds. At this power setting, the flash duration is about 1/13000 second. As a further – and probably unnecessary – measure to mitigate shutter shock affecting the strobe images, the camera was set to trailing curtain synch and the shutter to 3.2 seconds, allowing the camera to stabilize from the shock of the first curtain movement before the flash went off.
For the continuous-lighting pictures, the camera was set to 1/250 second with the ND filter at minimum absorption. An exposure was made. Then the shutter was set 1/3 stop slower, the ND filter was adjusted to give the same meter reading, and another exposure effected. That process was repeated all the way to maximum ND filter absorption and a shutter speed of ¼ second.
Then I processed the images in Lightroom with the default settings, corrected for (minor, as it turns out) exposure differences, and exported the files to Lightroom as layers. I labeled the layers with the exposure times and compared them. The images that I’m posting here are crops from the upper right-hand corner, enlarged 3x using nearest neighbor, and JPEG’d. Because of the way that Photoshop handles EXIF data from images composed of multiple layers, the EXIF data for the posted images is bogus. If anyone would like to see the Photoshop stack, please contact me.
I tested three mounting configurations all in landscape mode:
- A RRS L-bracket, head under camera.
- B as above, but with a RRS rail with a RRS clamp on top and clamp with swivel base on the bottom, and plate underneath that, head under camera. The whole assembly added 23 ounces of weight, which should help performance at high shutter speeds.
- C as in B, but with a wood prop under the lens barrel near the front of the lens, head under camera. This might help to alleviate vibrations stemming from motion of the lens with respect to the adapter or of the adapter with respect to the camera.
All that left me with 3 collections of 23 images each, or 69 images. I will be able to show you only a tiny fraction of those. As always, please contact me if you want the look at the complete Photoshop stacks, in this case, three files of 23 layers per file.
As with the Zeiss 135 on the D800E in the last post, the strobe-lit images showed resolution down to the pixel level. However the APO Telyt seems to have much less contrast at that resolution than the APO Sonnar did. I think this is virtually entirely due to differences in the lenses and hardly at all due to differences in the cameras. Here’s the strobe lit image from the B configuration. The A and C configuration images are similar:
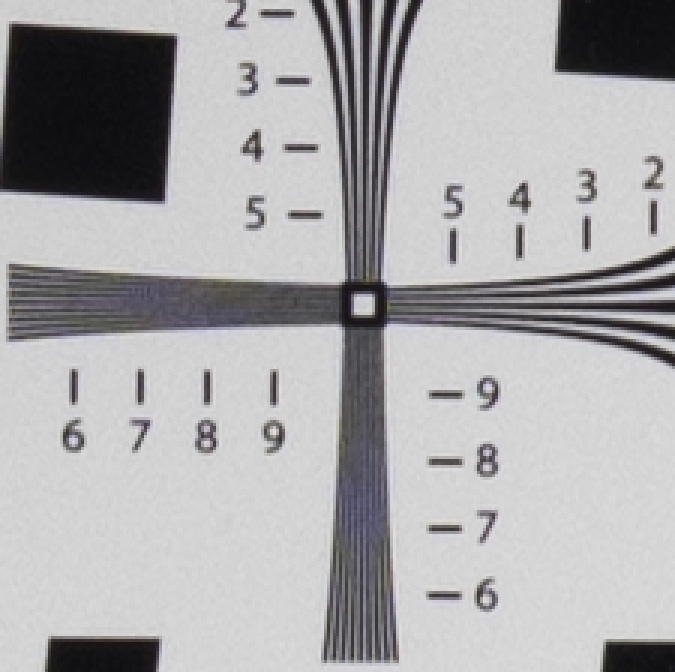
At 1/250 second, the best image is from the B configuration. It loses some contrast with respect to the strobe lit image of the same configuration, but little resolution. Surprisingly, the C configuration image is the worst at that shutter speed:
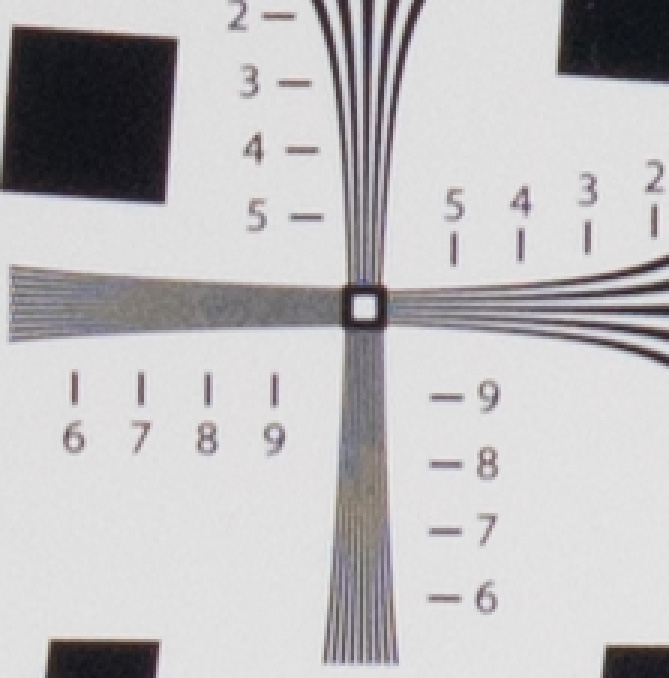
The worst shutter speed for the A configuration is 1/60:

1/60 is also the worst shutter speed for configuration B, which gives about the same results with the horizontal features as configuration A, but substantially worse performance on the vertical lines. This is a surprise.
The worst shutter speed for configuration C is 1/80 second, where it gives worse results than either of the other configurations.
Things get better as the shutter gets slower. By ¼ second in configuration B, the results are close to the strobe lit image, and a little better than 1/250:
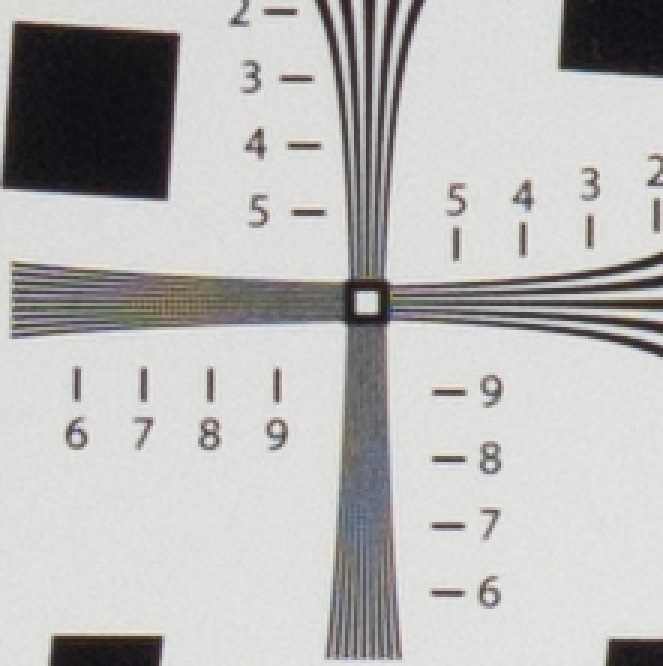
Configuration C gets about as good at ½ as it was at 1/250:

Configuration A tracks Configuration B pretty well at slower shutter speeds.
These results are a surprise to me. Configuration A is just about as good as the other two. I’m guessing that the rail offers opportunities for vibration that offsets any bracing advantages with the compact, stiff, Leica lens. The weight doesn’t help consistently, although I have to point out that it didn’t try it without the rail, and also that the weight was sandwiched between the head and the camera, which is different from the dead weight system that Joe Holmes has proposed.
I wish I had better news, but, as my high school physics teacher used to say, “A negative conclusion is valuable, too.”
One piece of good news is that the Zeiss 135mm f/2 APO Sonnar is a significant step up in performance over the Leica 135mm f/3.4 APO Telyt, even though the Leica lens is a lot more expensive. The Zeiss lens is much bigger and heavier, however.
Leave a Reply