Before we go any farther, I’d like to deal with an assumption that I’ve been making all along. It’s not a conjecture that I’m comfortable with. The only reason that I’ve been holding on to it is that, if it’s not true, there’s not much we can do with a tripod to control the shutter vibration’s effect on our images. The assumption is that any motion of the sensor with respect to the camera’s base plate causes negligible image blurring. I don’t know that that’s so. I know of only one way to test it, and I don’t have the equipment to do so.
In hopes that there’s someone out there with the means and the will to conduct the following experiment, here’s how to find out. Clamp the camera solidly to an optical bench. Support the lens, too. Clamp the target to the same bench and stabilize it with solid supports. Using the variable neutral density filter trick, make a series of exposures of the ISO 12233 target at a wide variety of shutter speeds, but at constant ISO setting and aperture. Compare them. If they all look the same, then the internal vibrations of the camera aren’t part of the problem.
Keeping in mind that we may be looking for our keys under the lamp post, let’s press on.
If you can stomach a little mathematics, I recommend you go here and read the section called “Theory of tabletop vibration” that starts on page eight. If it will motivate you, it could have easily been called “Theory of tripod-mounted camera vibration” had the author been concerned with that subject. For those who didn’t read the section, I will summarize, using almost no math.
For the purposes of this discussion, we’ll consider only one-dimensional systems, even though we know that cameras and tripods have three dimensions. By avoiding some of the complexity of the real world, we can elucidate some approximate truths that pertain, and your head – and mine – won’t hurt so much.
Let’s consider a simplified automobile suspension. This car has only one wheel, and the tire isn’t made of rubber; it’s solid and rigid. There’s a spring that resists movement of the car in a downward direction, supplying an upward force proportional to the downwards displacement. The car has mass, and there’s a shock absorber that can dissipate energy. If we press downward on the car body, the spring allows the car to settle. When we take our hand off the car, it rises back to where it was. This system exhibits what physicists call simple harmonic motion. The compliance of the system is the distance the car moves downwards (the displacement) when a unit force is applied to the body in that direction. Compliance can apply to forces and displacement that are not constant over time. In this case, the force is called the forcing function. Imagine that the forcing function is a sinusoid (OK, I lied about the math) of any frequency we desire.
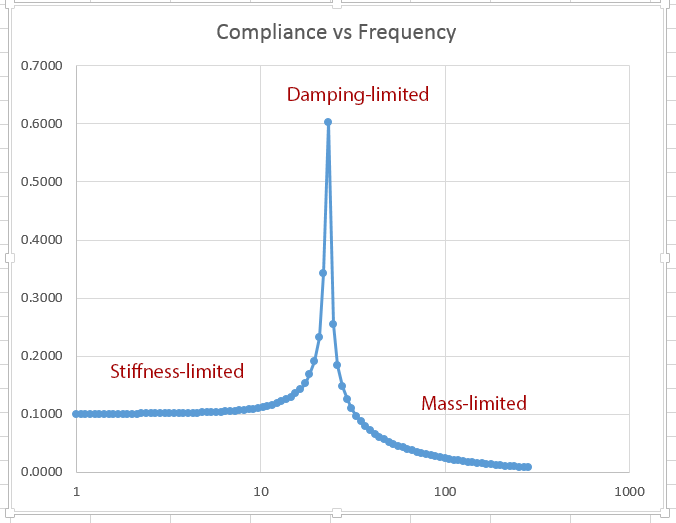
We can plot a curve of compliance versus frequency for our simple car suspension. At frequencies near zero, the compliance is only a function of the stiffness of the spring. As the frequency goes up and we get near the point where the mass of the car and the stiffness of the spring cause the car to resonate, the compliance is only a function of the damping in the shock absorber – without the shock absorber, at resonance the compliance would be zero. Well above resonance we reach a region where the compliance is only a function of the mass of the car.
Thus, to get the best results over a large range of frequencies, you can’t just go for the most mass, or the most damping, or the stiffest spring. Although there are frequency regions where maximizing each of these will help, there are places where it will hurt. There are a few principles that can be gleaned from analyzing the simple system we have constructed. The stiffness-to-mass ratio is defined as the stiffness of the spring over the mass of the weight. The resonant frequency is the square root of the stiffness-to-mass ratio.
- If the resonance is likely to be excited by the forcing function, a good design strategy for minimizing motion is to increase the stiffness and lower the mass, thus driving the resonant frequency higher and the amplitude of the resonance down.
- Another strategy that is appropriate for cameras to be operated at higher shutter speeds is to add enough mass and/or make the mount stiffness low enough to force the resonant frequency low enough so that the shutter can freeze the camera’s motion.
- Yet another design goal that would be appropriate for long shutter speeds is to add sufficient damping to the system that the amount of time that the camera shakes after the shutter is fired is much shorter than the length of the exposure.
In order to pick the right mass, spring stiffness, and damping to minimize camera movement in response to shutter movement, we have to know something about the forcing function created by the shutter movement, and also about the range of shutter speeds that are important.
What kind of forcing function does a focal plane shutter generate? Stay tuned.
Leave a Reply