• site home
  • blog home
  • galleries
  • contact
  • underwater
  • the bleeding edge

the last word

Photography meets digital computer technology. Photography wins -- most of the time.

You are here: Home / The Last Word / Shutter slap simulation with ISO 12233, part 3

Shutter slap simulation with ISO 12233, part 3

January 5, 2014 JimK Leave a Comment

Today we’re back to simulated images of the ISO 12233 target. Here are the camera parameters:

  • Perfect lens
  • 64-bit floating point resolution
  • Target resolution: 10000×6667 pixels
  • Target size in camera pixels: 1500×1000
  • No photon noise
  • No read noise
  • No pixel response non-uniformity
  • 100% fill factor
  • No focus error
  • Bayer pattern color filter array: RGGB
  • No anti-aliasing filter
  • Demosaiced in Matlab with bilinear interpolation

Here’s the topic for the day, for which I hope to gain some insight with the camera simulator. I’ve noticed that in the real camera images of the ISO 12233 target, and in the simulated images that we’ve seen as well, that there are often large changes to the character of the false-color regions of the image. These false colors are generated by the interaction of the target image projected on the sensor, the Bayer pattern in the color filter array, the sensels, and the demosaicing operation in the raw processor. They are a form of aliasing, though not the classical one.

In examining the images of the ISO 12233 target, the differences in the false-color patterns is the first thing you notice. I have seen people doing testing ascribing significance to these patterns, and I have been tempted to do it myself. But can the false-color patterns offer any insight into the sharpness of an image-capturing system? I doubted it, and I set out to create an experiment to test my thoughts.

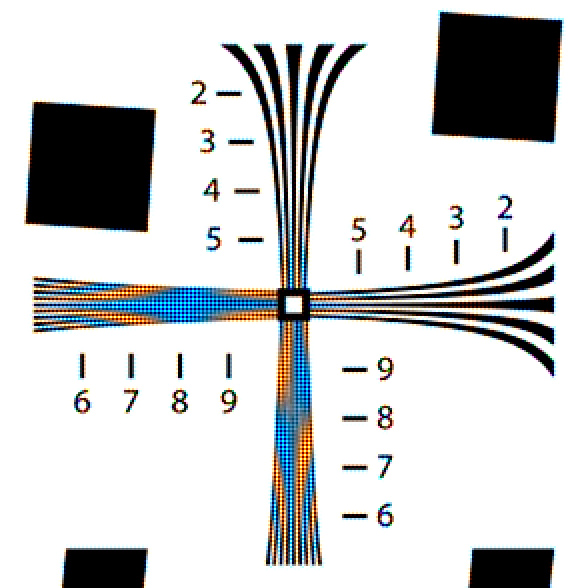
I created this image (a crop of the ISO 12233 target to the region that we’ve been concentrating on, magnified 2x using nearest neighbor so that the details will hold up under JPEG compression) with the camera parameters as above:

cr no shift

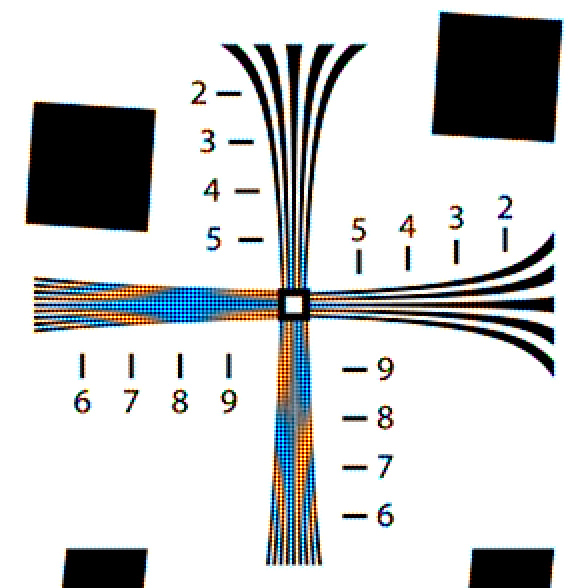
Then I displaced the target image by two camera pixels horizontally and vertically, and ran the sim again:

cr 2v2h

Quite a difference.

A two camera-pixel horizontal displacement only affects the vertical lines:

cr 2h

A one-camera-pixel horizontal displacement shows large changes:

cr 1h

Even a half-camera-pixel horizontal displacement shows changes:

cr p5h

You don’t have to pixel-peek to see the differences in the false-color patterns caused by displacements. Here’s the whole target with no displacement:

all no shift

And with two pixels both vertically and horizontally:

all 2v2h

There is some aliasing caused by res-ing down the 1500 pixel wide image to 700 pixels wide for the web, but the differences are striking.

Since displacement does not affect sharpness, and does affect the false-color patterns, my conclusion is that we can’t learn anything about sharpness by the nature of the false color-patterns. That’s not to say that their presence or absence is unimportant, or even their strength. But seeing one false-color pattern in one image and another false-color pattern in another says nothing about relative sharpness.

Are there one, two, or even more pixel shifts in real images with tripod mounted cameras? You betcha. If you touch a 36 megapixel camera on a tripod, even with a short lens, you will see a shift in the next image. You haven’t seen them in the images I’ve posted before this post (although you can in the images above), because I’ve corrected for them, but they were there.

The Last Word

← Shutter slap testing with ISO 12233, part 4 Shutter slap testing with ISO 12233, part 5 →

Leave a Reply Cancel reply

Your email address will not be published. Required fields are marked *

May 2025
S M T W T F S
 123
45678910
11121314151617
18192021222324
25262728293031
« Apr    

Articles

  • About
    • Patents and papers about color
    • Who am I?
  • How to…
    • Backing up photographic images
    • How to change email providers
    • How to shoot slanted edge images for me
  • Lens screening testing
    • Equipment and Software
    • Examples
      • Bad and OK 200-600 at 600
      • Excellent 180-400 zoom
      • Fair 14-30mm zoom
      • Good 100-200 mm MF zoom
      • Good 100-400 zoom
      • Good 100mm lens on P1 P45+
      • Good 120mm MF lens
      • Good 18mm FF lens
      • Good 24-105 mm FF lens
      • Good 24-70 FF zoom
      • Good 35 mm FF lens
      • Good 35-70 MF lens
      • Good 60 mm lens on IQ3-100
      • Good 63 mm MF lens
      • Good 65 mm FF lens
      • Good 85 mm FF lens
      • Good and bad 25mm FF lenses
      • Good zoom at 24 mm
      • Marginal 18mm lens
      • Marginal 35mm FF lens
      • Mildly problematic 55 mm FF lens
      • OK 16-35mm zoom
      • OK 60mm lens on P1 P45+
      • OK Sony 600mm f/4
      • Pretty good 16-35 FF zoom
      • Pretty good 90mm FF lens
      • Problematic 400 mm FF lens
      • Tilted 20 mm f/1.8 FF lens
      • Tilted 30 mm MF lens
      • Tilted 50 mm FF lens
      • Two 15mm FF lenses
    • Found a problem – now what?
    • Goals for this test
    • Minimum target distances
      • MFT
      • APS-C
      • Full frame
      • Small medium format
    • Printable Siemens Star targets
    • Target size on sensor
      • MFT
      • APS-C
      • Full frame
      • Small medium format
    • Test instructions — postproduction
    • Test instructions — reading the images
    • Test instructions – capture
    • Theory of the test
    • What’s wrong with conventional lens screening?
  • Previsualization heresy
  • Privacy Policy
  • Recommended photographic web sites
  • Using in-camera histograms for ETTR
    • Acknowledgments
    • Why ETTR?
    • Normal in-camera histograms
    • Image processing for in-camera histograms
    • Making the in-camera histogram closely represent the raw histogram
    • Shortcuts to UniWB
    • Preparing for monitor-based UniWB
    • A one-step UniWB procedure
    • The math behind the one-step method
    • Iteration using Newton’s Method

Category List

Recent Comments

  • JimK on How Sensor Noise Scales with Exposure Time
  • Štěpán Kaňa on Calculating reach for wildlife photography
  • Štěpán Kaňa on How Sensor Noise Scales with Exposure Time
  • JimK on Calculating reach for wildlife photography
  • Geofrey on Calculating reach for wildlife photography
  • JimK on Calculating reach for wildlife photography
  • Geofrey on Calculating reach for wildlife photography
  • Javier Sanchez on The 16-Bit Fallacy: Why More Isn’t Always Better in Medium Format Cameras
  • Mike MacDonald on Your photograph looks like a painting?
  • Mike MacDonald on Your photograph looks like a painting?

Archives

Copyright © 2025 · Daily Dish Pro On Genesis Framework · WordPress · Log in

Unless otherwise noted, all images copyright Jim Kasson.