• site home
  • blog home
  • galleries
  • contact
  • underwater
  • the bleeding edge

the last word

Photography meets digital computer technology. Photography wins -- most of the time.

You are here: Home / The Last Word / Shutter slap testing with ISO 12233, part 10

Shutter slap testing with ISO 12233, part 10

January 13, 2014 JimK 4 Comments

A “to do” from some time ago was to verify that the Heliopan ND filter that I’m using for the shutter series testing does not itself introduce unsharpness that would invalidate the conclusions that I’ve been drawing in the previous posts. I’ve been waiting on a flash with shorter duration than my White Lightning X1600s, and now I have a pair of the Paul Buff Einstein 640 watt-second flashes. The Einsteins have a mode where they can vary power output without affecting the color temperature of the output very much. I used that mode in the testing that follows. The Einsteins also exhibit predictable, repeatable shortening of the flash duration as the power level is reduced. They also provide digital control of the power level in tenth-stop increments, a big improvement over the analog controls on the X1600.

For my first test, I put a Leica 50mm f/1.4 Summilux on the a7R with a Novoflex adapter. I mounted the RRS a7 L-bracket to the camera, and mounted that to an Arca Swiss C1 Cube sitting on the RRS TVC-44 legs. I set up the camera at a distance from the ISO 12233 target that gave a target height of about 900 pixels. The Summilux has poor corner performance on the a7R, but great on-axis sharpness, so it was fine in this application. Why didn’t I use the Sony/Zeiss 55mm f/1.8 FE? It probably would have been fine, but I trust the stiff, purely mechanical focusing of the Summilux to stay put throughout a series of pictures, and I haven’t reached that level of confidence with the focus-by-wire 55 FE. I will say that the feel of the ‘Lux, which is fine for rangefinder focusing or handheld live view work, is a little sticky for the ultra-precise focusing I have to do with the ISO 12233 target.

I focused the lens wide open and then set it to f/5.6. I made exposures through the Heliopan variable ND filter set at maximum and minimum absorption, adjusting the flash level to keep the resulting exposure constant. I only used one Einstein, which was set at 1 stop down from a full dump for the maximum absorption, and 8 stops down for minimum absorption. I set the self-timer for 2 seconds, the shutter speed to 5 seconds, and triggered the flash manually about halfway through the exposure.

I processed the raw files in Lightroom 5.3 using the default settings except white balance, which was set to “Flash”, and Exposure.

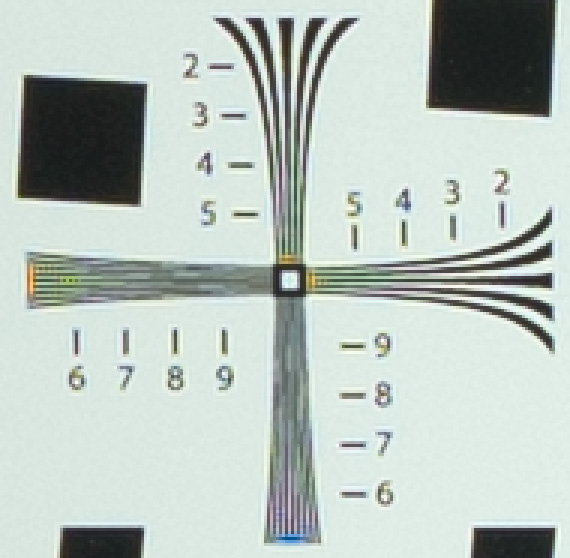
Here’s the upper right hand “cross” (at 3x using nearest neighbor) at maximum ND filter attenuation:

Remote flash trigger max absorb

And here it is at minimum attenuation:

Remote flash trigger min absorb

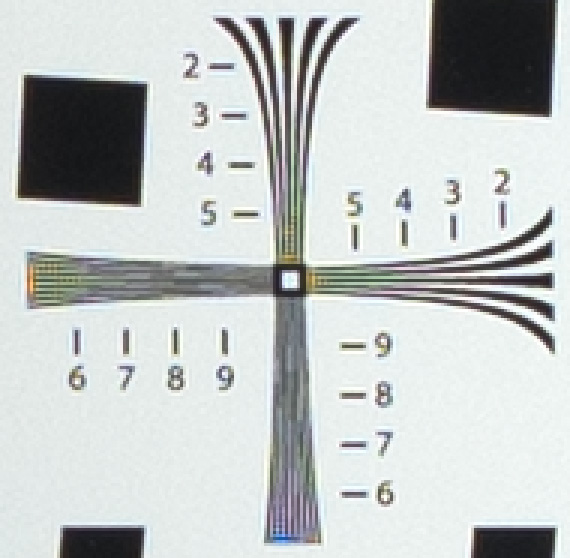
There are no important sharpness differences between these images, although you can see a distinct shift in white balance. It looks like the ND filter is not introducing material lack of sharpness throughout its range.

Whew!

Next up: what happens when the flash is triggered by the camera.

The Last Word

← Shutter slap testing with ISO 12233, part 9 Shutter slap testing with ISO 12233, part 11 →

Comments

  1. Ferrell McCollough says

    January 13, 2014 at 7:21 pm

    I wonder how front curtain and rear curtain flash would compare and how that comparison would change with a variety of shutter speeds, particularly 1/100sec and something like 1/20sec.

    Reply
  2. Jim says

    January 13, 2014 at 7:25 pm

    Ferrell, I’ve done some of the testing already, tho’ I’m not done yet. Posts to come…

    Jim

    Reply
  3. Ferrell McCollough says

    January 14, 2014 at 6:43 am

    Jim, when you do a visual inspection of the cross for vibration does color come into it? Another words, is a specific color an indicator of more or less vibration? Sometimes I see blue other times yellow, I’m not sure what I should glean from this. Thank you.

    Reply
    • Jim says

      January 14, 2014 at 7:49 am

      Ferrell, specific colors are totally useless in analyzing vibration. A while back I did a simulation study where I just shifted the simulated sensels with respect to the target and got wildly different color patterns.

      Jim

      Reply

Leave a Reply Cancel reply

Your email address will not be published. Required fields are marked *

May 2025
S M T W T F S
 123
45678910
11121314151617
18192021222324
25262728293031
« Apr    

Articles

  • About
    • Patents and papers about color
    • Who am I?
  • How to…
    • Backing up photographic images
    • How to change email providers
    • How to shoot slanted edge images for me
  • Lens screening testing
    • Equipment and Software
    • Examples
      • Bad and OK 200-600 at 600
      • Excellent 180-400 zoom
      • Fair 14-30mm zoom
      • Good 100-200 mm MF zoom
      • Good 100-400 zoom
      • Good 100mm lens on P1 P45+
      • Good 120mm MF lens
      • Good 18mm FF lens
      • Good 24-105 mm FF lens
      • Good 24-70 FF zoom
      • Good 35 mm FF lens
      • Good 35-70 MF lens
      • Good 60 mm lens on IQ3-100
      • Good 63 mm MF lens
      • Good 65 mm FF lens
      • Good 85 mm FF lens
      • Good and bad 25mm FF lenses
      • Good zoom at 24 mm
      • Marginal 18mm lens
      • Marginal 35mm FF lens
      • Mildly problematic 55 mm FF lens
      • OK 16-35mm zoom
      • OK 60mm lens on P1 P45+
      • OK Sony 600mm f/4
      • Pretty good 16-35 FF zoom
      • Pretty good 90mm FF lens
      • Problematic 400 mm FF lens
      • Tilted 20 mm f/1.8 FF lens
      • Tilted 30 mm MF lens
      • Tilted 50 mm FF lens
      • Two 15mm FF lenses
    • Found a problem – now what?
    • Goals for this test
    • Minimum target distances
      • MFT
      • APS-C
      • Full frame
      • Small medium format
    • Printable Siemens Star targets
    • Target size on sensor
      • MFT
      • APS-C
      • Full frame
      • Small medium format
    • Test instructions — postproduction
    • Test instructions — reading the images
    • Test instructions – capture
    • Theory of the test
    • What’s wrong with conventional lens screening?
  • Previsualization heresy
  • Privacy Policy
  • Recommended photographic web sites
  • Using in-camera histograms for ETTR
    • Acknowledgments
    • Why ETTR?
    • Normal in-camera histograms
    • Image processing for in-camera histograms
    • Making the in-camera histogram closely represent the raw histogram
    • Shortcuts to UniWB
    • Preparing for monitor-based UniWB
    • A one-step UniWB procedure
    • The math behind the one-step method
    • Iteration using Newton’s Method

Category List

Recent Comments

  • bob lozano on The 16-Bit Fallacy: Why More Isn’t Always Better in Medium Format Cameras
  • JimK on Goldilocks and the three flashes
  • DC Wedding Photographer on Goldilocks and the three flashes
  • Wedding Photographer in DC on The 16-Bit Fallacy: Why More Isn’t Always Better in Medium Format Cameras
  • JimK on Fujifilm GFX 100S II precision
  • Renjie Zhu on Fujifilm GFX 100S II precision
  • JimK on Fuji 20-35/4 landscape field curvature at 23mm vs 23/4 GF
  • Ivo de Man on Fuji 20-35/4 landscape field curvature at 23mm vs 23/4 GF
  • JimK on Fuji 20-35/4 landscape field curvature at 23mm vs 23/4 GF
  • JimK on Fuji 20-35/4 landscape field curvature at 23mm vs 23/4 GF

Archives

Copyright © 2025 · Daily Dish Pro On Genesis Framework · WordPress · Log in

Unless otherwise noted, all images copyright Jim Kasson.