In yesterday’s post, I used photographs of an oscilloscope screen to conclude that the Sony a7R/Zeiss 100mm f/2 Makro-Planar ZF/Novoflex F to E mount adapter/Novoflex adapter collar/Arca Swiss Monoball/Gitzo GT3541XLS combination produced 2 or 3 camera pixels peak-to-peak vibration with the camera oriented in portrait position. The day before yesterday, I performed testing of the same equipment that involved photographing the ISO 12233 teat target at various shutter speeds at a constant aperture and camera ISO setting, adjusting for light levels with a variable neutral density filter.
Today I’d like to try to join the results of the two kinds of testing and see if they’re telling us the same things. The tool I’m going to use in this exercise is the camera simulation that I described in this post. I plan to vary the parameters of the simulator until I get results close to those I got when I was actually photographing the target, and see what conclusions I can draw from looking at the values of those parameters. The name for this activity is analysis by synthesis. I first ran into it in the early sixties when I was working on speech bandwidth compression but the principle is generally applicable, if subject to error when the model is wrong.
When first started on this task, I got results from the real images that were wildly divergent from those from the simulation. I had been using Lightroom to demosaic and process the real raw pictures, and had been using bilinear interpolation and no other processing in my simulation. It turned out that was the problem; Lightroom, with its “secret sauce” does a much better job than plain old bilinear interpolation.
That left me with two choices. I could try to reverse engineer Lightroom and use all their tricks in the simulation, or I could demosaic the real images using bilinear interpolation and leave the model alone.
It wasn’t a hard decision. I used DCRAW in document mode to get at the mosaicked image, and demosaiced it in Matlab. Then I asked DCRAW to demosaic the image using bilinear interpolation. I got equivalent results, so I decided to let DCRAW do the work and convert the primaries to Adobe RGB while it was at it.
I didn’t try to get DCRAW to do a contrast boost or black level correction; I did that afterwards my eye, and imperfectly. The simulated images and the real images differ in saturation, color balance, and black level. The simulated camera captures Adobe RGB natively, and thus has no need for, or problems with, conversion from camera primaries to Adobe RGB. The real camera is not so lucky. Still, by looking mostly at the false color patterns, I was able to adjust the camera parameters to get a pretty good match.
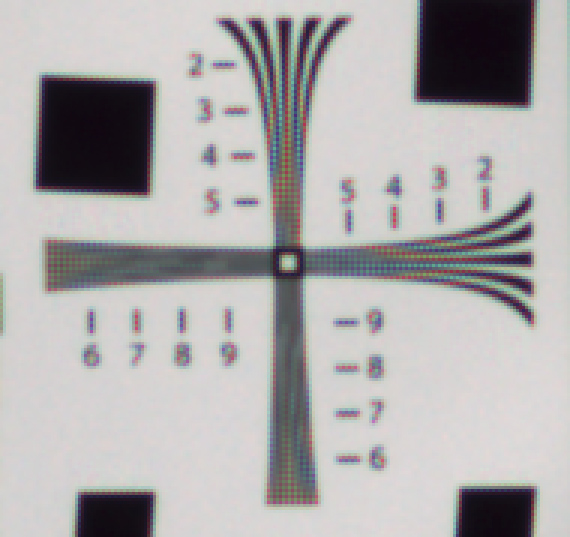
First, a crop to our favorite region of the ISO 12233 target made with the real camera in portrait orientation at 1/500 second, as demosaiced by DCRAW with bilinear interpolation, then enlarged 3x using nearest neighbor:
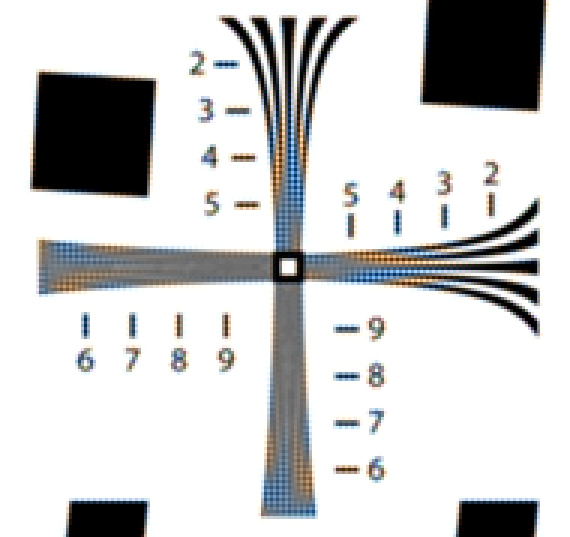
Next, a simulated image with the camera parameters set to
- Perfect lens, except for blur provided by a 0.5 pixel pillbox filter applied twice
- 64-bit floating point resolution
- Target resolution: 10000×6667 pixels
- Target size in camera pixels: 960×640
- No photon noise
- No read noise
- No pixel response non-uniformity
- 100% fill factor
- Bayer pattern color filter array: RGGB
- No motion blur
- No anti-aliasing filter
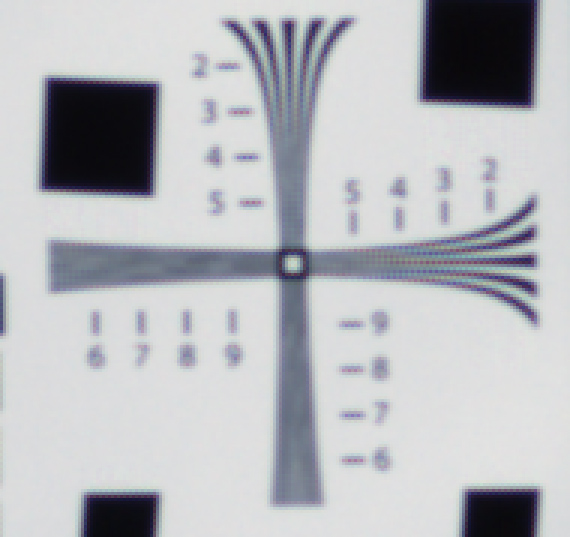
Next, I considered worst image of ISO 12233 target made with the real camera, which was in portrait orientation at 1/80 second:
I approximated this image by setting the linear motion blur to 3 pixels at 30 degrees (2 is clearly too little, and 4 is too much). This amounts to 1.5 pixels vertically and 2.6 pixels horizontally. Those numbers are approximately consistent with the oscilloscope pictures.
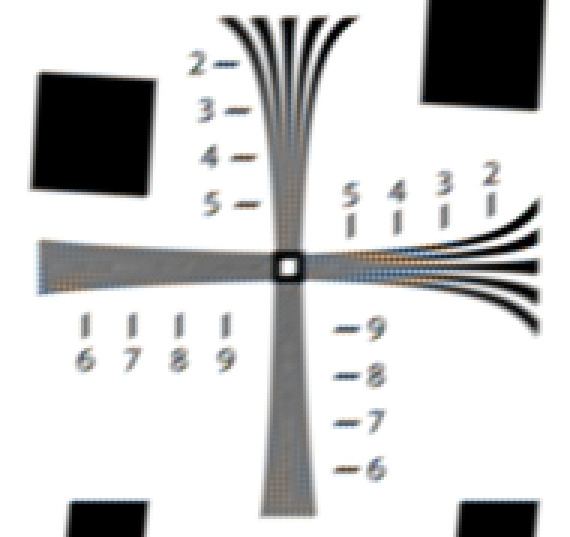
Not bad, huh? The half pixel lens blur that I picked to match the real image indicates that the lens could handle a sensor of considerable more resolution than the a7R, if the camera can be gotten to hold still.
In the event that a firmware update gives us the option to delay exposure after the 1st curtain closing…… I wondered if it’s possible to make an educated guess on how short a delay would be optimum.
thank you for your superb work!
I’ve been corresponding with Mike Collette of Betterlight. He’s done some studies that bear on this point. I’ll talk to him and see if I can pass some of his findings on.
Jim
Jim: You continue to do some very interesting & helpful work on this topic. Again, thank you. Are you able to share your work with Sony engineers? I ask because recently I had the opportunity to speak with a “level II ” Sony customer service person out of SanDiego (I think) and he told me that he had never herd of this issue before and he couldn’t find any documented complaints in his database.
I have no contacts at Sony. I would be happy to talk to any developer about this. I would not anticipate making any progress talking to a field service person, since I think my a7R works as designed.
Jim