• site home
  • blog home
  • galleries
  • contact
  • underwater
  • the bleeding edge

the last word

Photography meets digital computer technology. Photography wins -- most of the time.

You are here: Home / The Last Word / Shutter slap testing with ISO 12233, part 8

Shutter slap testing with ISO 12233, part 8

January 10, 2014 JimK 1 Comment

Early on in my testing of the Sony a7R, I ventured the opinion that the camera probably wouldn’t exhibit image degradation from shutter slap with lenses of 135mm or shorter focal length with the camera in landscape orientation with the camera mounted directly to a tripod head (no lens collar). Then I found image degradation with the 55mm f/1.8 FE lens, and that shook my confidence. I found surprisingly high vibration frequencies with the Zeiss 100mm f/2 Makro-Planar ZF, and that further eroded my faith.  In the last few posts, I pretty much pinned down the Makro-Planar vibration amplitude as being about three pixels peak-to-peak, and about three pixels of linear blur at 1/80 second.

All that caused me to try to test how far off I was in my original judgment. I mounted a Leica 135mm f/3.4 APO-Telyt on the A7R with a Novoflex adapter. I bolted a generic RRS plate to the bottom of the camera and mounted it on a RRS BH-55 that was attached to a set of RRS TVC-44 legs. These are heftier legs than I’d been using; I wanted to give the camera every advantage. I placed the tripod on concrete pavers and aimed it at the ISO 12233 target. I positioned the target approximately 93 million miles from a thermonuclear D50 illuminant.

I mounted a Heliopan variable ND filter on the lens. I set the camera ISO to 100. I opened the lens all the way, focused, and stopped down to f/5.6. I set the camera to “A” exposure mode, and adjusted the exposure compensation dial until the shutter speed read 1/2000. I hadn’t gone any higher than 1/500 in the previous testing, and it had looked like there might have been some motion at that shutter speed, since images made at 1/400 were more blurred. You don’t really know you’ve got as fast a shutter speed as you need to deal with the motion blur until at least you top two shutter speeds have the same amount of blur.

I made the first exposure, adjusted the filter so the shutter speed slowed by a third of a stop, made another exposure, and kept on until I got to 1/15 second.

In Lightroom, I set the white balance of all the images to daylight, added two stops of exposure boost, and exported all the images as layers to Photoshop. There I labeled the layers with the appropriate shutter speeds, cropped to the target, and took a look, concentrating on the cross in the upper right hand corner that’s become so familiar to my regular readers.

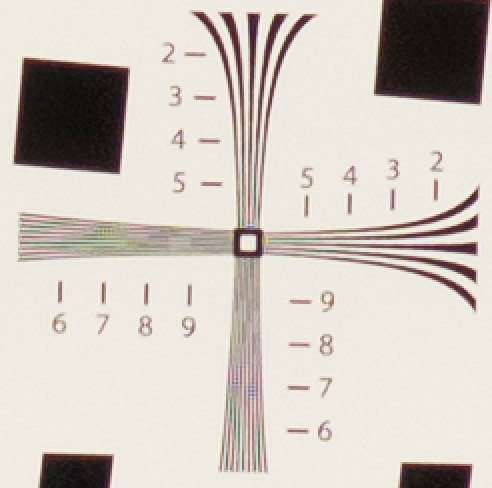
Here’s what I found, res’d up 2x using nearest neighbor:

The images from 1/2000 to 1/500 were very similar. There were some small differences in resolution, most of which could be attributed to small shifts of the target in the frame, but not entirely so. Here’s what is possibly the sharpest image, made at 1/1600 second:

135 f5p6 RRS 1600th

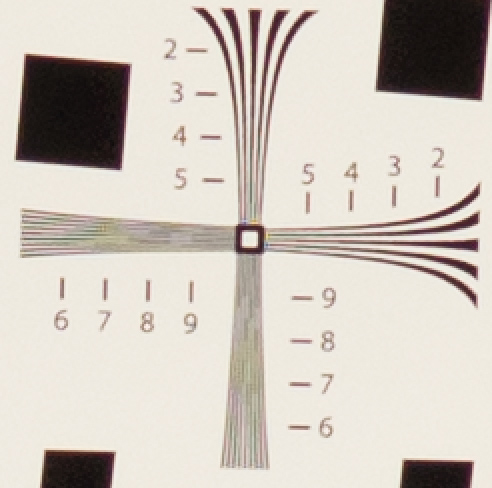
1/400 and 1/320 were almost as good as 1/500. The first frame which suffered degradation that might possibly be noticed in normal photography was made at 1/250 second, and has most of the visible loss in the vertical lines, indicating that the movement that caused the degradation was horizontal:

135 f5p6 RRS 250th

1/200 is noticeably worse in both directions. This amount of blurring would be noticeable under the right circumstances in normal photographs:

135 f5p6 RRS 200th

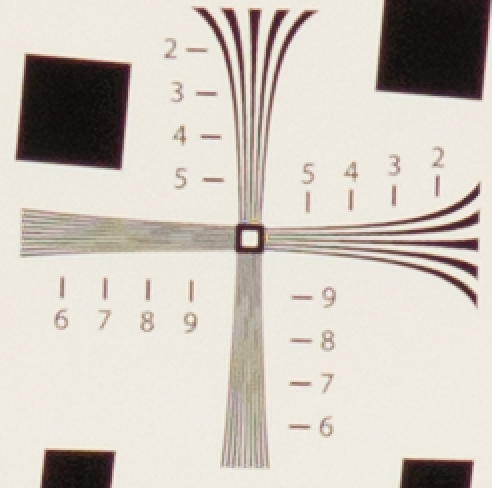
1/160 is better for the horizontal lines and about the same for the vertical ones, 1/125 is worse, and 1/100 is about as bad as it gets:

135 f5p6 RRS 100th

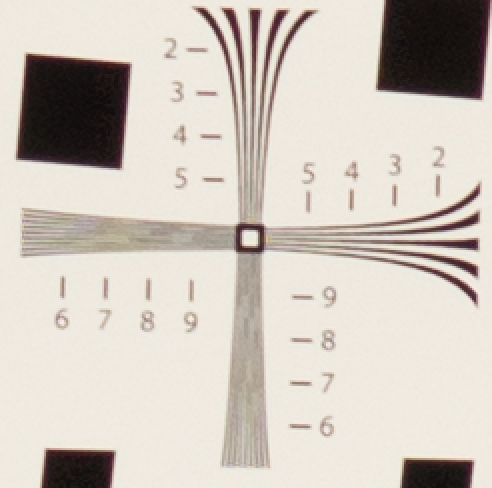
1/80 is about the same as 1/100, and then things stay about the same until 1/25, when there’s a little improvement. At 1/15, it looks like this:

135 f5p6 RRS 15th

I think I have to eat my words. There is certainly degradation from 1/250 through 1/15 that could be noticeable in real photographs. Whether or not it is important to those images is up to the photographer.

The Last Word

← The effect of vibration blur on resolution Demystifying the Sony a7R shutter operation →

Comments

  1. DavidH says

    June 17, 2017 at 6:14 pm

    Thanks for all these tests and sticking with it.
    This certainly makes it seem like the effective resolution of the A7R suffers in so many circumstances that it doesn’t seem worth the price difference to an A7.

    Reply

Leave a Reply Cancel reply

Your email address will not be published. Required fields are marked *

May 2025
S M T W T F S
 123
45678910
11121314151617
18192021222324
25262728293031
« Apr    

Articles

  • About
    • Patents and papers about color
    • Who am I?
  • How to…
    • Backing up photographic images
    • How to change email providers
    • How to shoot slanted edge images for me
  • Lens screening testing
    • Equipment and Software
    • Examples
      • Bad and OK 200-600 at 600
      • Excellent 180-400 zoom
      • Fair 14-30mm zoom
      • Good 100-200 mm MF zoom
      • Good 100-400 zoom
      • Good 100mm lens on P1 P45+
      • Good 120mm MF lens
      • Good 18mm FF lens
      • Good 24-105 mm FF lens
      • Good 24-70 FF zoom
      • Good 35 mm FF lens
      • Good 35-70 MF lens
      • Good 60 mm lens on IQ3-100
      • Good 63 mm MF lens
      • Good 65 mm FF lens
      • Good 85 mm FF lens
      • Good and bad 25mm FF lenses
      • Good zoom at 24 mm
      • Marginal 18mm lens
      • Marginal 35mm FF lens
      • Mildly problematic 55 mm FF lens
      • OK 16-35mm zoom
      • OK 60mm lens on P1 P45+
      • OK Sony 600mm f/4
      • Pretty good 16-35 FF zoom
      • Pretty good 90mm FF lens
      • Problematic 400 mm FF lens
      • Tilted 20 mm f/1.8 FF lens
      • Tilted 30 mm MF lens
      • Tilted 50 mm FF lens
      • Two 15mm FF lenses
    • Found a problem – now what?
    • Goals for this test
    • Minimum target distances
      • MFT
      • APS-C
      • Full frame
      • Small medium format
    • Printable Siemens Star targets
    • Target size on sensor
      • MFT
      • APS-C
      • Full frame
      • Small medium format
    • Test instructions — postproduction
    • Test instructions — reading the images
    • Test instructions – capture
    • Theory of the test
    • What’s wrong with conventional lens screening?
  • Previsualization heresy
  • Privacy Policy
  • Recommended photographic web sites
  • Using in-camera histograms for ETTR
    • Acknowledgments
    • Why ETTR?
    • Normal in-camera histograms
    • Image processing for in-camera histograms
    • Making the in-camera histogram closely represent the raw histogram
    • Shortcuts to UniWB
    • Preparing for monitor-based UniWB
    • A one-step UniWB procedure
    • The math behind the one-step method
    • Iteration using Newton’s Method

Category List

Recent Comments

  • JimK on Goldilocks and the three flashes
  • DC Wedding Photographer on Goldilocks and the three flashes
  • Wedding Photographer in DC on The 16-Bit Fallacy: Why More Isn’t Always Better in Medium Format Cameras
  • JimK on Fujifilm GFX 100S II precision
  • Renjie Zhu on Fujifilm GFX 100S II precision
  • JimK on Fuji 20-35/4 landscape field curvature at 23mm vs 23/4 GF
  • Ivo de Man on Fuji 20-35/4 landscape field curvature at 23mm vs 23/4 GF
  • JimK on Fuji 20-35/4 landscape field curvature at 23mm vs 23/4 GF
  • JimK on Fuji 20-35/4 landscape field curvature at 23mm vs 23/4 GF
  • Ivo de Man on Fuji 20-35/4 landscape field curvature at 23mm vs 23/4 GF

Archives

Copyright © 2025 · Daily Dish Pro On Genesis Framework · WordPress · Log in

Unless otherwise noted, all images copyright Jim Kasson.