• site home
  • blog home
  • galleries
  • contact
  • underwater
  • the bleeding edge

the last word

Photography meets digital computer technology. Photography wins -- most of the time.

You are here: Home / The Last Word / Sony a7II focus peaking anisotropy

Sony a7II focus peaking anisotropy

August 4, 2015 JimK 4 Comments

It has seemed to me that the Sony alpha 7 camera line’s focus peaking is more sensitive to contrast variations in the horizontal than the vertical direction.

I thought to devise a test. I wrote a Matlab script to generate a sinusoidal grating that varied in one direction in frequency, and in the other direction in modulation index. I printed out two copies, and taped them to the wall, one in landscape orientation, and one in portrait.

Then I lit the target with a 5500 degree Kelvin flood, and pointed an a7II with a Leica 18mm f/3.8 Super Elmar lens on it at the two. I set the focus magnify to the lower magnification, turned focus peaking on, and this is what I saw in the LCD display:

_DSC5144


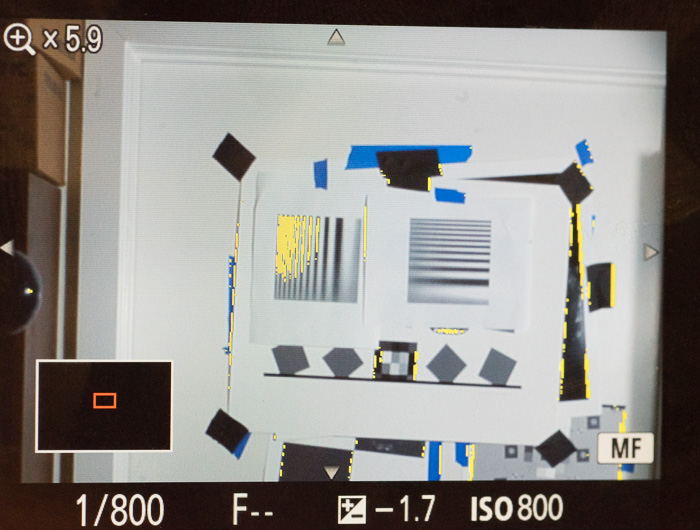
You can see that the left grating, the one with the horizontal sinusoids, is lit up like a Christmas tree. The right grating, , the one with the vertical sinusoids, shows no peaking.

There’s one other thing you can see from this shot. Look at the left grating. The modulation index gets greater as you go higher on the chart. Note that the modulation required to trigger the peaking false color is a function of the frequency of the sinusoid, with lower frequencies requiring greater modulation. That is expected.

What is not expected is that the modulation required to trigger the false color rises at the very highest frequencies. I don’t think that is designed into the peaking algorithm. I think that it is a consequence of the lens’ resolution decreasing at those frequencies, and the subsampled display resolution also decreasing at those frequencies.

My guess is that the focus peaking is derived only from the digital equivalent of the horizontal scan lines, through an operation similar to differentiation and thresholding. It’s a quick, and definitely dirty, way to accomplish this function.

What’s this mean to a7x shooters? Angle your camera so that the greatest contrast changes are in the camera’s horizontal direction (when shooting in landscape format, look for vertical lines) to increase the focus peaking sensitivity. If you have a subject with more contrast changes in one direction than the other, you can get continuously variable focus peaking sensitivity — something otherwise unobtainable on the a7x — by rotating the camera to taste.

In case anyone has any use for it, here’s the code that generates the target:

ml sin code

The Last Word

← Kolari thin-stack mod on a7II vs M240 — Leica WATE at 21mm Testing IBIS on the Kolari-modified a7II →

Comments

  1. Mike Aubrey says

    August 4, 2015 at 12:34 pm

    I’ve noticed the same thing on the original A7. A local coffee house has a checker patterned carpeting where every other square has the carpet stitching going perpendicular every other square. Focus peaking only responds to the squares that appear vertical in the EVF.

    Reply
  2. Jean Pierre says

    August 4, 2015 at 1:50 pm

    Hi Jim, Well done and give me the opportunity to make the same test to my Samsung NX1!
    And the result is equal. Only on vertical lines focus peaking works. Thus, I have to remember to rotate the camera to portrait orientation, when the image not have enough vertical lines for correct focus adjustment.

    Reply

Trackbacks

  1. Sony a7II CDAF anisotropy? | The Last Word says:
    February 6, 2016 at 8:19 pm

    […] Sony a7x cameras are the result of the same hardware and software. I begged to differ, and offered the focus-peaking anisotropy that I’d demonstrated earlier as evidence. He said that the CDAF did that, […]

    Reply
  2. Towards a quick, qualitative lens tilt test says:
    December 18, 2016 at 3:20 pm

    […] There is one big problem with this test. It only can measure side-to-side tilt. It is insensitive to up-and-down tilt. That’s because the Sony a7x focus peaking system only looks at horizontal changes. […]

    Reply

Leave a Reply Cancel reply

Your email address will not be published. Required fields are marked *

May 2025
S M T W T F S
 123
45678910
11121314151617
18192021222324
25262728293031
« Apr    

Articles

  • About
    • Patents and papers about color
    • Who am I?
  • How to…
    • Backing up photographic images
    • How to change email providers
    • How to shoot slanted edge images for me
  • Lens screening testing
    • Equipment and Software
    • Examples
      • Bad and OK 200-600 at 600
      • Excellent 180-400 zoom
      • Fair 14-30mm zoom
      • Good 100-200 mm MF zoom
      • Good 100-400 zoom
      • Good 100mm lens on P1 P45+
      • Good 120mm MF lens
      • Good 18mm FF lens
      • Good 24-105 mm FF lens
      • Good 24-70 FF zoom
      • Good 35 mm FF lens
      • Good 35-70 MF lens
      • Good 60 mm lens on IQ3-100
      • Good 63 mm MF lens
      • Good 65 mm FF lens
      • Good 85 mm FF lens
      • Good and bad 25mm FF lenses
      • Good zoom at 24 mm
      • Marginal 18mm lens
      • Marginal 35mm FF lens
      • Mildly problematic 55 mm FF lens
      • OK 16-35mm zoom
      • OK 60mm lens on P1 P45+
      • OK Sony 600mm f/4
      • Pretty good 16-35 FF zoom
      • Pretty good 90mm FF lens
      • Problematic 400 mm FF lens
      • Tilted 20 mm f/1.8 FF lens
      • Tilted 30 mm MF lens
      • Tilted 50 mm FF lens
      • Two 15mm FF lenses
    • Found a problem – now what?
    • Goals for this test
    • Minimum target distances
      • MFT
      • APS-C
      • Full frame
      • Small medium format
    • Printable Siemens Star targets
    • Target size on sensor
      • MFT
      • APS-C
      • Full frame
      • Small medium format
    • Test instructions — postproduction
    • Test instructions — reading the images
    • Test instructions – capture
    • Theory of the test
    • What’s wrong with conventional lens screening?
  • Previsualization heresy
  • Privacy Policy
  • Recommended photographic web sites
  • Using in-camera histograms for ETTR
    • Acknowledgments
    • Why ETTR?
    • Normal in-camera histograms
    • Image processing for in-camera histograms
    • Making the in-camera histogram closely represent the raw histogram
    • Shortcuts to UniWB
    • Preparing for monitor-based UniWB
    • A one-step UniWB procedure
    • The math behind the one-step method
    • Iteration using Newton’s Method

Category List

Recent Comments

  • JimK on Goldilocks and the three flashes
  • DC Wedding Photographer on Goldilocks and the three flashes
  • Wedding Photographer in DC on The 16-Bit Fallacy: Why More Isn’t Always Better in Medium Format Cameras
  • JimK on Fujifilm GFX 100S II precision
  • Renjie Zhu on Fujifilm GFX 100S II precision
  • JimK on Fuji 20-35/4 landscape field curvature at 23mm vs 23/4 GF
  • Ivo de Man on Fuji 20-35/4 landscape field curvature at 23mm vs 23/4 GF
  • JimK on Fuji 20-35/4 landscape field curvature at 23mm vs 23/4 GF
  • JimK on Fuji 20-35/4 landscape field curvature at 23mm vs 23/4 GF
  • Ivo de Man on Fuji 20-35/4 landscape field curvature at 23mm vs 23/4 GF

Archives

Copyright © 2025 · Daily Dish Pro On Genesis Framework · WordPress · Log in

Unless otherwise noted, all images copyright Jim Kasson.