• site home
  • blog home
  • galleries
  • contact
  • underwater
  • the bleeding edge

the last word

Photography meets digital computer technology. Photography wins -- most of the time.

You are here: Home / The Last Word / Sony a7II IBIS and sloppy technique

Sony a7II IBIS and sloppy technique

April 25, 2015 JimK 4 Comments

I tested the performance of the in-body image stabilization (IBIS; Sony calls it Steadyshot) on the Sony alpha 7 Mark II (a7II) with 16mm, 28mm, 55 mm, and 180mm lenses. The improvements over handholding without the IBIS turned on were impressive, both in reduction of the average amount of blur, and the tightening of the spread in blur between groups of shots.

It has been my experience in the past with optically-stabilized lenses — mostly the Nikon VR lenses — that if you’re not careful, turning on the image stabilization can actually make things worse, as the shutter is open while the camera and lens combination are frantically trying to get the camera motion figured out.

Does IBIS suffer from the same problem? I set out to answer that question.

Here’s my test protocol:

  • The camera: the Sony a7II.
  • The lens: the Leica 180mm f/3.4 Apo-Telyt-R.
  • The lighting: a single Fotodiox LED-200WA-56 daylight balanced flood.
  • ISO set to 1000, f-stop set to 8,
  • Focusing manually using maximum magnification wide open,
  • Drive set to single
  • EFCS on
  • Manual exposure mode.
  • Bring the camera quickly to the eye, then press the shutter button all the way down. Don’t wait for the image to stabilize.
  • Exposure protocol: Light to maximum,, shutter to 1/1000 second, make 16 exposures, Turn the light  down a stop, make 16 exposure, until you get to 1/60 of a second.
  • Make one series with IBIS on, and one with it off.
  • Develop in Lightroom 5.7.1 with standard settings.
  • Crop, export as TIFFs, analyze for horizontal edge and vertical edge MTF50 in Imatest.
  • Export the results to Excel, crunch the stats, and graph.

The results:

180ibis-sloppy

The vertical axis is the MTF50 for the image: the point where, as the spatial frequency of the subject matter increases, the response on the sensor is reduced to half its very-low-frequency value. The units of spatial frequency are cycles per picture height. Since the a7II has a picture height of 4000 pixels, the highest that the MTF50 should ever get is 2000 cycles per picture height. 1500 is exemplary performance.

The horizontal axis is the shutter duration. 0.001 seconds, the number at the left edge, is 1/1000 second. 0.016 is 1/60 second.

The heavy lines are the average for all 16 exposures. The red is with IBIS on, and the blue is with is off (In the legend, I call IBIS “SS”, for SteadyShot). The light lines are the average plus one standard deviation and the average minus one standard deviation. If the statistics for handheld MTF50 turn out to be Gaussian, about two thirds of the images will fall between the two narrow lines.

You can see that IBIS never makes things worse, and at shutter speeds of 1/125 and 1/60, actually helps thing quite a lot.

Good technique is still worth a lot, though. Consider this set of curves using the “Pete Souza” grip: left palm under base, left fingers bracing the underside of the front part of the lens, elbows against chest, and following this rifle-range release protocol: Inhale, exhale, brace gently, think calm thoughts, squeeze the shutter release, remembering to “pull through”.

180ibis-careful

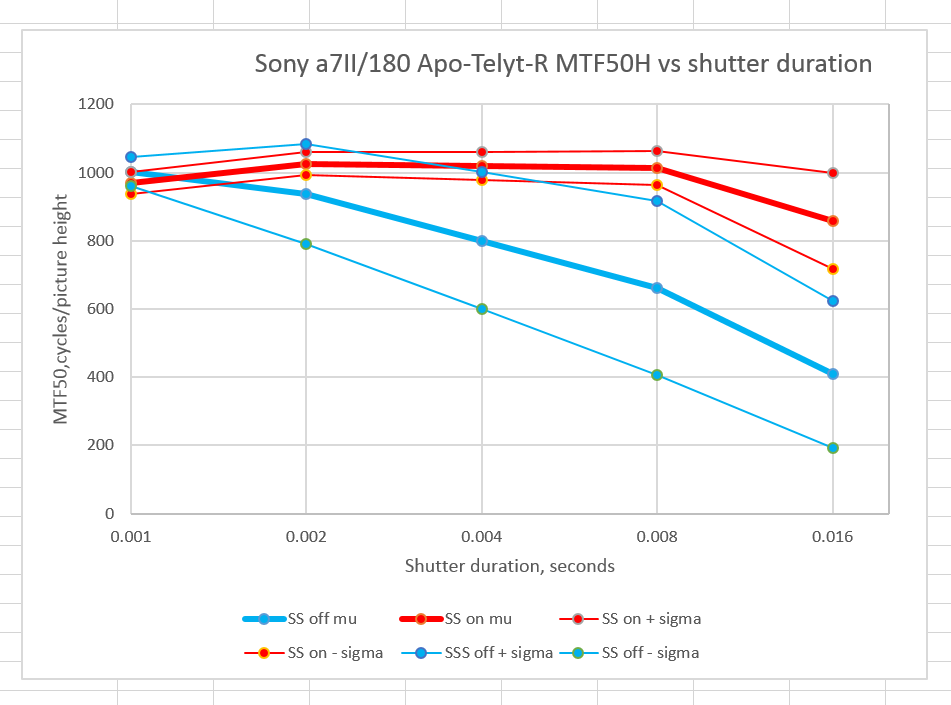
The take home lesson is that you don’t have to be afraid to use IBIS if you’re in a hurry.

Why isn’t 1/1000 better than 1/500 in the sloppy technique curves? Beats me. I bet it wouldn’t be if I made the sample space much larger.

The Last Word

← Simulating Sony a7II camera motion blur 135 Apo-Sonnar, Apo-Telyt, handheld with IBIS on the a7II →

Comments

  1. Urban says

    April 30, 2015 at 6:06 am

    Great Blog Jim! Just was wondering as I was reading through your test protocol list in the series of a7II IBIS testing and didn’t see anything on dialing the Steadyshot Adjust to match the focal length. Was that performed?

    Thanks!

    Reply
    • Jim says

      April 30, 2015 at 6:44 am

      >Was that performed?

      Yes, it was.

      Jim

      Reply
  2. Ad says

    August 9, 2015 at 4:58 am

    Just speculating: the drop-off at 1/1000s might be related to vibration of the second shutter curtain? I’d think that at faster speeds that vibration is relatively more influential.

    Reply
    • Jim says

      August 9, 2015 at 7:40 am

      I agree. See this:

      http://blog.kasson.com/?p=8509

      …the higher shutter speeds are more problematical than the lower ones, though the differences are small. That’s because the time the second curtain is moving is a larger portion of the time the shutter is open when the shutter speeds are shorter

      Reply

Leave a Reply Cancel reply

Your email address will not be published. Required fields are marked *

May 2025
S M T W T F S
 123
45678910
11121314151617
18192021222324
25262728293031
« Apr    

Articles

  • About
    • Patents and papers about color
    • Who am I?
  • How to…
    • Backing up photographic images
    • How to change email providers
    • How to shoot slanted edge images for me
  • Lens screening testing
    • Equipment and Software
    • Examples
      • Bad and OK 200-600 at 600
      • Excellent 180-400 zoom
      • Fair 14-30mm zoom
      • Good 100-200 mm MF zoom
      • Good 100-400 zoom
      • Good 100mm lens on P1 P45+
      • Good 120mm MF lens
      • Good 18mm FF lens
      • Good 24-105 mm FF lens
      • Good 24-70 FF zoom
      • Good 35 mm FF lens
      • Good 35-70 MF lens
      • Good 60 mm lens on IQ3-100
      • Good 63 mm MF lens
      • Good 65 mm FF lens
      • Good 85 mm FF lens
      • Good and bad 25mm FF lenses
      • Good zoom at 24 mm
      • Marginal 18mm lens
      • Marginal 35mm FF lens
      • Mildly problematic 55 mm FF lens
      • OK 16-35mm zoom
      • OK 60mm lens on P1 P45+
      • OK Sony 600mm f/4
      • Pretty good 16-35 FF zoom
      • Pretty good 90mm FF lens
      • Problematic 400 mm FF lens
      • Tilted 20 mm f/1.8 FF lens
      • Tilted 30 mm MF lens
      • Tilted 50 mm FF lens
      • Two 15mm FF lenses
    • Found a problem – now what?
    • Goals for this test
    • Minimum target distances
      • MFT
      • APS-C
      • Full frame
      • Small medium format
    • Printable Siemens Star targets
    • Target size on sensor
      • MFT
      • APS-C
      • Full frame
      • Small medium format
    • Test instructions — postproduction
    • Test instructions — reading the images
    • Test instructions – capture
    • Theory of the test
    • What’s wrong with conventional lens screening?
  • Previsualization heresy
  • Privacy Policy
  • Recommended photographic web sites
  • Using in-camera histograms for ETTR
    • Acknowledgments
    • Why ETTR?
    • Normal in-camera histograms
    • Image processing for in-camera histograms
    • Making the in-camera histogram closely represent the raw histogram
    • Shortcuts to UniWB
    • Preparing for monitor-based UniWB
    • A one-step UniWB procedure
    • The math behind the one-step method
    • Iteration using Newton’s Method

Category List

Recent Comments

  • bob lozano on The 16-Bit Fallacy: Why More Isn’t Always Better in Medium Format Cameras
  • JimK on Goldilocks and the three flashes
  • DC Wedding Photographer on Goldilocks and the three flashes
  • Wedding Photographer in DC on The 16-Bit Fallacy: Why More Isn’t Always Better in Medium Format Cameras
  • JimK on Fujifilm GFX 100S II precision
  • Renjie Zhu on Fujifilm GFX 100S II precision
  • JimK on Fuji 20-35/4 landscape field curvature at 23mm vs 23/4 GF
  • Ivo de Man on Fuji 20-35/4 landscape field curvature at 23mm vs 23/4 GF
  • JimK on Fuji 20-35/4 landscape field curvature at 23mm vs 23/4 GF
  • JimK on Fuji 20-35/4 landscape field curvature at 23mm vs 23/4 GF

Archives

Copyright © 2025 · Daily Dish Pro On Genesis Framework · WordPress · Log in

Unless otherwise noted, all images copyright Jim Kasson.