I have developed a test for “ISOlessness” as part of the photon transfer analysis program. The test is described here.
Here’s a summary: You specify the highest ISO that you wish to consider, and what the mean signal level should be at that ISO as a ratio to full scale. For example, if you’re interested in an 18% mean, you’d specify it as 0.18. Then you tell the method what’s the lowest ISO you want to consider. The program picks a raw channel, finds the sample closest to the specified mean at the highest ISO and records the standard deviation and the SNR. Then it looks at the samples at the next ISO down from that in the data set, and finds the mean that corresponds to the same amount of light hitting the sensor, and records the standard deviation and the SNR. It keeps going until it reaches the lowest ISO of interest. It goes on to the next raw channel, and does the same thing, until it’s performed the calculations for all the raw channels.
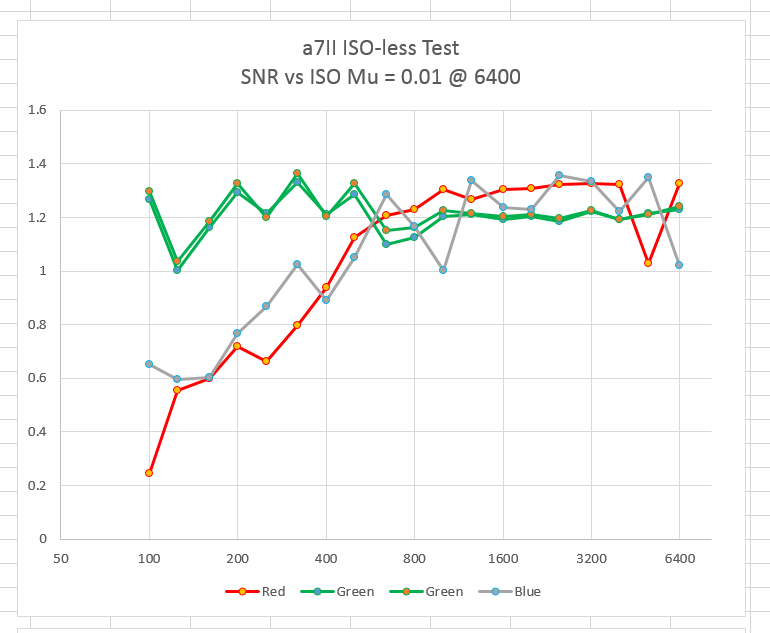
I applied the test to the a7II, and got noisy, inconsistent results:
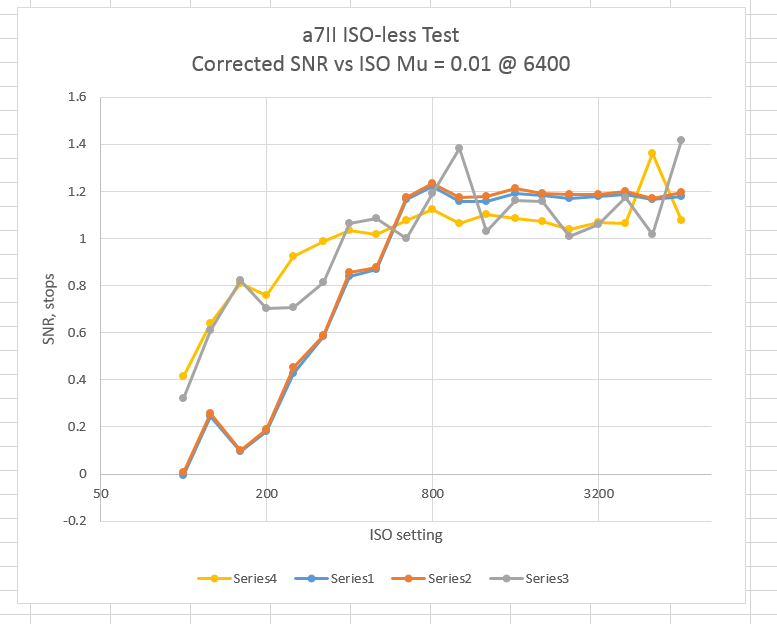
Even after applying corrections — the intellectual basis for which is shaky at low SNRs — the results were more gestural than definitive:
The it hit me. I was operating on a data set that had been cleaned of near-duplicates and low-SNR samples. That was what was appropriate for read noise analysis, but not for this test, which depends on having samples in the data set that are close to the mean values that you’re looking for. I turned off the data cleaning step, and here’s what I got with a target mean value at ISO 6400 of 0.01, with no corrections:

It shows that you don’t get much advantage in turning up the a7II ISO knob past 800 in shadow areas that are about 6.5 stops (log2 of 100) down from saturation. But look at the absolute values of the SNR numbers! They are terrible. I consider an SNR of 10 to the the threshold of goo photographic quality. That’s a bit over three stops. Looking at tones this dark in interesting, but not of the greatest utility.
Let’s double the target mean, to 0.02:

As expected, we got almost a stop more SNR. 800 still looks like the magic ISO.
Doubling the mean again produces this:

A bit more SNR, but still not to the goal of 3 or so. It looks like any ISO over 200 is good enough.
Doubling the target mean again:

We’ve got the SNR we’re looking for, and the curve is quite flat.
Let’s go all the way to a mean of 18%:

ISOless? You bet. Another way of looking at this graph is that the 18% target at ISO 6400 is a 9% target at ISO 3200, a 4.5% one at ISO 1600, a 2.25% one at ISO 800 and so on.
Hi,
What do you say about the sensor, how does it compare to other cameras?
So you want me to just cut to the chase, right? I’m not done with my a7II sensor testing, but so far, I’d give it a B+, or maybe an A-. All of the Sony’s Exmor sensors are good, but this one isn’t a home run like the a7S or the D810 sensor.
Is that what you’re looking for?
Jim
Yep, that’s pretty much.
How is it compared to the D750?
I don’t know anything about the D750. Sorry.
Hello!
Interesting but above my understanding level I am afraid. I am getting the A7II tomorrow to upgrade from my NEX-6 (with Lens Turbo 2). I shoot mostly Canon FD glass so the IBS is a great option plus having input for MIC will make me record more piano playing etc.
So, what have you found out about the sensor after the extra months since this test and what is your opinion about it.
A very simple Sesame Street explanation of the above would be welcome too. 🙂
Thanks!
Hello. I know this is an old post, but have you tested the camera in real life situations rather than lab? I own A7II and I can tell you it is far from isoless camera… You may be able to push ISO200 image by 5stops and get results similar to ISO6400 images, but the quality of that ISO200 image will be far worse compared to the one taken at ISO6400. Been testing the camera in various situations and I can conclude that the older generation Canon 6D is hands down better performer at higher ISOs. Sony is only good at low ISOs ~100-800ISO is where the cameras DR capabilities are superior. But everything beyond that is where the camera falls behind a lot. High ISOs in 6400 range looks worse compared to Canon 6D, and pushing those numbers from lower values i.e. shoting image at ISO500 and pushing in post does not deliver same quality as shoting the image with 6400 in camera. The main issue noise introduced in postprocessing, the noise look awful compared to the one you get shooting images at high ISO in camera. Furthermore I do not think that the noise introduced in postprocessing could be corrected using photo stacking techniques to reduce random pattern noise that occur at high ISOs. These issues are a really huge let down especially taking in to account that people are considering these cameras to be issoless, from my perspective, the true nature of these cameras are far from being truly isoless.