• site home
  • blog home
  • galleries
  • contact
  • underwater
  • the bleeding edge

the last word

Photography meets digital computer technology. Photography wins -- most of the time.

You are here: Home / a9 / Sony a9 — multiple ADC operations?

Sony a9 — multiple ADC operations?

June 5, 2017 JimK 2 Comments

This is the 11th in a series of posts on the Sony a9. The series starts here.

Warning: this is a yet another techie post about esoteric aspects of camera sensor analysis and modeling. There is not much to learn here that applies to general photography. If you aren’t interested in these things for their own sake, do yourself a favor and skip this.

A Sony engineer, Hayato Wakibayashi, has patented some interesting tricks that might be used in the a9. Some thought these might explain the anomalies described in the previous post. In the patent, the inventor describes an architecture that, among other things, allows a group of analog to digital converters (ADCs) to operate on sensor pixels in parallel when speed is of the essence, and all together on the same pixel to reduce read noise. You could imagine that, if the 12-bit ADCs were used in groups of four, that they could operate on four separate pixels at a time in the a9’s continuous shutter mode, and on a single pixel, with their outputs added together, in single shot mode. The latter scheme would produce a 14-bit output. 

I decided to simulate their approach, assuming an implementation like that described above. But first, I did some looking at the photon transfer curves of the a7 in continuous shutter mode. The one at ISO 100 was particularly interesting. I’ll just show you the darkest part:

See that “rippling”? That’s the same kind of thing I showed you in the last post from the simulation run where I used a 12-bit ADC and cut the post-Amp read noise in half:

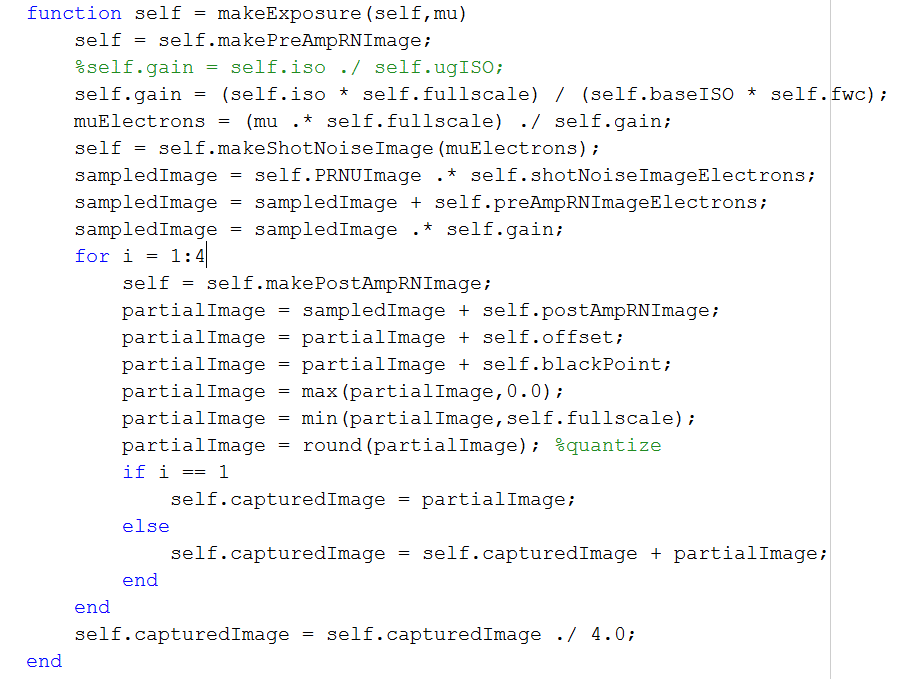
I set up the simulator to use one sample for each pixel with the photon noise and the pre-amp read noise added in, but to then do four 12-bit conversions on each one and average the results, which is a scaling factor away from adding them together. If you’re interested, here’s the code:

I set the post-amp read noise to twice what I’d measured in the camera’s 14-bit mode, since this averaging should reduce noise by a factor of two. But then I divided that number by 4, since we’re talking 12-bit precision, not 14-bit. I ran the sim for ISO 100 through 500, and plotted the results on a plot with those from the real camera from ISO 640 on up:

Now let’s compare that with the same plot from the real camera:

Two things are clear to me:

  1. I got about the right amount of noise. Well, maybe it’s a little high, but it’s in the ballpark. Extra credit for the noise that I put in being a tad more than I see when the camera is in continuous mode.
  2. There are no “kinks” to the simulated curves, so the multiple ADCs is not a way to explain the kinks in the real camera’s curves.

Let’s look first at the simulated ISO 100 PTC:

And the real one:

Again, it looks like my post-amp read noise is a little high, but the curves lok otherwise alike. There is no “ripple” in either case. The read noise seems to supply enough dither.

Does this proved that Sony is using the technology described in the patent above in the a9? No, it does not. But it certainly doesn’t disprove it, and it is a plausible idea. It’s also a plausible idea for a7c cameras, and could explain why the read noise in continuous shutter mode is so much higher than in single shot mode.

As an aside, if you’ve read the patent and can tell me a combination of switches 131, 132, and 133 that connects one pixel to both ADCs and doesn’t load the source follower with two constant-current sources, I’d be interested. If you can’t, do you think it’s an error in the patent? 


a9, The Last Word

← Sony a9 read noise anomalies Sony a9 electronic shutter details →

Comments

  1. BarsMonster says

    November 2, 2017 at 12:21 am

    I believe patents are not always 100% detailed, hence the absence of details around current sources.

    In your simulation to see some weird effects of multiple ADC sampling you might need to include more realistic ADC model with uneven (non-ideal) steps. Even very good ADCs typically have some 0.25LSB systematic errors. This error might have complex distribution across the ADC’s range and will differ among ADC’s instances.

    Reply

Trackbacks

  1. New Sony A9 tests (with banding test by Diglloyd. Ryan Brenizier swtiches from Nikon D5 to Sony A9) - sonyalpharumors sonyalpharumors says:
    June 11, 2017 at 4:21 am

    […] F1.8 Art Test – MC-11 Adapter (Video by Dan Watson). Sony a9 — multiple ACD operations? (Jim Kasson) Behind The Scenes Shooting In The Studio With The New Sony a9 (Video by Miguel Quiles). Sony A9 […]

    Reply

Leave a Reply Cancel reply

Your email address will not be published. Required fields are marked *

May 2025
S M T W T F S
 123
45678910
11121314151617
18192021222324
25262728293031
« Apr    

Articles

  • About
    • Patents and papers about color
    • Who am I?
  • How to…
    • Backing up photographic images
    • How to change email providers
    • How to shoot slanted edge images for me
  • Lens screening testing
    • Equipment and Software
    • Examples
      • Bad and OK 200-600 at 600
      • Excellent 180-400 zoom
      • Fair 14-30mm zoom
      • Good 100-200 mm MF zoom
      • Good 100-400 zoom
      • Good 100mm lens on P1 P45+
      • Good 120mm MF lens
      • Good 18mm FF lens
      • Good 24-105 mm FF lens
      • Good 24-70 FF zoom
      • Good 35 mm FF lens
      • Good 35-70 MF lens
      • Good 60 mm lens on IQ3-100
      • Good 63 mm MF lens
      • Good 65 mm FF lens
      • Good 85 mm FF lens
      • Good and bad 25mm FF lenses
      • Good zoom at 24 mm
      • Marginal 18mm lens
      • Marginal 35mm FF lens
      • Mildly problematic 55 mm FF lens
      • OK 16-35mm zoom
      • OK 60mm lens on P1 P45+
      • OK Sony 600mm f/4
      • Pretty good 16-35 FF zoom
      • Pretty good 90mm FF lens
      • Problematic 400 mm FF lens
      • Tilted 20 mm f/1.8 FF lens
      • Tilted 30 mm MF lens
      • Tilted 50 mm FF lens
      • Two 15mm FF lenses
    • Found a problem – now what?
    • Goals for this test
    • Minimum target distances
      • MFT
      • APS-C
      • Full frame
      • Small medium format
    • Printable Siemens Star targets
    • Target size on sensor
      • MFT
      • APS-C
      • Full frame
      • Small medium format
    • Test instructions — postproduction
    • Test instructions — reading the images
    • Test instructions – capture
    • Theory of the test
    • What’s wrong with conventional lens screening?
  • Previsualization heresy
  • Privacy Policy
  • Recommended photographic web sites
  • Using in-camera histograms for ETTR
    • Acknowledgments
    • Why ETTR?
    • Normal in-camera histograms
    • Image processing for in-camera histograms
    • Making the in-camera histogram closely represent the raw histogram
    • Shortcuts to UniWB
    • Preparing for monitor-based UniWB
    • A one-step UniWB procedure
    • The math behind the one-step method
    • Iteration using Newton’s Method

Category List

Recent Comments

  • bob lozano on The 16-Bit Fallacy: Why More Isn’t Always Better in Medium Format Cameras
  • JimK on Goldilocks and the three flashes
  • DC Wedding Photographer on Goldilocks and the three flashes
  • Wedding Photographer in DC on The 16-Bit Fallacy: Why More Isn’t Always Better in Medium Format Cameras
  • JimK on Fujifilm GFX 100S II precision
  • Renjie Zhu on Fujifilm GFX 100S II precision
  • JimK on Fuji 20-35/4 landscape field curvature at 23mm vs 23/4 GF
  • Ivo de Man on Fuji 20-35/4 landscape field curvature at 23mm vs 23/4 GF
  • JimK on Fuji 20-35/4 landscape field curvature at 23mm vs 23/4 GF
  • JimK on Fuji 20-35/4 landscape field curvature at 23mm vs 23/4 GF

Archives

Copyright © 2025 · Daily Dish Pro On Genesis Framework · WordPress · Log in

Unless otherwise noted, all images copyright Jim Kasson.