• site home
  • blog home
  • galleries
  • contact
  • underwater
  • the bleeding edge

the last word

Photography meets digital computer technology. Photography wins -- most of the time.

You are here: Home / The Last Word / Street photography strategies

Street photography strategies

July 29, 2016 JimK 2 Comments

This is a follow-on to my last post, which was about street photography:

Technical aspects of street photography

Today, I’ll talk about street photography at a higher level than the technical, but still not at the level of intent, vision, and aesthetics.

There probably are more, but I’be employed the following broad strategies for street work:

  1. Walk around more or less aimlessly and hope that you’re ready when something you want to photograph happens.
  2. Find an interesting activity, and hang around and see what develops.
  3. Find an interesting place or angle, and hang around and see how people interact in the more-or-less predetermined shot.

Some of the above can be combined. I think that most people, when they think of street photography, think that the photographer is employing strategy 1. That’s not my go-to approach, although it once was. I’m more in the 2 and 3 camp.

I am most definitely not alone. Henri Cartier-Bresson talked about looking for, and finding “the decisive moment”. I imagined that his contact sheets were populated by perfect individual images carefully chosen in time. I was surprised when I got to see many of his contact sheets at the ICP museum in New York City. In one respect, his contact sheets looked a lot like mine: finding a likely spot, exploring a few ways of dealing with it, running into some dead ends, finding something that works, and either making two or three quick exposures and moving on or making several exposures with essentially the same framing while waiting for people to arrange themselves. (I’m not claiming that my contact sheets look like Cartier-Bresson’s in any larger sense, although I wish they did). The contact sheets tell the story of a photographer working out the possibilities of a situation or a scene while making images, rather than waiting for the perfect moment and tripping the shutter.

I’m going to go out on a limb here, and show you some examples of all three strategies as illustrated by my contact sheets. For a photographer, showing contact sheets is a little like undressing in public, but I will attempt to conquer my fears.

I’m not showing you these images because they are especially good, but because I was able to lay my hands on the contact sheets without too much effort. As you might imagine, I haven’t looked at them in twenty years.

Here’s an example of approach number 1:

contactsheets001

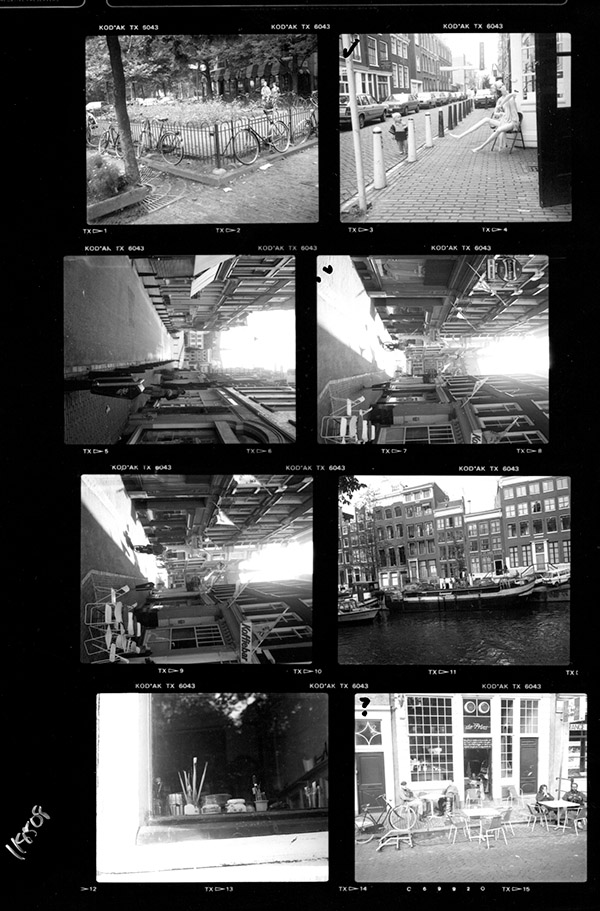
You can see that there are a bunch of (fairly crappy, I admit) random images, and one gem:

Imacon Color Scanner

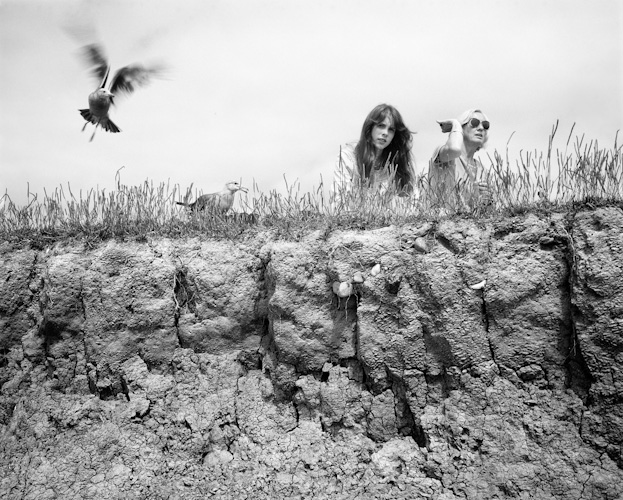
Here’s another approach. I found a promising foreground at Point Lobos, with a mother and daughter feeding seagulls.

contactsheets003

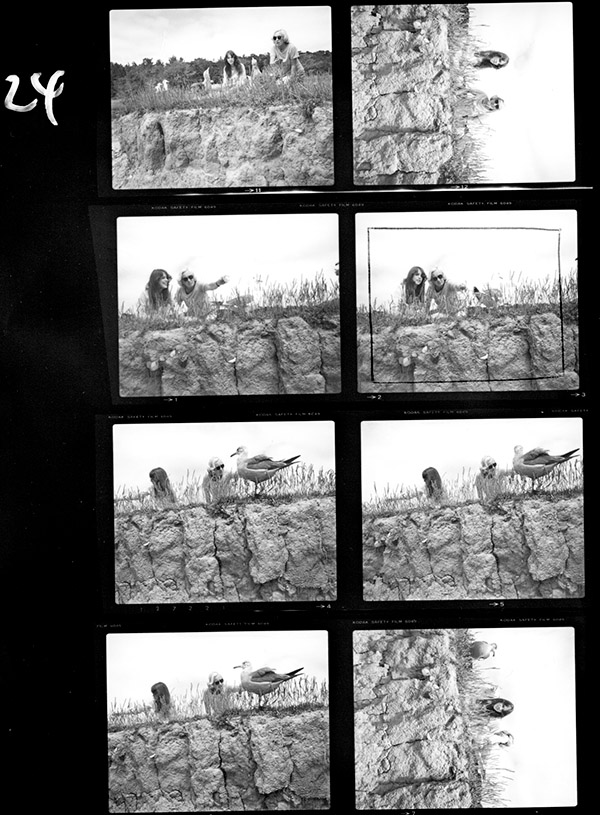
I shot a whole roll without ever getting what I was looking for. I reloaded:

contactsheets004

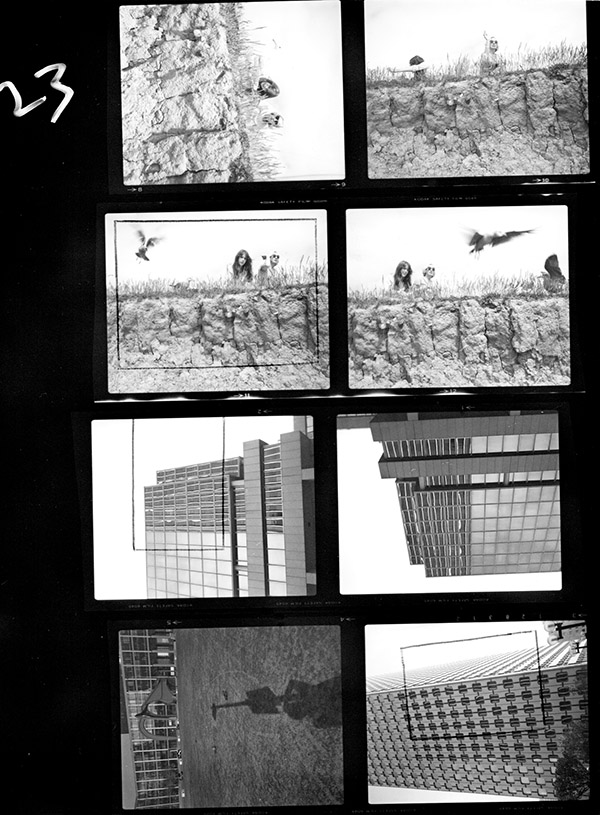
On the third shot, I got the picture. I knew I had it. You’ll notice that I only took one shot after that:

Imacon Color Scanner

Here’s a shot where I found the angle and the scene, but had to wait until I had the person and the gesture:

contactsheets011

And here’s the shot:

Imacon Color Scanner

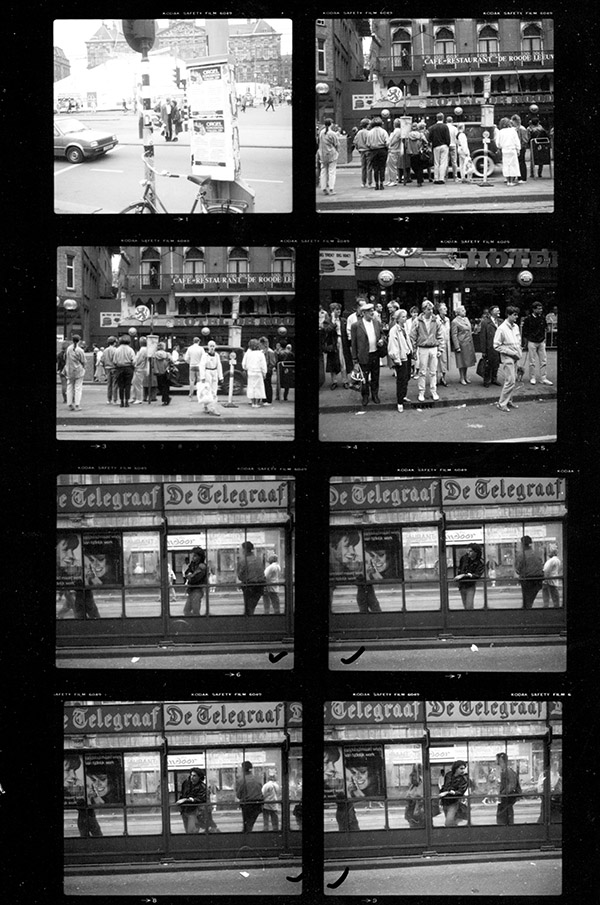
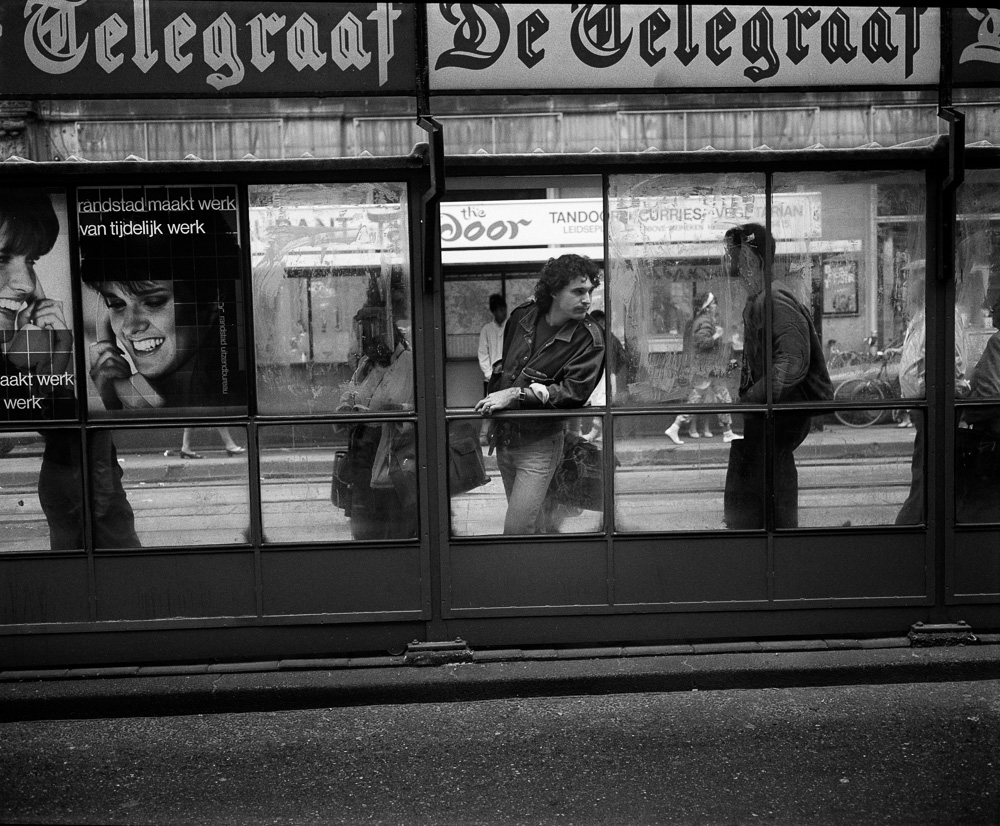
Here’s one where I found a bus stop with a pane out, and didn’t get what I was looking for until the last shot on the roll:

contactsheets002

Imacon Color Scanner

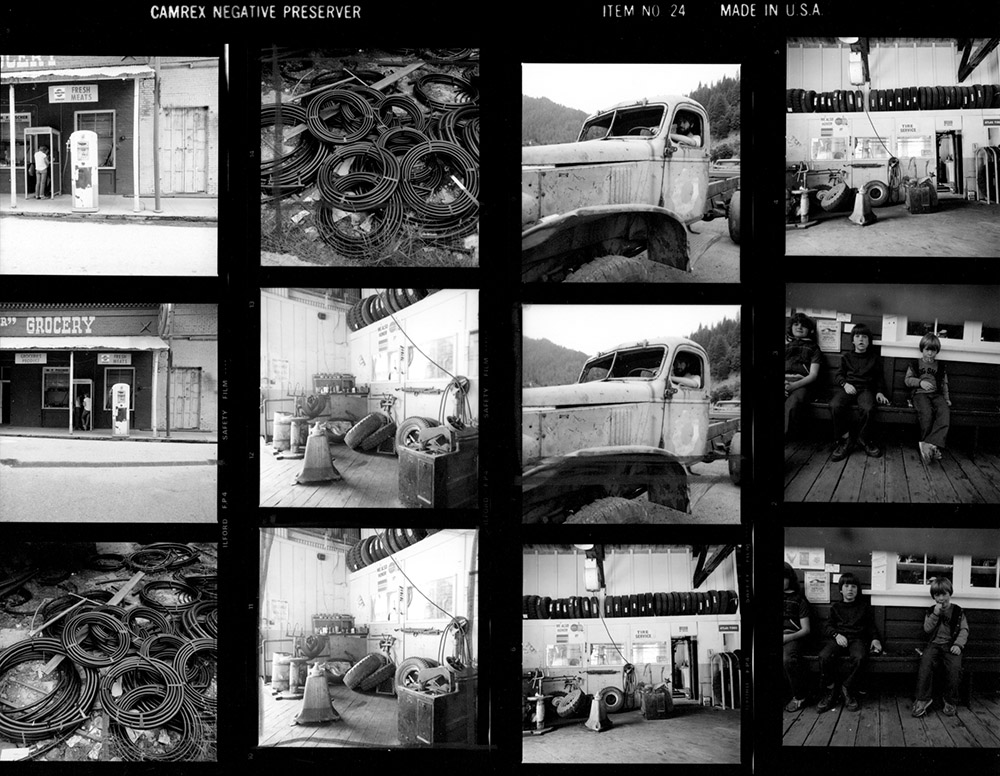
Here is a roll of film exposed in the gold country of California. I had already gotten one good image of an old guy sitting in a service bay with a repurposed post office mail sorter behind him (middle row, left image), when I spotted two groups of teenagers, one under a tree, and a couple near a phone booth. I worked a little with the larger group until I was satisfied.

contactsheets005

Imacon Color Scanner

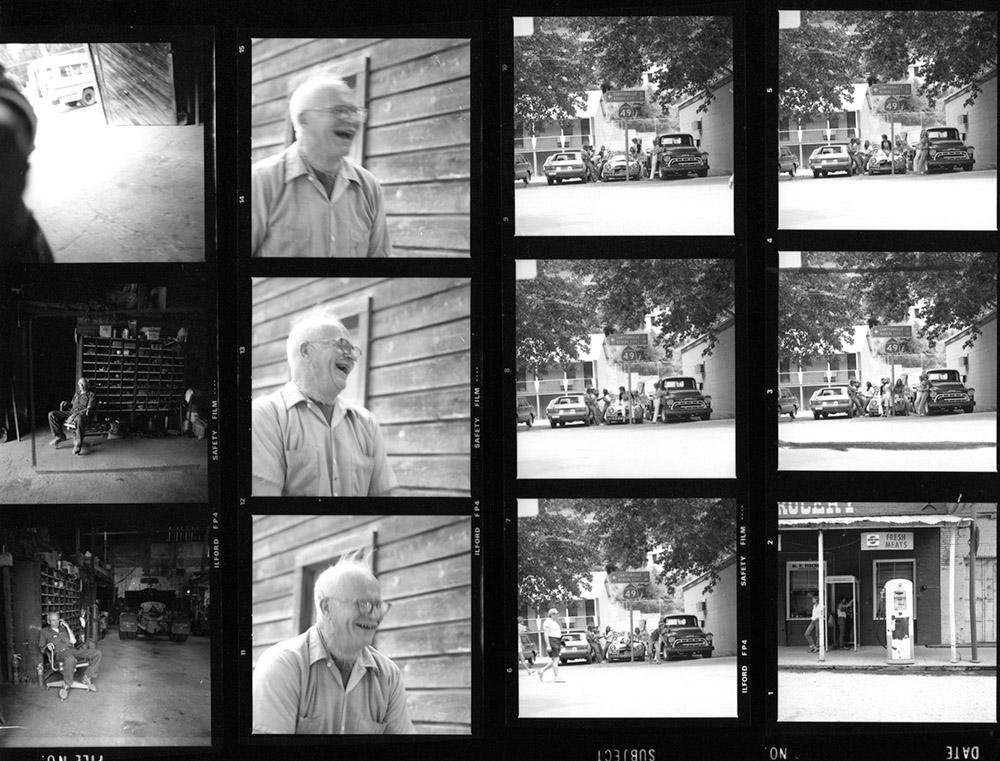
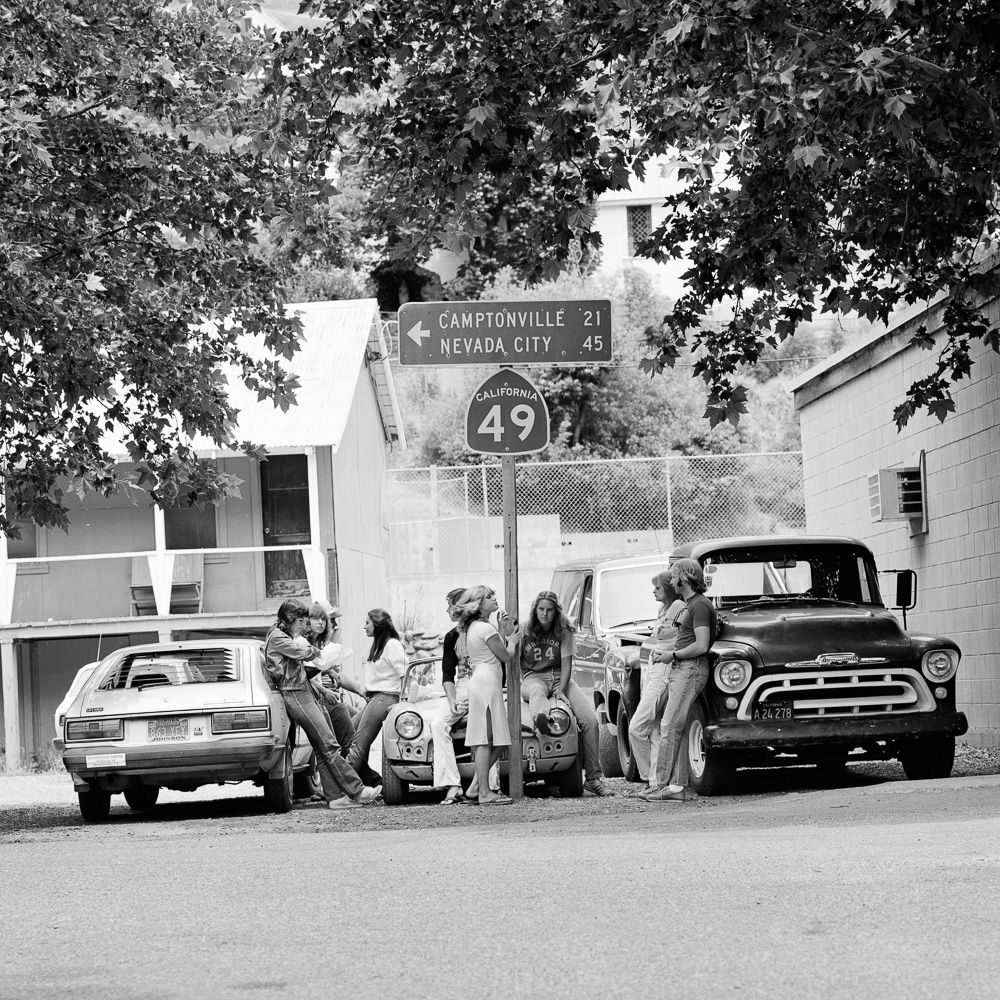
And my first shot of the couple turned out to be the one:

Imacon Color Scanner

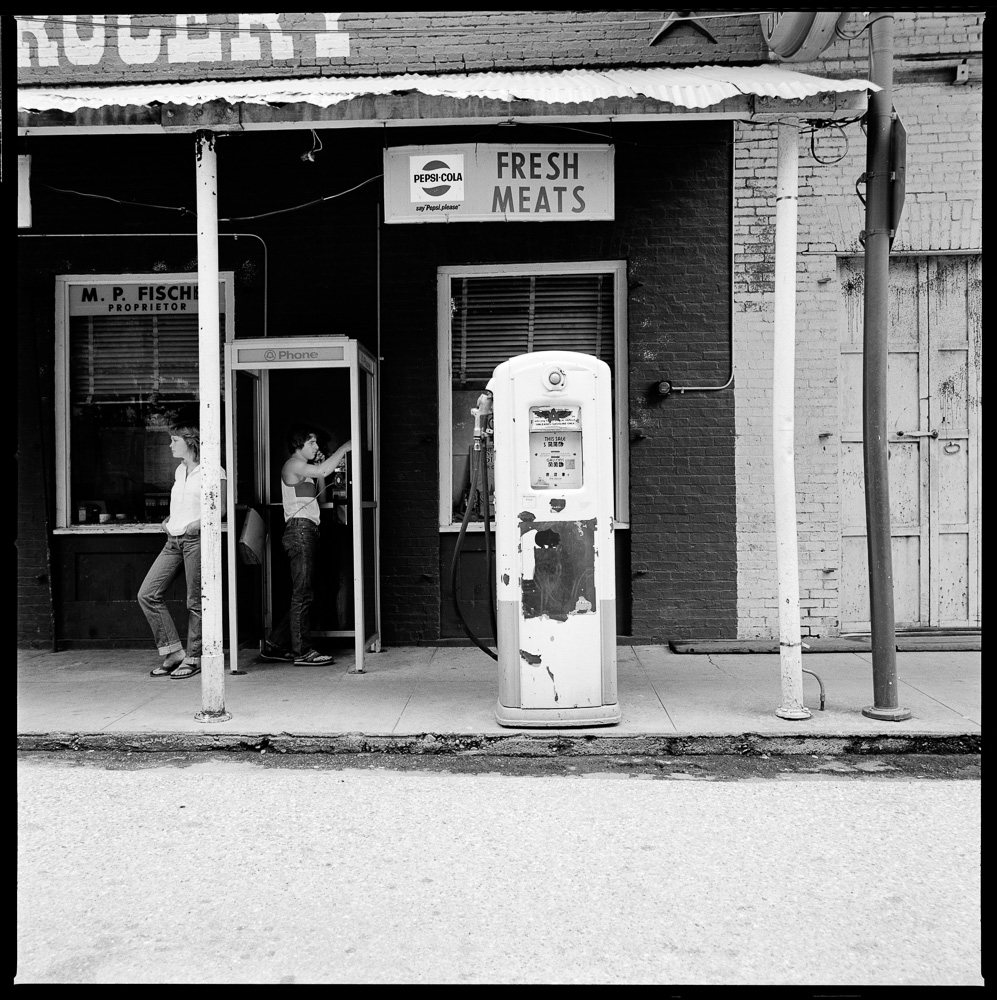
I reloaded and made some more images of the couple, but the first one turned out to be the best.

contactsheets010


The Last Word

← Technical aspects of street photography A book report — printing scheduled →

Comments

  1. Anton says

    August 5, 2016 at 7:04 am

    Hi Jim,
    Are you OK? I hope you’re doing well but I noticed there were no new posts lately. You’re one of the few people in this world I give a damn about (I am sure there are others that feel the same way). Please let us know you’re doing OK.

    Reply
    • Jim says

      August 5, 2016 at 9:20 am

      I’m doing fine. I’ve been dealing with a large forest fire close to my house, and it’s distracted me.

      I’ve been blogging about the fire at http://www.kasson.com/bleeding_edge/

      Check it out if you’re interested.

      Thanks for thinking of me.

      Jim

      Reply

Leave a Reply Cancel reply

Your email address will not be published. Required fields are marked *

May 2025
S M T W T F S
 123
45678910
11121314151617
18192021222324
25262728293031
« Apr    

Articles

  • About
    • Patents and papers about color
    • Who am I?
  • How to…
    • Backing up photographic images
    • How to change email providers
    • How to shoot slanted edge images for me
  • Lens screening testing
    • Equipment and Software
    • Examples
      • Bad and OK 200-600 at 600
      • Excellent 180-400 zoom
      • Fair 14-30mm zoom
      • Good 100-200 mm MF zoom
      • Good 100-400 zoom
      • Good 100mm lens on P1 P45+
      • Good 120mm MF lens
      • Good 18mm FF lens
      • Good 24-105 mm FF lens
      • Good 24-70 FF zoom
      • Good 35 mm FF lens
      • Good 35-70 MF lens
      • Good 60 mm lens on IQ3-100
      • Good 63 mm MF lens
      • Good 65 mm FF lens
      • Good 85 mm FF lens
      • Good and bad 25mm FF lenses
      • Good zoom at 24 mm
      • Marginal 18mm lens
      • Marginal 35mm FF lens
      • Mildly problematic 55 mm FF lens
      • OK 16-35mm zoom
      • OK 60mm lens on P1 P45+
      • OK Sony 600mm f/4
      • Pretty good 16-35 FF zoom
      • Pretty good 90mm FF lens
      • Problematic 400 mm FF lens
      • Tilted 20 mm f/1.8 FF lens
      • Tilted 30 mm MF lens
      • Tilted 50 mm FF lens
      • Two 15mm FF lenses
    • Found a problem – now what?
    • Goals for this test
    • Minimum target distances
      • MFT
      • APS-C
      • Full frame
      • Small medium format
    • Printable Siemens Star targets
    • Target size on sensor
      • MFT
      • APS-C
      • Full frame
      • Small medium format
    • Test instructions — postproduction
    • Test instructions — reading the images
    • Test instructions – capture
    • Theory of the test
    • What’s wrong with conventional lens screening?
  • Previsualization heresy
  • Privacy Policy
  • Recommended photographic web sites
  • Using in-camera histograms for ETTR
    • Acknowledgments
    • Why ETTR?
    • Normal in-camera histograms
    • Image processing for in-camera histograms
    • Making the in-camera histogram closely represent the raw histogram
    • Shortcuts to UniWB
    • Preparing for monitor-based UniWB
    • A one-step UniWB procedure
    • The math behind the one-step method
    • Iteration using Newton’s Method

Category List

Recent Comments

  • bob lozano on The 16-Bit Fallacy: Why More Isn’t Always Better in Medium Format Cameras
  • JimK on Goldilocks and the three flashes
  • DC Wedding Photographer on Goldilocks and the three flashes
  • Wedding Photographer in DC on The 16-Bit Fallacy: Why More Isn’t Always Better in Medium Format Cameras
  • JimK on Fujifilm GFX 100S II precision
  • Renjie Zhu on Fujifilm GFX 100S II precision
  • JimK on Fuji 20-35/4 landscape field curvature at 23mm vs 23/4 GF
  • Ivo de Man on Fuji 20-35/4 landscape field curvature at 23mm vs 23/4 GF
  • JimK on Fuji 20-35/4 landscape field curvature at 23mm vs 23/4 GF
  • JimK on Fuji 20-35/4 landscape field curvature at 23mm vs 23/4 GF

Archives

Copyright © 2025 · Daily Dish Pro On Genesis Framework · WordPress · Log in

Unless otherwise noted, all images copyright Jim Kasson.