The is a guest post by Huntington Witherill, a prolific, versatile photographer who has mastered both the technical and artistic parts of the pursuit. He’s also a great lecturer, teacher, and friend. You can see his work here. He’s been working on the a7R shutter slap for a couple of weeks now, and he’s come up with something that looks very promising.
Take it away, Huntington:
I’ve been reading, with interest, a number of web and blog posts by Joseph Holmes, Mike Schultz, Jim Kasson, and others in relation to the Sony A7r “shutter vibration” problem. (And in particularly, I’m most interested in the A7r shutter vibration issue as it relates to the use of longer lenses.)
I have no doubt that the A7r shutter vibration problem is indeed a reality. The problem itself has been more than adequately demonstrated to me. At the same time, I also know that, in most instances, motion blur in a picture arises as a direct result of physical movement of the camera, the lens (or both) during the moment of exposure. Thus, it stands to reason that a significant contributing factor (in most images that display motion blur) will likely originate with that physical movement.
The Sony A7r allows for 14.4x magnification of the focus point when using manual focusing. This is a feature that I’d not previously experienced with my older cameras. When I started to use this feature, I was amazed to see (so clearly and graphically!) just how much movement the act of hand focusing a lens can cause to the camera (and the lens) despite the fact that they have been mounted to a sturdy tripod. At 14.4x magnification, the image (in the viewfinder) can be seen to literally jump and vibrate all over the place when the camera (or lens) are the least bit disturbed! And, in fact, even slightly tapping the camera (or lens) produces clear evidence of the effect.
When a camera is mounted to a tripod at only one point — regardless of how sturdy that tripod is and also, regardless of whether the camera is mounted via the solid base of the camera body itself, or via a lens collar or lens “foot” (to help balance the weight of a longer lens, for example) you might be quite surprised (as I was) at just how much potential for camera and lens movement still exists, despite the fact that the camera (or lens) has been firmly affixed to a good solid tripod and properly tightened down. There seems to be a sort of “cantilever” effect (regardless of whether the camera or lens are used as the attachment point) that presents too many opportunities for the camera and lens to “flex” thereby introducing easily induced vibration and movement.
To help alleviate the above described potential problems, I’ve come up with what may be a relatively easy (though admittedly a bit kludgy) fix that can greatly reduce the potential for camera and lens movement (when using a tripod) and specifically, when using longer lenses with the Sony A7r camera. The fix allows for the camera and lens combination to be supported at two (2) specific points, rather than just one. The two-point mounting system can alleviate the “cantilever” effect and significantly reduce the potential for camera and lens movement during exposure.
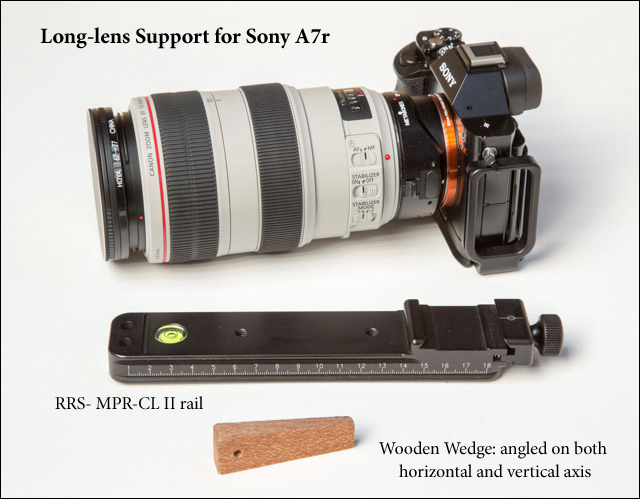
BTW, I use Really Right Stuff for most all of my camera/tripod connections. Thus, the fix I’m going to suggest is based upon the use of RRS products. (Though likely, other manufactured product solutions could be concocted.)
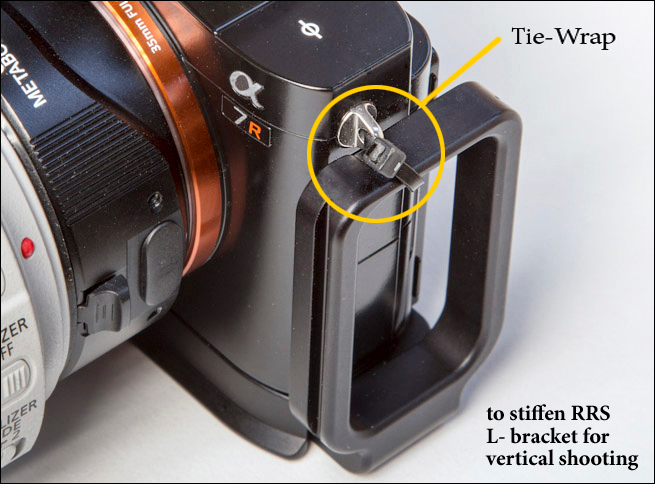
First, I attached a small “Tie-Wrap” (small enough to fit through the eye-hole of the camera strap ring attachment point) and I cinched the tie-wrap as tightly as possible. The RRS: “BA7-L Set” fits to the base of the camera quite nicely. But, there is a fair amount of “flex” to the vertical part of the “L” which makes mounting the camera (to the tripod) in a vertical orientation, particularly unsteady and prone to vibration. By simply attaching and cinching down the tie-wrap, the bracket becomes equally stiff and solid in both horizontal and vertical orientations.
Next, I mount the base of the camera (to which I have an attached RRS: “BA7- L Set”) to an RRS: “MPR CL II Rail” (which has, itself, been mounted to an RRS: “B2 LLR II clamp” that is a permanent part of my RRS Ball-Head).
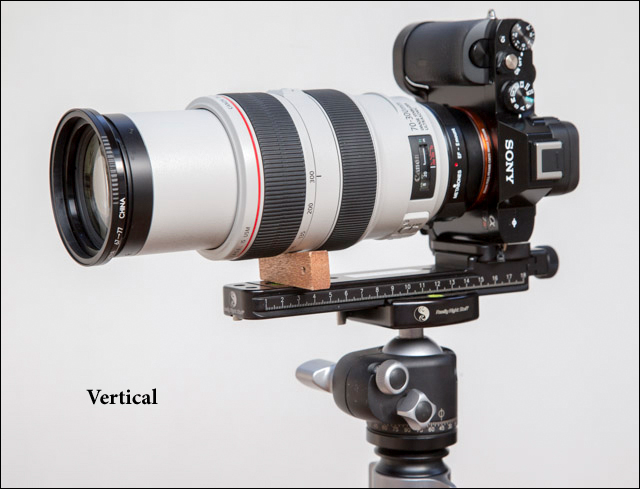
Lastly, I use a custom manufactured small wedge of hardwood which has been slightly angled along both the horizontal and vertical axis (thereby accommodating the differences in the distance between the bottom of the lens barrel, and the top surface of the MPR CL II Rail, when mounting the camera either horizontally, or vertically). The wooden “wedge” is simply slipped into place to make a solid connection (to provide support) between the lens barrel and the top surface of the MPR CL II Rail. (BTW, one needn’t “jam” the wedge into place. It takes but a small bit of pressure to cause the camera and lens to then be fully and firmly supported at two (2) separate points. I’ve found that this simple arrangement eliminates better than 95% of the potential camera movement, in both horizontal and vertical orientations. And, it’s reasonably quick to set up as that special light is fading and the moon is rising!

And BTW, you can check the solidity of the fix by mounting the camera in most any “normal” configuration (either using just a lens collar attachment foot, or just a Metabones adaptor foot, or just using the RRS L-plate attachment). Once the camera and lens are attached in a (more normal) single point configuration, zoom in using the magnified manual focus feature and gently tap either the camera or the lens. Note the amount of movement that you will see in the viewfinder. (And of course, using longer lenses and/or closer focus points will serve to magnify the movement.) Now, do the same thing using the two-point mounting system (as described above) and note that the camera and lens movement has been significantly reduced using the two-point mounting system. (And yes, if you give the camera or lens a good smacking with the two-point mounting system, you’ll of course see movement.)
One of the nice things about this solution is that it can be used with virtually any lens. I’ve set it up to work with my Canon 70-300mm f/4-5.6 L IS USM lens. But, with the adaptation of different sized wood wedges, one could use the same setup for virtually any lens.
If you already have an RRS rail (and of course, you’re using RRS connections) you’re good to go. All you need do is craft a small wedge of wood. (Took me all of 5-minutes).
As I said, it looks a bit kludgy, but it really adds (significantly) to the overall stability of the camera and lens when used on a tripod.
Huntington Witherill
Herb Sennet says
Thank you for the nice and clear post. Lloyd Chambers showed almost the same “solution”. I certainly believe that the results can be improved by this setup. And I also wonder why nobody is showing/using the “official” RRS long lens support package. On the other hand my intuition says that we probably shift the vibrating frequency upwards which might pop up again at higher shutter speeds. Jim has to come to help again to proof if assumptions are right here.
Ferrell McCollough says
Simple and effective!
Bob Abela says
Thank you for this, very informative. I’ll give some thought and perhaps think of a less “kludgy” scheme.
Scott McAlpine says
It works for me. I previously had all the parts necessary and finally decided to test the “fix” on my Sony 70-200 f/4. (w/ a7r) The before and after results are astounding resulting in mostly tack sharp pictures w/ a few just being sharp. I’ll try the method next on my Sigma 150 f/2.8 and close up photography. Any way, my 70-200 problems are solved. Thanks for posting and thanks to Huntington Witherill.