I’ve been reporting on the results of testing sharpness, as measured by MTF50 results from slanted-edge testing with the Otus 55/1.4 on the Nikon D810 and the Sony alpha 7R (a7R). For the last few days, I’ve posted nothing. That hasn’t been because I’ve stopped working. It’s been because I haven’t been able to produce reliable, repeatable, accurate results.
First off, there’s the inherent statistics of the camera and measurements. Take 16 pictures as I do, under the same conditions, and you’ll get 16 different results. 16 pictures is enough to get fairly accurate mean results, but you can’t cut down the number of pictures per data point without introducing the possibilities of chance materially skewing the results. The spreads were pretty tight with the strobe-illuminated images, but they are looser with continuous illumination.
The second thing is that focusing needs to be incredibly accurate to get meaningful comparisons at the Otus’s sharpest f-stop, which is about f/4. In fact, I have not yet devised a way to get repeatable results with the D810, using live view at f/1.4 and maximum magnification to focus on the Siemens star on the target.
It’s not a problem with the a7R, not so much because of the better live view resolution, but due to focus peaking, which is unavailable on the D810. Peaking works great on the Siemens star, and provides a microscope into whether the image is at its sharpest.
I’m not sure what to do about the focusing issue. One possibility is to look for other focusing targets, and print out an Imatest target with the Siemens star replaced by one that works better on the D810, In the past, I’ve had better luck focusing on the zone plate at the center of the ISO 12233 target than with the Siemens star.
Whether I focus on the star or a zone plate, in the absence of focus peaking, my strategy is to concentrate on an appropriate aliasing artifact, and find the focus point that maximizes the artifact. Kind of a perverse way to focus, but it works well.
Another possibility is to get a big display, connect it to the D810 with an HDMI cable, and use that for focusing.
Yet another potential solution, which I categorically reject, is to refocus each exposure. There are usually more than 200 photographs in a series, and it’s maddeningly boring already — though less so since I realized I can use the D810’s built-in intervalometer to do each set of 16 exposures.
Trying to trace what’s behind the non-repeatibility of some of he measurements I’ve been making (and won’t show you; they confuse even me, and I made them) has caused me to examine many of the plots that Imatest does for each analysis. That has been instructive, if time-consuming. I have found evidence of camera motion on both the D810 and a7R images, even in situations where you’d expect such motion to be minimal. Let me show you a few.
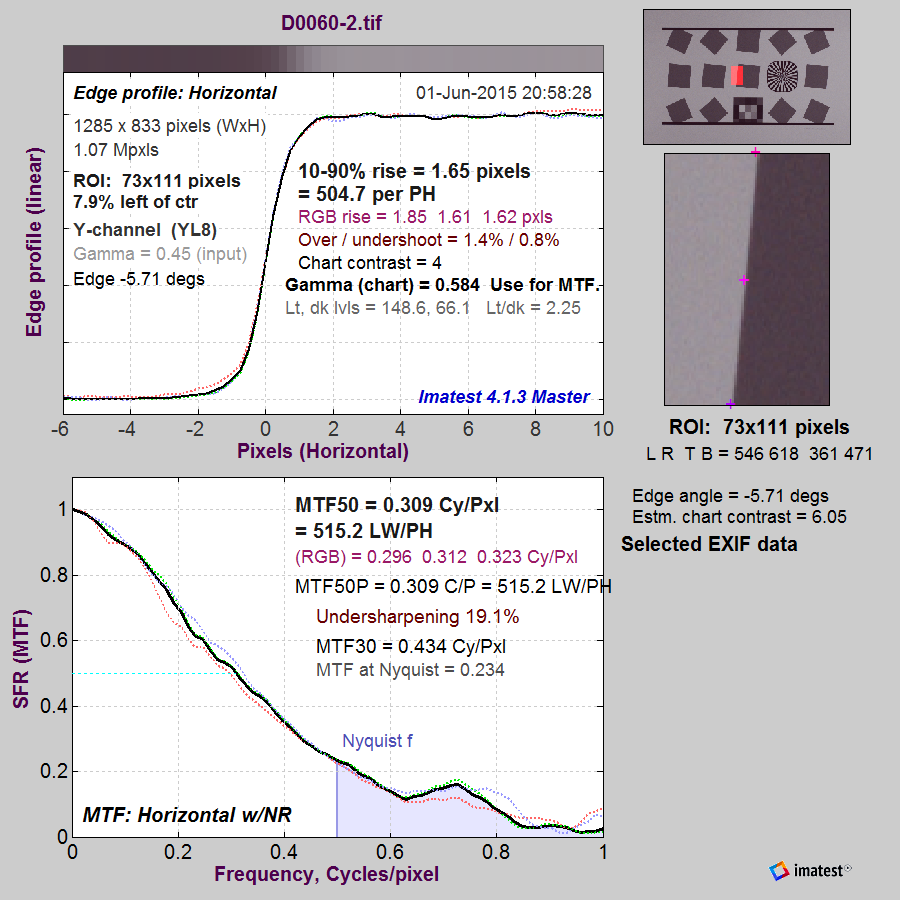
This image was made with the D810 in landscape orientation, looking at a (highlighted) vertical edge.
Now let’s look at a horizontal edge of the same exposure, which will suffer more from the second curtain of the shutter (the first curtain is not being used) since the shutter moves up and down on the D810:
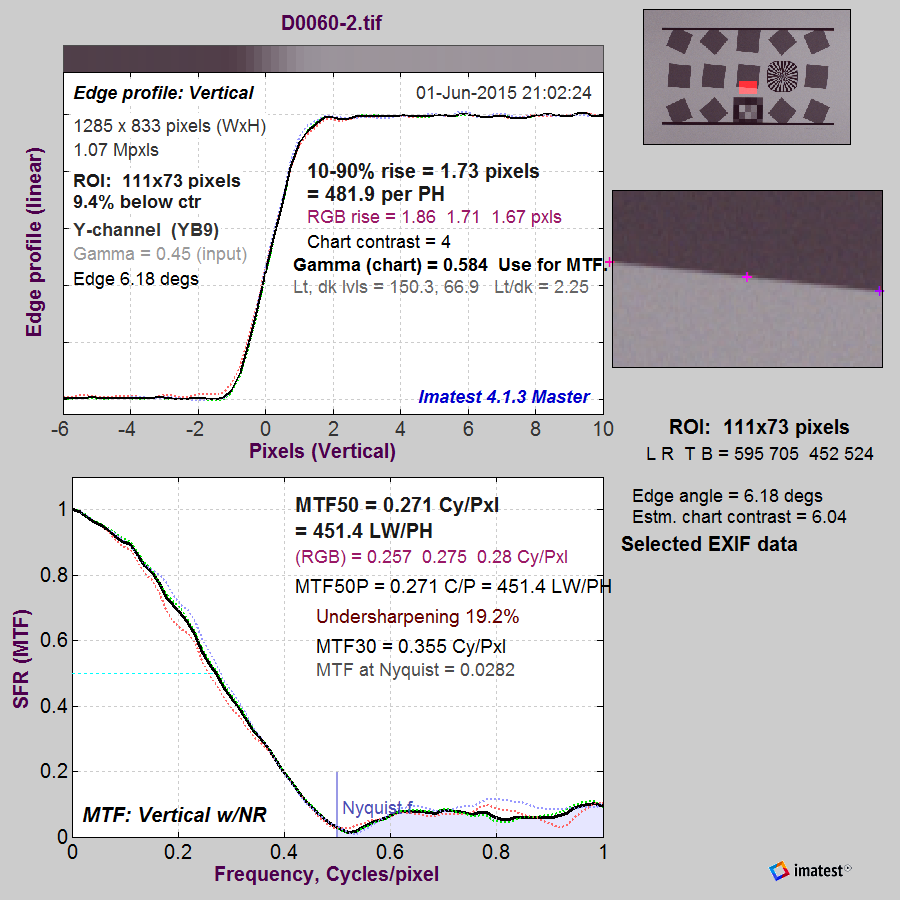
See that little notch in the MTF curve, just above the Nyquist frequency? That looks for all the world like the effect of a mild anti-aliasing (AA) filter. But neither camera has such a filter, and this effect doesn’t occur in all the images from either camera.
Even some of the pictures that were made with the strobe show the effects of camera vibration, showing that the short-duration Einstein isn’t short enough to allow us to stop worrying about camera motion. Here’s the vertical edge from one such image, this time with the a7R:

And here’s the horizontal edge from the very same exposure:

If I didn’t know better, and hadn’t seen pictures from the a7R that don’t exhibit this effect, I’d swear it had a mild anisotropic AA filter.
It’s all very frustrating. Yet, I persist, since being able to make consistent, repeatable images of test charts is instructive as to ways to make consistent, repeatable images of the real world.
You’ve probably thought of this already, but have you turned up sharpening in the camera picture controls to maximum? This gives you an almost peaking-like effect. You could boost contrast and maybe clarity or something named something like that to help. It will affect the JPEG preview of the RAW, but not the RAW itself.
I also use an old 20-inch (1280×1024) monitor fed from the D810’s HDMI port when I do DSLR scanning of my film negatives, and that seems to help too.
Sorry one more thing: a LCD magnifier helps too. The Kinotehnik LCDVF 4N has a metal frame that latches into the same spots as the plastic screen protector, and the magnifier itself attaches to the frame with magnets. I’ve found it very useful in the field, and much sleeker solution than the Zacuto.
I have a 14-diopter loupe — I take my glasses off.
Jim
As a technically ignorant person, I can safely say that i am too ignorant to realize that the following question may be silly or totally wrongheaded. therefore i’ll blithely ask it:
Is it possible that we are now pushing up against the limits of “mechanical reliability” or predictability, which was always there but we just couldn’t see it before? Because mirror or mirrorless, there’s still this shutter jobby, which is mechanical. And sometimes there’s a small vibration and sometimes there isn’t.
In Physics, as I in my pathetic way understand it, the tinier you get the weirder things are. You wouldn’t think we would be at that point with this engineering problem, but maybe there’s a metaphor/analogy here.
How I adore these tests! It show us, how the interaction of the macanical shutter with the electronic from the sensor-prozessor works, or not?!
I am shure, that mecanical shutter speed has an impact for the sensor-prozessor, how long the sensor needs to “read” (analog-digital-converting) all information from all over the sensor and then to convert in digital values!
Is 1/500 or 1/4000s not to short for the sensor prozessor? Does the snsor-prozessor need longer shutter speed?
In my opinion, not all “blur” reaction is caused by camera-body shake! It can also be from mecanical shutter speed….
as long as the sensor needs to “read” all information from all over the sensor and then to convert even in digital values.
On mechanical-shutter cameras, once the shutter is closed, it doesn’t matter how long it takes to convert the stored charges to bits, provided no material amount of charge leaks off, and that time is independent of the exposure time. Assuming the camera is well-designed, the readout doesn’t start until the shutter is closed.
Jim
I wonder if at this level the “plain” cover glass, which does incorporate IR filtration, is ansiotropic just because of the manufacturing process (of which I am totally ignorant) or the coating?
Is the coating applied in a sintered deposit type of way or curtain coated, as in laying down a film emulsion which would obviously be directional?
Jim, the AA look of those curves seems strange to me too: I wonder if Imatest is not being a bit too happy-go-lucky in the higher frequencies, where accuracy dwindles. If you send me the two files above I can put them through MTF Mapper and get a second opinion.