Lloyd Chambers has asserted that a 1/5 pixel blur on a 36 megapixel camera turns it into an instrument with the resolving power of a 24 megapixel one. The logic is superficially appealing: the pixel pitch of a full frame 36 megapixel camera is 4.88 micrometers; multiply that by 1.2 and you get 5.86 um, and the pitch of a full frame 24 megapixel camera is 5.9 micrometers.
But is that really the right way to think about it? It seems awfully facile. Now that I’ve got a camera simulator that appears to do a reasonable job at modeling the effects of motion blur, I thought I’d do some tests.
For the base 36 megapixel camera, I set up the simulator as follows:
- Perfect lens
- 64-bit floating point resolution
- Target resolution: 10000×6667 pixels
- Target size in camera pixels: 960×640
- No photon noise
- No read noise
- No pixel response non-uniformity
- 100% fill factor
- Bayer pattern color filter array: RGGB
- No motion blur
- No defocus blur
- No anti-aliasing filter
To make the comparisons between the various resolutions fair, I res’d up the results to 1200×800 pixels using bilinear interpolation.
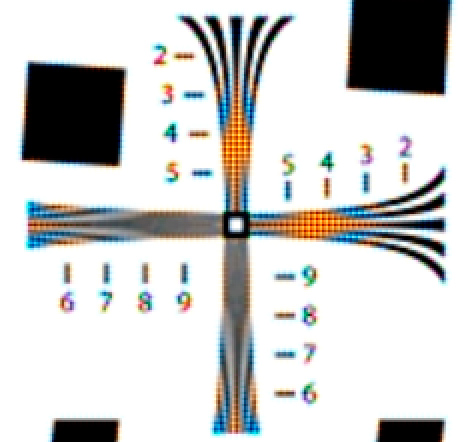
I fed the sim the ISO 12233 target, and here’s a 2x blowup using nearest neighbor of the usual crop of the result:

Then I added 0.2 pixel horizontal blur and ran the sim again:

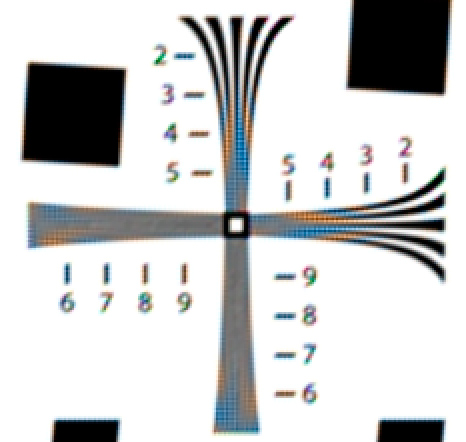
I can’t see any difference. Maybe Mr. Chambers was talking about 1/5 pixel blur in both the horizontal and vertical direction. I set up the sim for a 0.2828 pixel blur at a 45 degree angle, which amounts to the same thing:

That looks the same to me, too, and I’m flipping layers on and off in Photoshop.
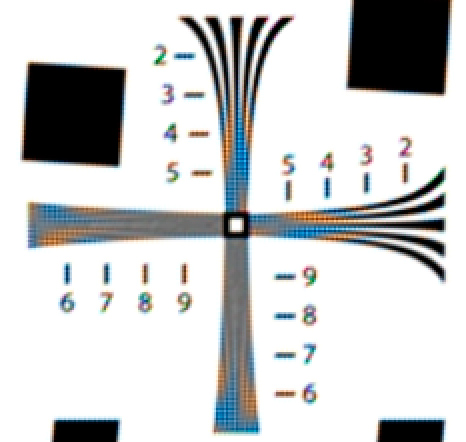
Let’s look at the 24 megapixel sim with no motion blur. Now the target is 533×800 pixels:
Now we see significant loss in resolution. So the rule of thumb that Mr. Chambers has proposed is far from accurate.
The obvious question is, “What amount of camera vibration does it really take to turn a 36 megapixel camera into one with the resolution of a 24 megapixel one?”
Here’s 1 pixel blur at a 45 degree angle in the 36 megapixel camera:

Not as blurry as the 24 megapixel camera.
A 1.414 pixel blur at a 45 degree angle in the 36 megapixel camera:

Close, but not blurry enough.
A 2 pixel blur at a 45 degree angle in the 36 megapixel camera:
Now we’ve gone too far.
1.6 pixels at a 45 degree angle seems about right, although the false colors and aliasing are quite different:
Well, that was certainly a counter-intuitive result. Why do things work that way? I think it’s because when we think of resolution, we think of the sensor array of the camera, and tend not to think of the color filter array and the demosaicing process that follows. The combination of the CFA and the demosaicing cause a loss in resolution. You could think of that loss in resolution as making the effective color pixels larger than the actual sensels, so that a 1/5 sensel blurring becomes less than that when applied to the effective pixel size. That kind of thinking has some appeal. However, I caution you that that same kind of loose mental process is how we got to the erroneous conclusion that started this post.
Another way to think about motion blur is that it increases the effective size of the antialiasing filter. Since the simulated camera has none, it introduces an error similar to that of an antialiasing filter. a 1/5 pixel AA filter is extremely light on a camera with a fill factor of 100%. Indeed, its effects are almost non-existent.
A caveat. I used bilinear interpolation for demosaicing. A more clever demosaicing algorithm might reduce the size of the effective pixels (there I go again, sorry) somewhat and thus increase the resolving power effect of a given motion.
I wonder if it would help in the analysis to layer the 2 sims in PS and set the mode to difference. Completely black indicates they are equal. It might help in judging what you might think looks the same. Also, not that it’s useful but there is also the motion blur filter and it’s possible to set the angle of blur e.g. 45 degrees.
Ferrell, if you do that, and apply a aggressive white point changing curve, you can see that they’re not actually the same, just a visual match. Do you want the Photoshop stack?
Ferrell, to use the Photoshop motion blur filter, I’d have to apply it after demosaicing, which wouldn’t be correct. The Matlab filter seems to be entirely adequate.
Jim
Jim,
Sure, I’ll have a look at the stack. Send to my email if possible.
Ferrell, I sent you a Dropbox link.
Jim
Jim;
Realize this article is a little old and you are miles past me in my understanding of how all this works. I have a pretty straightforward ‘at the end of the day’ question.
Will the newer 50meg cameras make landscapes harder to take since (I assume) wind and other elements will require a new level of steadiness by the camera? Ultimately will a really windy day make it impossible to get a super clear shot due to vibration?
I appreciate your advice and experience with this issue.
Here’s a comforting thought for you: at the same print size, sensor dimensions, and lens focal length, increasing the number of pixels in the capture will not make anything blurrier. Not out-of-focus things. Not camera motion. Not subject motion. Nothing will get worse.
How much of what that higher-res sensor can do for you in the face of all those other blur sources is another thing.
Here’s a final comforting thought: 50 MP is only twice the resolution of 12 MP.